Happy Tuesday! Here’s a little trick I used when painting a Christmas sweater on my son a couple days ago for my Christmas cards! I love that he still lets me do this! This year I used a lot of fun stencils to speed up the process, and finished it all in 1 hour and 20 minutes (photo below). Have a happy Thanksgiving everyone!
This one looks really detailed but stencils make it super quick! First I laid down a base with a sponge and a Tiger cake for a sunset background. Next, I used an Ooh! zombie arm stencil and mini kabuki brush to add the arms! The branches are actually done with a Christmas stencil that we sell. Then, using a round brush loaded with black, I added a little hanging bat in a tree (totally optional), some scraggly looking grass, and used a dry Cameleon blending brush to drag it down and fade into the forehead. The blood splatters I did using just a portion of a BAM 1415 splatter skull stencil, and then topped that off with some liquid bling!
I’m SOOOO upset right now that my most FAVORITE mini kabuki stencil brush has been discontinued by the manufacturer…I am working on sourcing some new ones and hope to have them up on the site SOON! Follow our Facebook page for updates! They are an absolute game changer for me when it comes to stencils…stay tuned on that!
Here’s another quick line buster design for Halloween…a butterfly-like spider design! First, lay down a base of your favorite tiger split cake with a petal sponge. Then, add some quick webs with black and a round brush. Use a spider stencil too if you like! Finish it off with some white highlights and Vivid Gleam orange glitter cream!
Happy Tuesday! Today I’d like to share a great tip that I learned from my artist friend Linda John! I’ll show you her cool trick for making super easy snowflakes without using any stencils or even a brush!
The snowfall here in Minnesota the past couple of days has been MAGICAL! My favorite kind…the thick, fluffy kind that falls slowly like a snow globe and sticks to the branches, making everything look like a fairy land! Here are just a few pics I took in my yard:
Today felt like just the perfect photo backdrop for me to paint a little snowball juggling snowman idea that I drew in my sketchbook during my paint jam earlier this month!
If you follow me on social media, you’re already way ahead of me here! It just dawned on me that I have failed to include my blog in the locations where I’m now sharing tips every Tuesday! SO, I’m going to take this opportunity to introduce my new “thing” to my blog readers here and get you all caught up!
Basically, every Tuesday at 10:00 am central time, I am going to be sharing some sort of tip with you! It could be face paint related or something for other art forms like balloons, glitter tattoos, etc. It could be a business tip. Some might be mind blowing, some might be “well duh, I already knew that!” But my goal is to share as many tips as I can come up with, and I hope that at least a few of them help you out in some way! I’ll try to keep them roughly 2 minutes long, give or take, but it’ll depend on the tip of course. Quick and helpful is my goal!
I started on Tuesday, November 22nd so there are a few already out there. I’ll post them below! And from here on out, I’ll try to remember to post these here on the blog so you don’t miss any if you are a blog subscriber! You also should be able to find these on Facebook, Instagram and YouTube.
SO, watch, subscribe, and enjoy! Please do comment if you find any of these useful…it helps me to know if I’m sharing good stuff or not! 😉 And if YOU have a great tip to share, send it our way! I’d love to share your tips too, and of course give YOU credit!
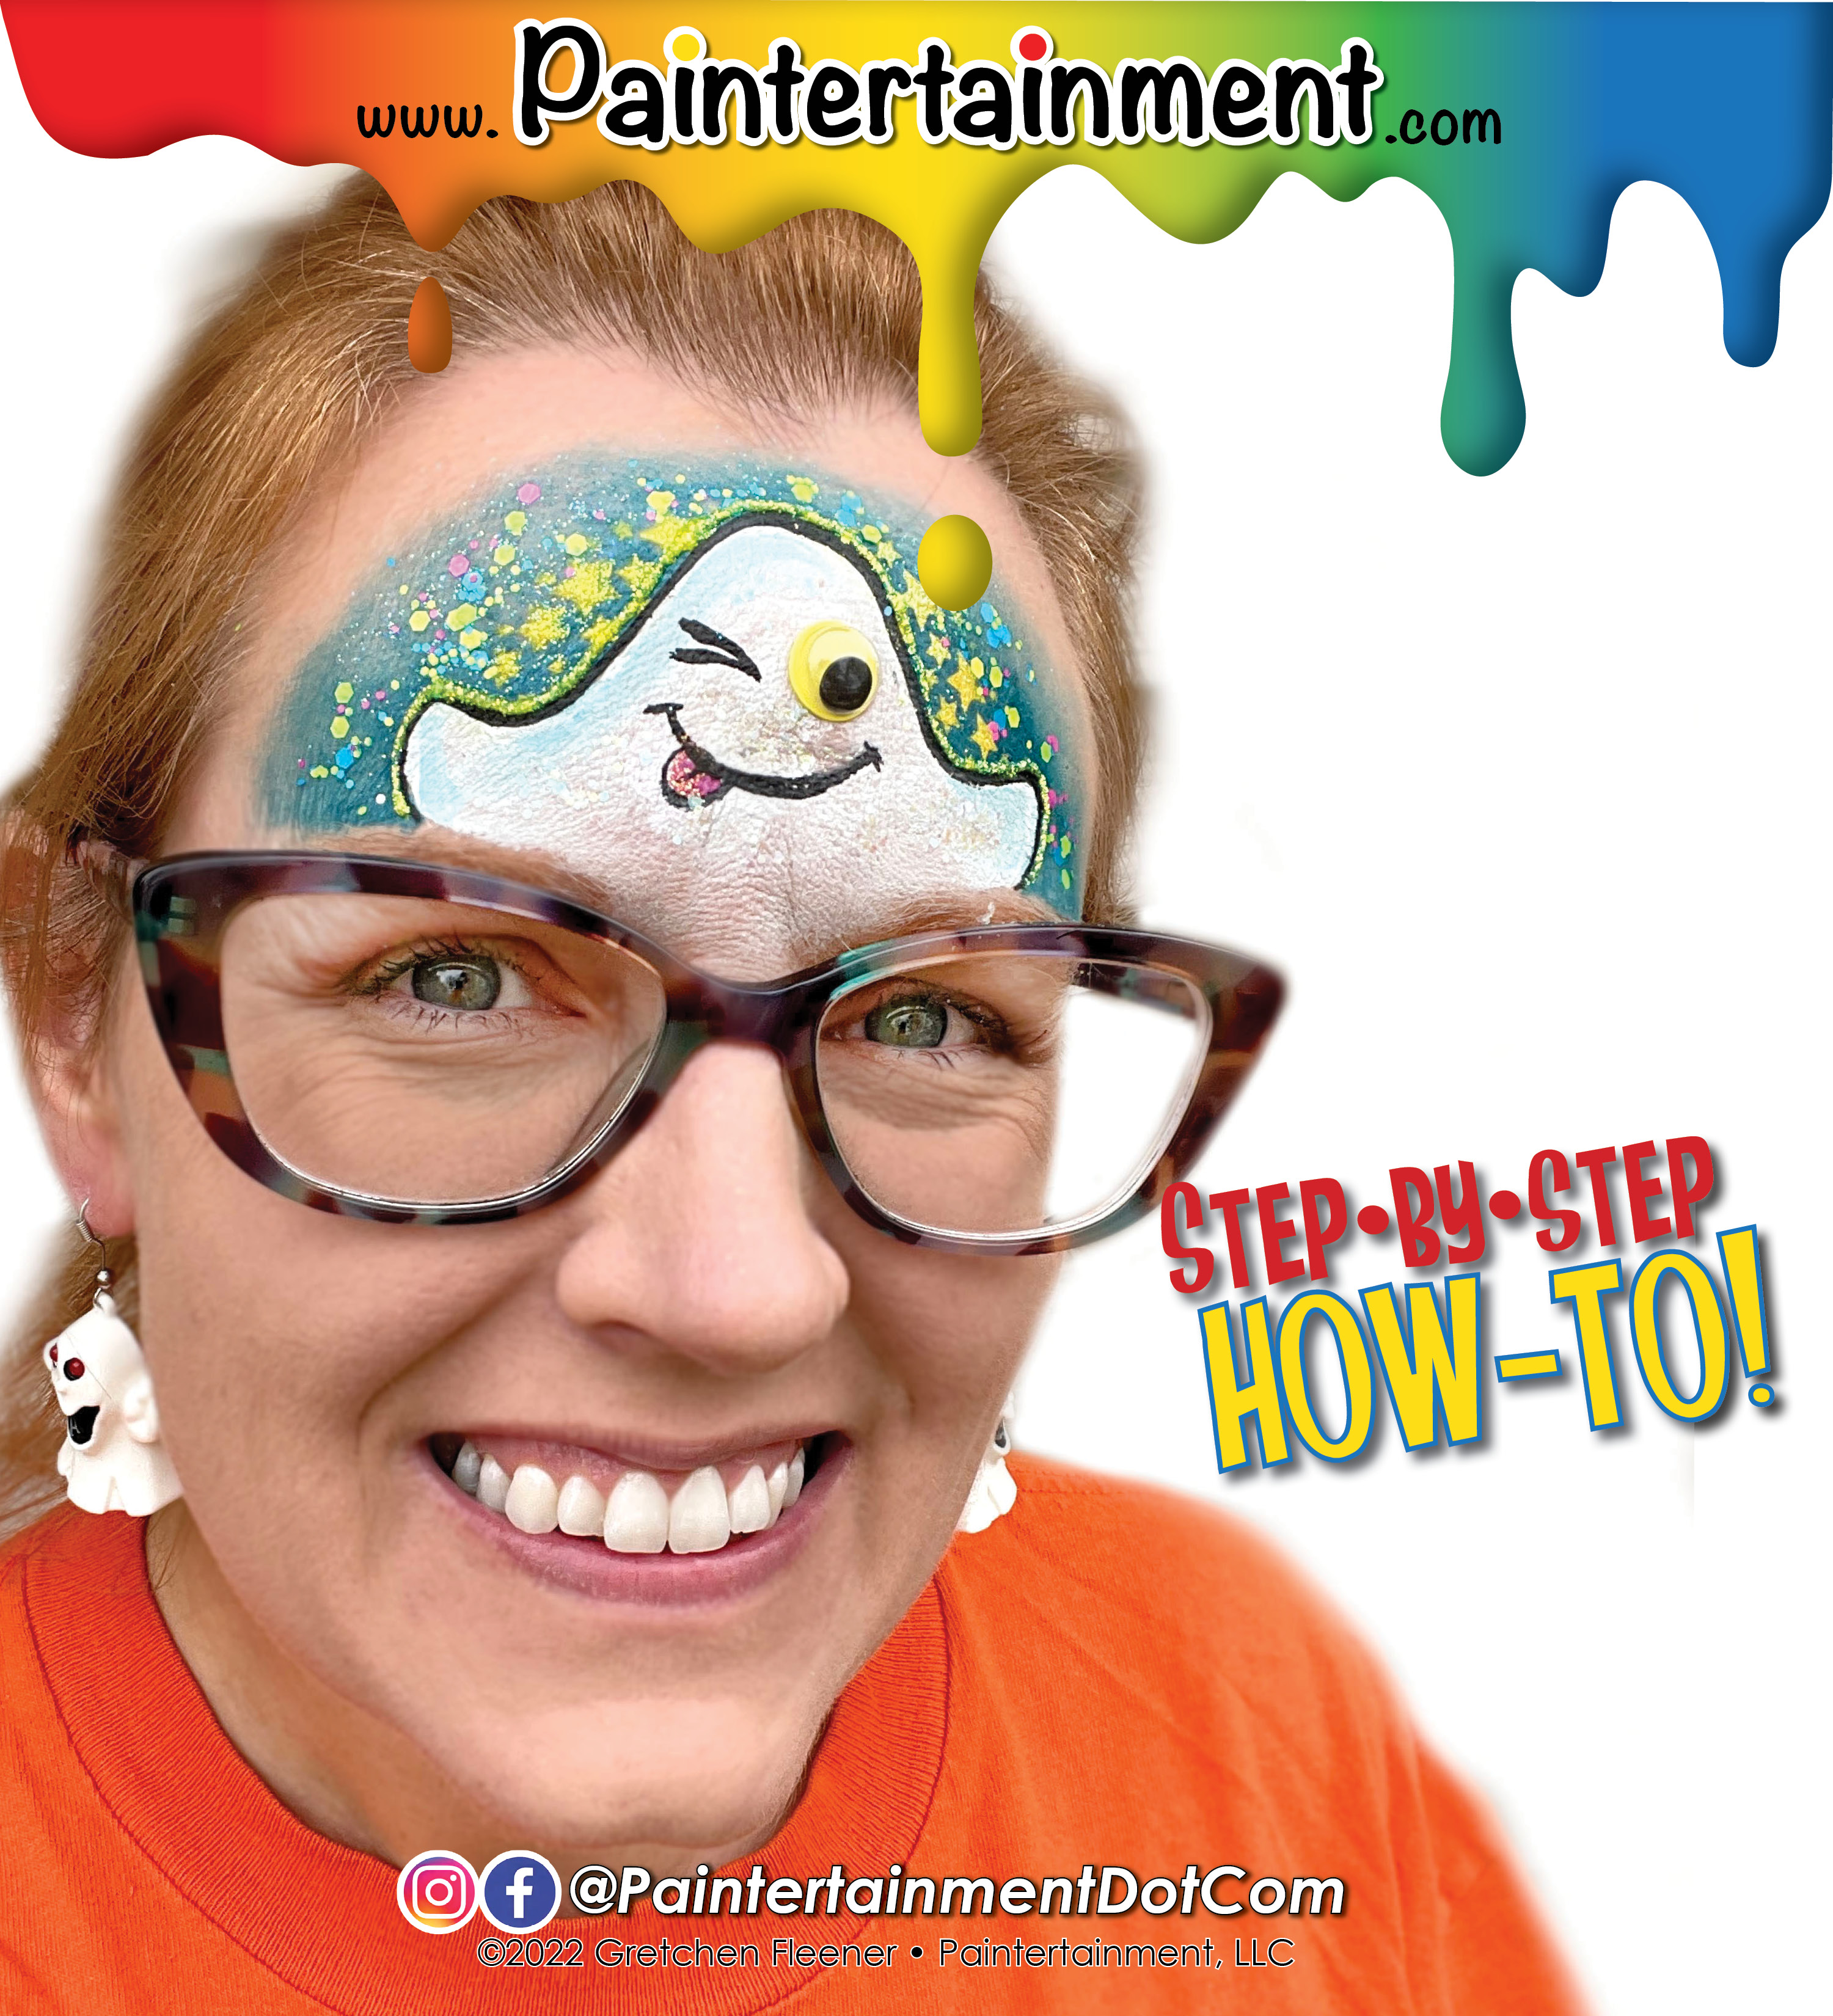
Want to offer some googly eyes to your designs but don’t have a lot of them on hand? You can make them stretch twice as far by making your characters WINK! 😉
This little ghost is SUPER simple and only requires ONE googly eye!
Step 1:
Using a round brush loaded with your favorite blue (I’m using FAB Shimmery snow petrol!), outline the curves of your ghost, and then paint around that for a background.
Add some stars! I’m using my Ooh! Star Flip stencil and a finger dauber loaded up with yellow. First I lay down the stencil and use a makeup remover wipe to wipe away the blue, then apply the yellow paint, and finally tap on some yellow glitter before removing the stencil. This gives me crisp, clear, bright yellow stars that are glittery only ON the stars!
Step 4:
Fill in the ghost with white. I’m using Wolfe white and a round brush. Add a little dimension with some light blue if you wish!
Step 5:
Clean away a spot where your google eye will go. I use mini daubers to do this but a wipe works too, or a clean brush. Using a small round brush loaded with black (I’m using Wolfe black), outline the design and add the mouth and winking eye. Add a little tongue if you like!
I’ve been on a google eye kick lately! Here’s a fun bat design that uses “human-style” google eyes! These eyes have fun colored irises, as opposed to your typical google eyes with just a black “pupil.”
Step 1:
Load a 3/4″ angled or flat brush with a pink & purple split cake. I pulled the neon pink & purple from my Superior Sunset base blender. With purple on top, paint the outlines of the wings.
Step 2:
Use a fluffy brush to blend the pink down over the eyes, and feather the purple. I love using my Cameleon large blending brush for this!
Step 3:
Paint some pink for the insides of the ears. I left a couple little tears in the edges of his ears!
Step 4:
Add a little texture to the inside of the wings. I used my mini stencil kabuki brush and purple with a HAS 5701 stencil (from the “Alive” set) to create a little texture, and wrapped it around and under my eyes a bit.
Step 5:
Using your favorite round brush and black, paint the bat’s head, tuft of hair, and wings.
Step 6:
Using a small round black loaded with white, add a smile, fangs and highlights. I also used a halftone stencil to fade the head onto the bridge of my nose. Finish it off with google eyes applied with Pros-Aide II, and some fun chunky glitter! I used “Valley Girl” Pixie Paint!
NOTICE: Our office will be CLOSED April 16-21. All orders placed during this time will begin processing and shipping on Monday, April 22. Thank you for your patience with this one-woman business! :-) Dismiss


 BAM 4009 checkers$4.00


You must be logged in to post a comment.