Posted on Leave a comment

Fast & Fun Candycorn Eye Design

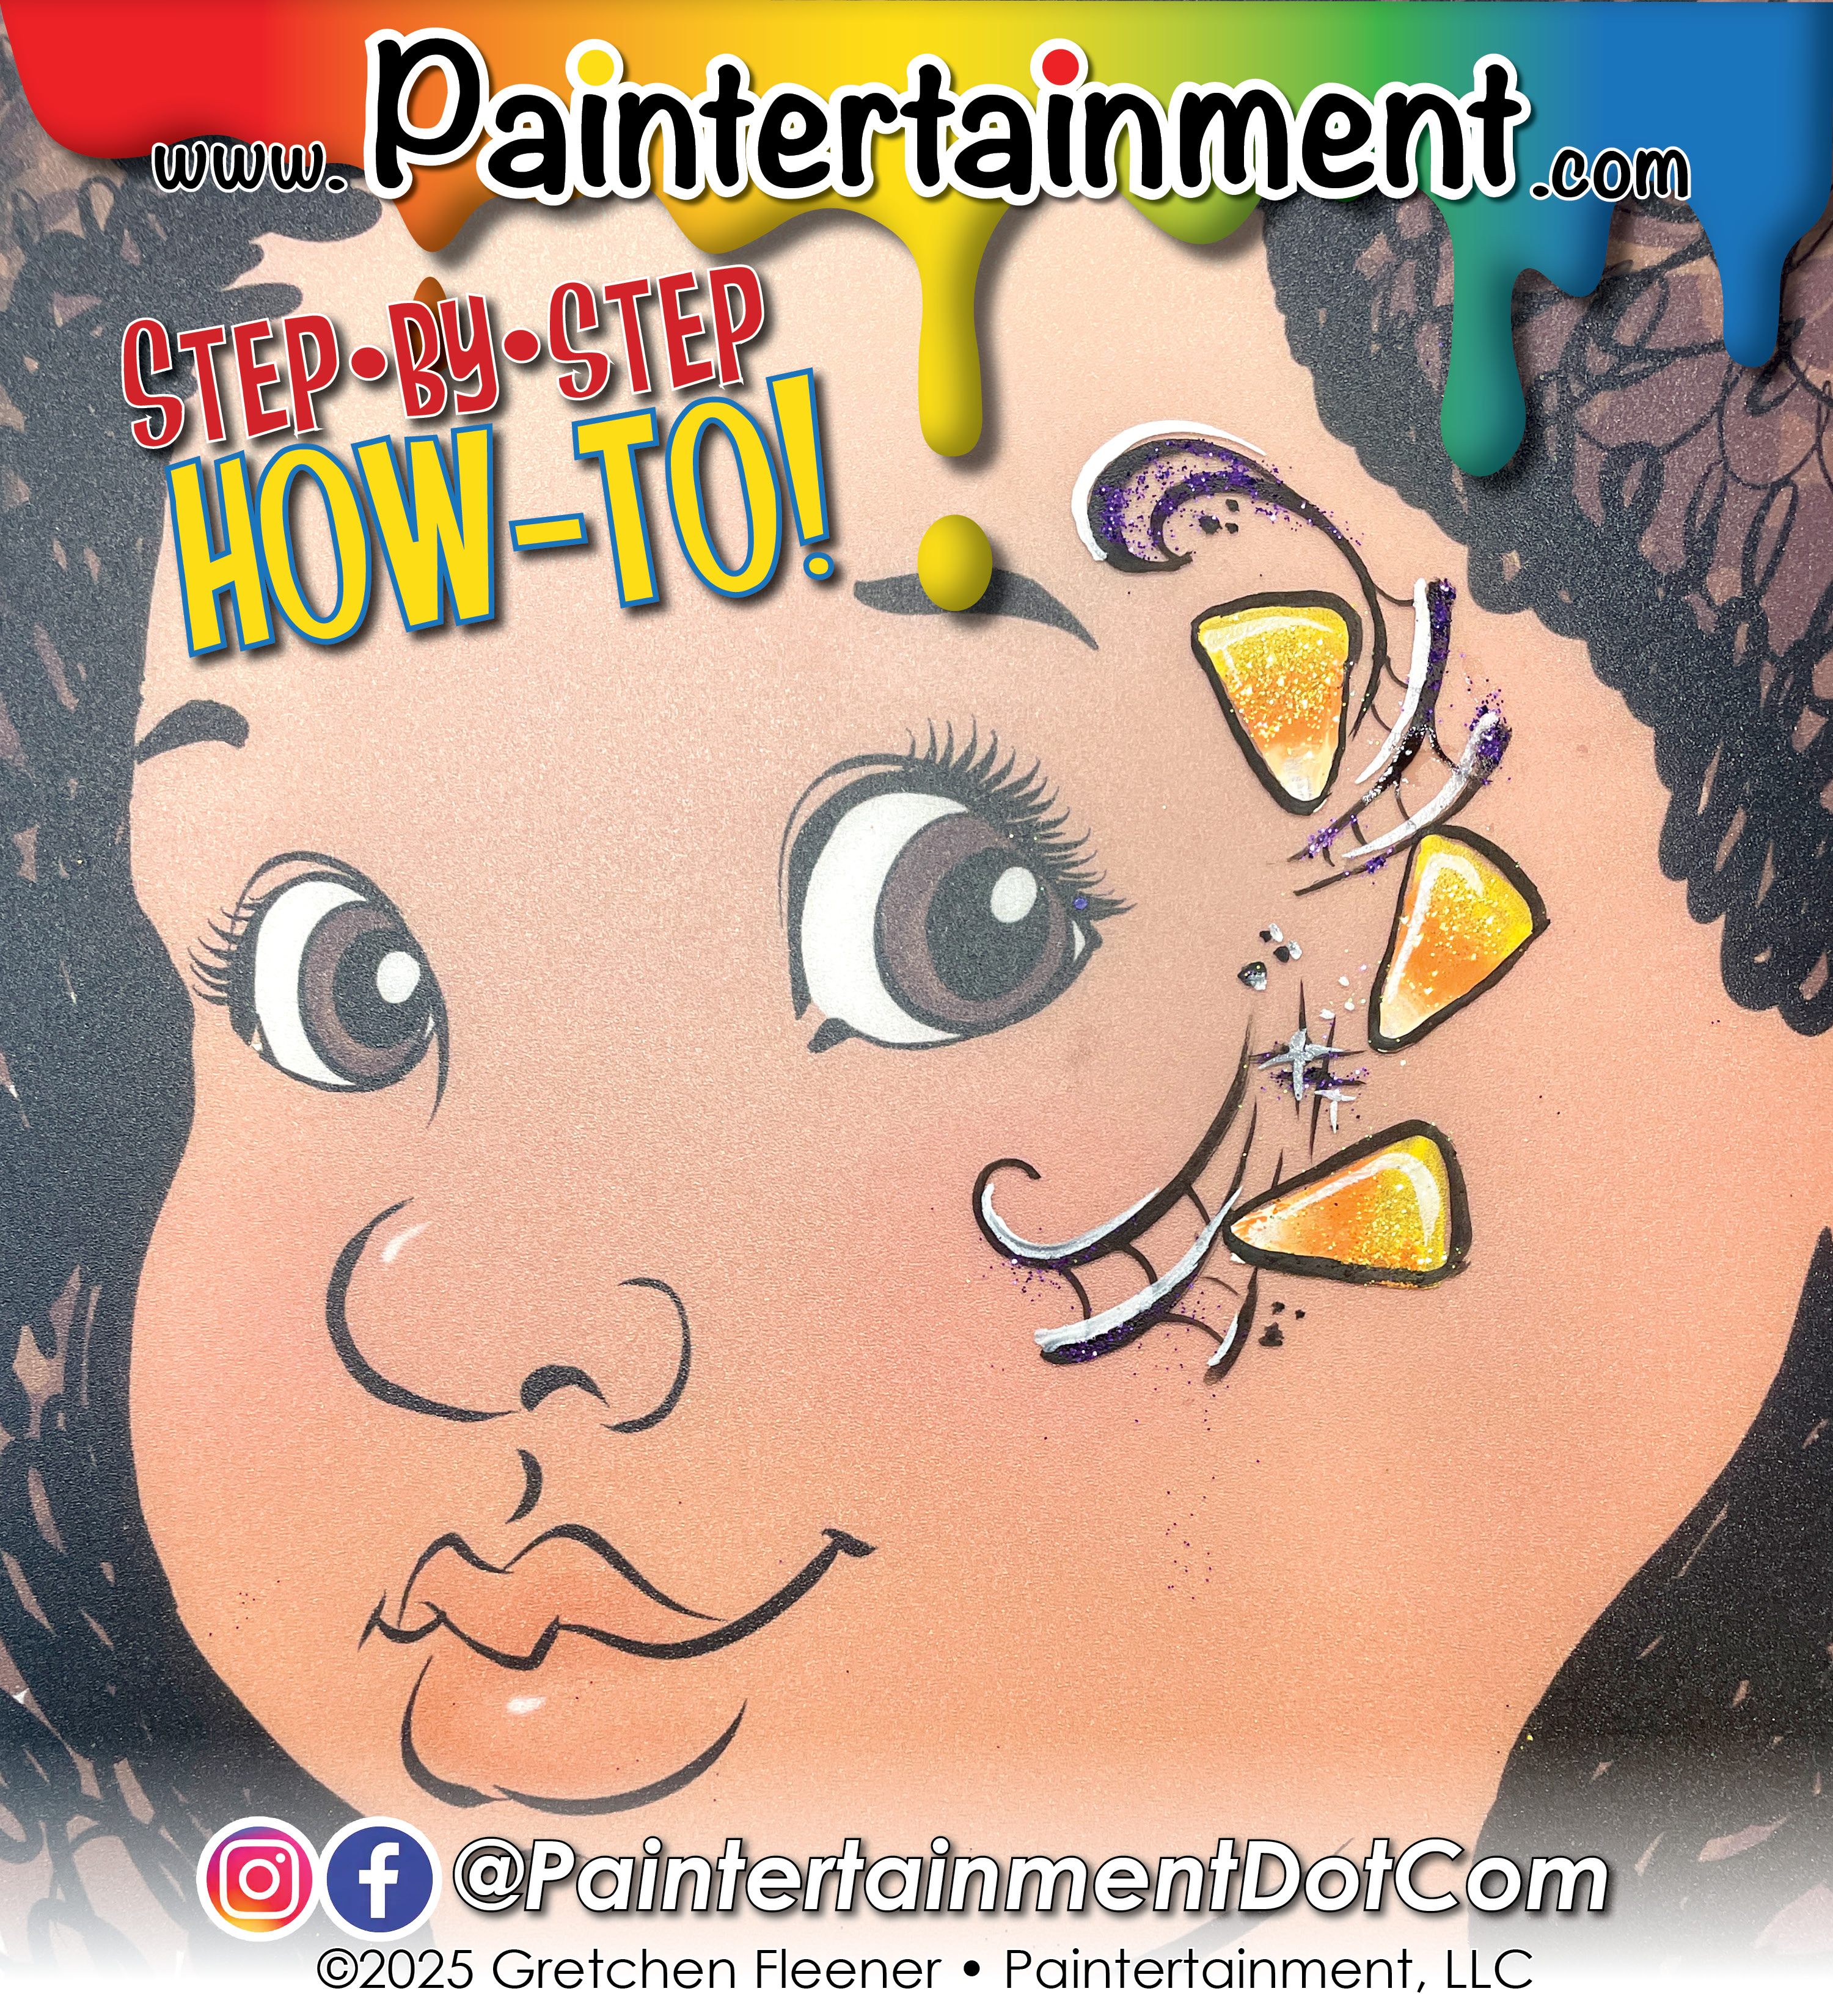
Halloween is just THREE days away, and if you haven’t made yourself a candycorn split cake, do it NOW! This little trick makes such quick work of candycorn designs! I made mine using an empty container from a Wolfe palette kit, but you can use any split cake sized container that matches the width of whatever brush you want to use. Mine fits my 1″ Squishy Doodle flat brush great!

Scroll down for step by step instructions and product links!

Step by Step Instructions:

1 – Make a split cake using Yellow, orange and yellow. I’m using GTX White (A), Cornbread (B) and Butternut (C). Load up a 1″ brush with your new cake. I’m using my new Squishy Doodle flat brush (D)!
2 – Twist only the yellow end of the brush to create a triangular candycorn shape!
3 – Repeat this step until you have as many pieces of candy as you wish.
4 – Add some outlines, swirls, dots and webs using your favorite black and a round liner brush.
5 – Add another pop of color with a little Amerikan Body Art Grape Soda glitter! (E) I’m also using Amerikan Body Art’s Lemon Zest on the candycorns here.
6 – Finish off the design with some white highlights! I do these AFTER the purple glitter so it doesn’t cover up the white.

Posted on Leave a comment

Fast & Fun Halloween CAT eye design

Happy Friday! Since I’m sure many of you are gearing up for a busy weekend of fall gigs, here’s another fast and fun Halloween eye design!

Step by Step Instructions:

1 – Load up a petal sponge (B) with a Mermaid cake (A) and lay down a background gradient over the eyelid and down to the cheek bone. Using a damp Jumbo dauber (C), press and twist to “erase” a spot for the moon.
2 – Load up your jumbo dauber (C) with some neon yellow. I’m using GTX Neon Moon! Press and twist to paint the moon, and dab on a little Lemon Zest glitter (E).
3 – Using a 1/4″ flat brush (F) loaded with black paint stripes for a fence, and add a couple horizontal lines to connect. I tapped a few lines below too to create a bit of a fade to the design.
4 – Add the cat with the same black and the same brush! Scroll down for more detailed steps on the cat!
5 – Load up a finger dauber (H) with white, and add some stars with an Ooh! star wrap stencil (G) in the sky.
6 – Finish off the design with some Wicked Festival Glitter! (I)

While the cat may take a little practice to get the muscle memory down, it was all done with just one load of the same flat brush I used for the fence! I’ve included some more detail below on just the cat!

1 – Using the same 1/4″ flat brush you used for the fence make a swoosh for the cat’s neck and arched back. Press and pull down while twisting to create the top of the cat’s back leg. Lifting and twisting as you go automatically creates the tapered shape of the hip.
2 – Drag the corner down to the fence to complete the back let.
3 – Repeat the process to create 4 legs. Touch the corner of the brush at the end of each leg to add paws!
4 – Outline the cat’s heat. I’m making sure it’s on top of the yellow moon here, which will make the eyes yellow already too!
5 – Lay down the brush on the top of the head and twist the bottom only to create quick triangles for the ears.
6 – Paint an arched v shape in the top of the head to outline the tops of the eyes with the corner of your brush.
7 – Reflect that same shape on the bottom to fill in the head and outline the bottoms of the eyes.
8 – Press down where you want the top of the tail…twist and lift as you paint an arc down to connect the tail to the cat.
9 – Simply “stamp” on little whiskers and pupils in the eyes with the tip of your flat brush to finish the cat!

Posted on Leave a comment

Fast & Fun Halloween ZOMBIE Eye Design

Happy Thursday, everyone! Today I wanted to share another super quick eye design for Halloween! This design takes advantage of some time saving tools for a quick but impressive design. There are so many things you can do to mix it up! Move it to the forehead and add the silhouette of a headstone! Try using an orange-yellow gradient for the background instead of gray! Have some fun with the zombie arm by mixing up the colors or adding some red liquid bling drips…the possibilities are endless to make it your own! Scroll down for step by step instructions and product links!

Step by Step Instructions:

1 – Load up a petal sponge (A) with a monochromatic cake. I’m using Tag magpie (B). And yes, I did squish my sponge way down to load it all up in a small split cake…it works!! Pat the gradient over the eyelid, around the eye and to the cheek bone.
2- Load up a finger dauber (C) with white, then scrub one edge with blue. Press and twist to create a moon, then touch on a dab of holographic white or lemon zest glitter (D)!
3 – Don’t rinse that dauber yet! Pat it around the sky to create some eerie clouds!
4 – Load up a mini stencil kabuki brush and use your Ooh! Zombie Arm stencil (F) to add the arm with black, dark green, or whatever color you like for zombies!
5 – Use a fine round brush with black to add some scraggly grass at the base.
6 – Finish off the design with a couple Ooh! stenciled (H) bats and glitter from the Vivid Gleam Nocturnal glitter cream palette (G)!

Posted on Leave a comment

Fast & Fun Halloween Bat Eye Design

We’re more than a week into October and our busy Halloween gig season is in full swing! Today I thought I’d share a super fast, fun and easy bat eye design! Taking full advantage of time saving products like split cakes, double-loaded daubers and stencils can help you create impactful designs in minutes! Check out the step by step photos and instructions below, along with links to the products used!

Step by Step Instructions:

1 – Load up a 1″ flat brush (I used a Bolt 1″ firm) with the darker side of a Sillyfarm Rainbow Cake “Mermaid“.
2 – Swoosh around the eye. I also used a Cameleon large blending brush to add a little of the pearl white on the eyelid and some holographic white glitter.
3 – Load up a jumbo dauber with white, then scrub just the edge on some blue.
4 – With the blue on the bottom, press and twist to create a moon. Add a little holographic white glitter!
5 – Using a mini kabuki brush (my secret weapon for perfect stenciling!) and this Ooh! Stencil, add some quick bats! I used Wolfe black for this.
6 – Add a few white outlines, starbursts and dots, and more glitter to finish off the design. I used Wolfe white for this.

Posted on Leave a comment

Tuesday Tips @ Ten: Super Easy Snowflakes!

Happy Tuesday! Today I’d like to share a great tip that I learned from my artist friend Linda John! I’ll show you her cool trick for making super easy snowflakes without using any stencils or even a brush!

Posted on Leave a comment

Tuesday Tips @ 10: 6 Ways to paint Fireworks!

Happy Tuesday and happy independence day!! Today I thought it would be fitting to show you 6 different ways to paint fireworks!

I hope you have a fun filled day of painting patriotic designs…please feel free to comment and share what YOU painted this year!

Posted on Leave a comment

Step by Step Easter Bunny Eye

The lake outside of my studio may still be frozen, but spring is technically here, haha! As I wait for those elusive 50 and 60 degree days in the extended forecast to reach me, I’ve decided to do a little Easter and springtime painting! Not only to get into the springy mood myself, but to warm myself up for my Easter gigs which start this weekend! In honor of spring’s inevitable return, today I wanted to share this simple little eye design…a bunny peeking around some eggs!

First, do a quick “sketch” outline of the eggs and bunny. I used a small, round brush with a little white.

Next, fill in the eggs with whatever springy colors and patterns you like! Try stripes, polka dots, zig zags, or just solid color! Experiment with metallic paints if you wish! I used my Cameleon small blending brush to blend the colors of the egg over to my eyelid.

With a round brush, fill in the white of the bunny. Add a few pink details inside the ears and the nose. I like to use a little light blue to add shading to white objects…it gives them a little dimension and a bit more color!

Outline the design with a fine, round brush and your favorite black. I like Wolfe black for my outlines. I also used some tiny dotters to add polka dots to my eggs here!

Add some fun flourishes around the design! I used my new Topaz Fleur Mirror eye stencil, combined with my Topaz Tiny Bubbles stencil. I then used a Deb’s Dotter to add a few more colorful dots to tie it all together.

I finished off the design with some “Capricorn” glitter creme by Amerikan Body Art…one of my favorites for the bright, cheery colors, and it blended perfectly with my colorful polka dots!

I have another fun Easter design that I will share soon, and hopefully some more as my schedule allows over the coming week! Stay tuned! Thanks so much for stopping by, and happy painting!

Posted on Leave a comment

Christmas Face Paintings!

Lately I’ve been having some fun painting some lesser known Christmas special/movie characters and posting them on our Facebook page! Here are a few I’ve done so far…there are more coming next week, so make sure to like and follow us on Facebook for more fun inspiration to come!

“Pink Nighmare!” from A Christmas Story – painted on myself
“Charlie-in-the-Box” from Rudolph the Red Nosed Reindeer – painted on myself! (Using some Ooh! Snowflake stencils!)
“Hocus Pocus” from Frosty the Snowman – painted on myself! (Using some Ooh! Snowflake stencils!)
“Abominable” (Buble!) – painted on my son Toby! (Using some Ooh! Snowflake stencils!)

Okay, this one below is not a particular movie character, however, it was an idea that came out of the Charlie-in-the-Box design with the pom poms! I thought they would make cute snowballs! 😀

“Snowball Fight” – painted on my son Sam! (Using some Ooh! Snowflake stencils!)

Here are a few of the products I used for the snowflakes in many of these designs…I love the short kabuki brush for detailed stencil designs, and am totally in love with these Ooh! Snowflake stencils!!

Stay tuned to our Facebook page for some more fun Christmas designs next week, as well as photos from our upcoming weekend events!

Posted on Leave a comment

New Images Added to Work Examples!

Each summer as my number of face painting gigs ramp up, I get more inspired to create new designs.  This past week I’ve been using both myself and my 3 and a half year old as models to try out a few ideas that I hope to add to my selection.  I’ve just recently added some photos of these designs to my work examples page (along with another new animated GIF!), but you can also check them out below!

(above:) On the top two, “Barbie Eyes” and “Frog Eye,” my eyes are actually closed, and I’ve painted eyes on my eyelids.  This is particularly difficult for me to do on myself, being that I am nearly blind without my glasses on, & can only get so close to the mirror with the brush in my hand!  The bottom two are of the same alien, with and without a black background.

 (above:) These are really fun for kids because they can make the mouths open and close.  Sammy loves fishing, especially since we’ve recently moved to a home on a lake, so we had to do a fish and a worm!

(above:) On the top is a frog I painted on my mouth.  Below Sammy is sporting the usual shark I’ve always done as “cheek art,” only now his mouth is aligned with the shark’s mouth.

Stay tuned for more new additions, and thanks for looking!