Posted on — Leave a comment

New Balloon Dog Necklaces!

Happy Friday, friends!! Every year I wish I had done more acrylic painting, so I started out this year with a little mini painting of a balloon dog! It’s about 6″ square.

Then I figured, hey, this would be really fun to wear as a necklace at balloon twisting gigs!  We now have these necklaces available in the shop for $15.00. The dog is covered by a domed glass piece, and it is hung on an 18″ sterling silver snake chain.

Now I’m dying to book my next balloon gig to wear it! I also hope to make a few more in the future…maybe a balloon flower next?
Happy twisting! 🙂

Posted on — 12 Comments

Do THIS, Not THAT: How to Achieve Speed AND Detail in Cheek Art Designs!

Over the years I have had so many artists come to me asking me to teach them how I do such clean, crisp cheek art so FAST.  It’s one of those things I’ve just been doing for so long, I never really could pinpoint what exactly to teach.  But, over the past year I’ve really tried to watch how others paint vs myself, and try to really stop and look at what I do, and whether it could be broken down into something useful and “teachable.” SO, here are at least a few tips I’ve come up with for improving your cheek art speed!

Cheek art?!  

*GASP!* (Can I say that word on the internet among PROFESSIONAL face painters?!)

It seems that “cheek art” is almost a naughty word these days.  Volunteer face painters do cheek art because they THINK it is quicker than full faces.  Clients request “something small” because they THINK smaller means faster.  A myriad of professionals avoid cheek art because they know it actually is NOT quicker than full faces, they’re afraid it’s too closely associated with amateurs, and they think the amount of detail in a small space is just too time consuming. Unfortunately some of those artists then resort to trash talking cheek art to minimize the fact that they don’t offer it to their clients, rather than working to perfect it.

Truthfully though, does it hurt to expand your repertoire to include some cheek art designs?  Think about it…eye designs, nose designs, and most full face & forehead designs are dependent on a specific body part.  Not every child’s face will be suited for a full face design.  For example, a forehead design might not be the best choice for a girl with big bangs.  A nose design may interfere with a child’s glasses.  A full face design might not be a good idea for a sloppy eater about to indulge in birthday cake, and you most certainly do NOT want to see your nose design end up on the kleenex of a kid with a cold!  I’ve been offering the whole range of full face, half face, eye designs & cheek art for the last 5 years, and I’ve still had events where every guest chose cheek designs over full face.  So, it is not even a matter of customers’ preferences.

Really good cheek art stands alone…it looks just as good on the arm, hand, or leg as it does on the cheek.  Let me just say that I think the whole term “cheek art” is a little silly…it really doesn’t matter where you are painting on a face…it’s still face painting. The fact that you offer cheek art does not make you an amateur. The forehead is part of the face.  The nose is part of the face.  And last time I checked, so is the cheek. The difference between “eye designs” and “cheek art” is basically like 1/4 of an inch.  So, what we’re REALLY discussing here is achieving a level of detail without compromising speed.

As a cheek art veteran, I am here to say that it IS in fact possible to achieve a high level of detail in your work (cheek art or otherwise!) and STILL maintain your speed.  For the first 15 years of my almost 20 year face painting career, I did nothing BUT cheek art.  So, yes, I will also tell you that you will be fastest at what you practice the most and what you’re used to.  Luckily practice time is something we all have control over!  But there are more ways that you can speed things up.  Here are a few tips and tricks that can help you create DETAILED designs, FASTER!

Careful Brush Selection

Choosing the right brush for a particular part of the design and using each brush shape to it’s fullest potential can play a huge part in your speed!  This is probably my biggest and best tip for detail + speed.  Honestly, I had no idea this was anything special until I started watching other artists work, and realized this is one thing that I apparently do differently than many artists.

 
Another VERY important thing for achieving clean lines and fine details is making sure your brushes are well cared for and have nice tips! If they are splayed out and not the shape they are intended to be, they will add time, not save time.  Keep your brushes in good condition and as soon as they start showing wear, replace them!

I’d also go as far as to say that not having too many brushes can play a role as well.  These days there is a tool for everything, but it isn’t always faster to dig out and load up a new tool just to make a quick dot or what have you.  More brushes means more weight to carry, more tools to sift through to find what you need, more expense, and more to clean and maintain.  I can really do everything I need with 2 round brushes, but found that having 2 sizes of filberts and flats actually speeds up things like the checkers & petals shown above.  I even have a 2″ wide flat brush because I think it’s so much faster to load and rinse than using sponges for wide split cakes!

Have fun trying the latest and greatest tools, but do an honest evaluation of whether it’s worth carrying around and if it really does make your work easier.  It’s okay if every tool you try doesn’t make the cut in your process of trial and error! (at least that’s what I tell myself with my FatMax full of seldom used tools!)

Paint Consistency & Load Time

If your paints are wetter, they’ll load quicker on your brush.  Most of us use water based face paints.  So, it’s okay to get them really wet as they do eventually dry back out.  Back in the day I only used Kryolan, and I only bought red, yellow, blue, black and white. I mixed every other color myself…orange, pink, green, brown, teal, etc.  I’d get them to an almost liquid consistency for good, even color mixing, then dry the back out into solid cakes.  I’ve painted with some artists who add so much water that their paints are like the consistency of pudding.  This makes it easy to just dip your brush in without all the swishing and twirling, and you’re instantly ready to go.  While it’s true that different brands and even different colors among the same brand react differently (ie. Global’s yellow  and Wolfe white gets really gooey & sticky, Kryolan’s dries out really fast, etc), if you can become familiar enough with your paints you can utilize the water-to-paint ratio to improve your speed.

I now use several brands and treat them all differently.  I make little pools in my Wolfe black and white to have a more liquid-y area.  I am constantly adding water to my Kryolan to keep it the right level of moisture.  Some I just leave alone and mist with water when I begin painting.  If I know my paints are going to sit open and flat on a table for days, I’ll make them more wet.  If I know I’m going to have to fold up my kit in an hour to transport it, I won’t get my paints so wet.

Whatever you do, figure out what works for you.  I find that keeping my paints wetter increases my speed, by decreasing my loading time. It’s definitely a science, especially when mixing brands!

Rinse Time

Rinsing between color changes is another point where speed can be increased.  First, I try to paint my designs in such a way that I am not re-loading the same color twice during one design, whenever possible.  If I can paint all the red parts at once, then I can be done with that color.  Of course sometimes I re-load white at the end for highlights, but with good planning you can avoid unnecessary repetitive loading & rinsing.

Of course you can increase the speed with which you swish your brush in your rinse water and that can shave some time off too.  I also really like my Loew-Cornell Brush Tub because the ridges in the bottom really clean the paint off my bristles with just a couple swipes. When I need to paint fast, I’m a super fast (and sometimes splash-y) rinser!

Some artists even have a brush for every color, eliminating the rinse time alltogether!

Planned Spaces

Just planning out the steps of your design better can really increase your speed.

Whenever possible, if I know a design well enough I try to leave negative spaces rather than just paint over the top.  Eyes are a great place to utilize this.  You don’t have to worry about painting the perfect eye shape because you’re defining it by the overlapping background color.  And, the white stays super white because it’s not layered over other colors.


Strategic Overlap

If you painstakingly outline every detail of a design, it’s going to take a while.  If you can take even a few elements and figure out how overlapping with a neighboring color can help define or refine a shape, you can really speed things up.

I hope some of these tips and tricks are useful for you!  I’ll try to add to this post as I think of more.  Got any of your own tips for speedy and still detailed cheek art? Please do share!

Happy painting! 🙂

Here are a few links that you might find useful:
Easter cheek art designs
Christmas cheek art designs
Cheek Art Facebook Group

Posted on — Leave a comment

Balloon Fun at Great Grandpa’s!

Tonight I had the pleasure of twisting balloons at my Grandpa Harvey’s memory care facility for their Christmas party!  I did it last year too and had a lot of fun! This year, however, I had a fabulous little helper! My 6 year old (almost 7) Sam got to try out his first “gig!”  I gave him his own little apron, pump, and balloons, and he made lots of balloon dogs and swords!  We had a great time making everyone feel like a kid again!

Me and my little guys

mistletoe hat!

My Mom & Dad!

My wonderful little helper and his balloon dog!

Sam came up with this hat on his own!

Santas! (My grandpa on the right)

Toby having a sword fight with Great Grampa Harvey

This lady just loves to play with the boys whenever we visit! She was chasing Toby around and he was going at her with his two swords! 🙂
My Grandma & Dad with Santa

Posted on — Leave a comment

New Products in November!

We’ve added a few new items to the shop lately and I wanted to give you a few links in case you’re interested in checking anything out!

Are you looking to re-organize your kit? We now have some exciting new options available for paint storage!

The photo above shows our new wooden boxes, along with trays that fit in them just perfectly! The boxes are tall enough that you can stack up to 3 trays inside, or leave one side for your one-strokes like I’ve done above.  Check out the individual components below…

Since I’ve recently gotten into henna, I have naturally added a selection of henna supplies and tools!  We are now carrying pre-made henna (which we store frozen!), henna kits to make your own paste, cellophane triangles to roll your own cones, and more!

We have a whole new and growing selection of Henna supplies!!

Cotton pads – Perfect to prep your clients for some beautiful henna!

100 pack of cotton swabs! Handy for henna touch-ups or lipstick application!

Squeeze bottles – no lid to lose! Great for adding a little water to your paints as needed, or for your alcohol in your henna kit!

This folding mirror is a great little size for your kit! Folds flat for storage, and then stands up on the table when needed.

These bottles are great for holding and dispensing your alcohol!

Glitter Applicator Brush! I’ll be adding more pics of this soon, but there is a fluffy brush under the black cap.  Fill the clear vial with your cosmetic glitter, and apply it with the brush!  The vial is just big enough to hold an entire bottle of our cosmetic glitter.

We’ve also recently added Ruby Red’s UV reactive face paints! These paints not only glow under black light, but they are the only UV reactive face paints on the market today that also use only FDA approved pigments.  We now carry them in larger cakes, and also small sampler kits in cast you’d like to try out a few colors before investing in the larger size.

Thanks for stopping by…Happy Painting! 🙂

Posted on — 5 Comments

WARNING: “Not For Cosmetic Use” or “For Hair & Special Effects”

So you’ve just spent a small fortune on neon makeup for your kit, only to turn them over and read something to the effect of “not for cosmetic use” or “for hair and special effects.”  You proceed to panic, wondering how any reputable face paint retailer could have mislead you by selling this paint in their store.  Perhaps you are starting to think horrific thoughts of all those poor children you painted at your last gig getting ghastly boils on their beautiful skin, and parents lining up to sue you. Or maybe you’re wondering why you see so many face painters with neons in their kit if they are not made for skin.

If you search message boards and social media sites for the topic, you’ll find endless threads with comments from artists who range from having no problem using neon paints on anyone, to dead set against using any neon paint whatsoever.   (Side note: if all the terminology of neon, dayglow, fluorescent, UV, and glow-in-the-dark are confusing for you, you may want to start by reading this post)

I would like to preface this article with this: 

“I personally am pretty neutral on the topic of whether to use neon / UV paint or not.  They are cool if you have a black light event, but I’ve yet to book one of those.  I find them to be really transparent, and require a lot of working up to get decent coverage, so I just don’t tend to use them much for that reason alone.  I say this to let you know that I have no agenda whatsoever on this topic…I am not trying to steer you towards one view or another.  If you’re looking for that sort of thing, you can find a plethora of artists in Facebook groups and message boards who are extremely passionate about this issue and dying to help sway your decision through endless comment threads! Please don’t start one of those here on this post as the purpose is not to start another age old debate…my goal in this post is solely to gather all the research and facts that I can and put them in one place, removing any opinions or hearsay, making it easier for you to make your own informed decision.  Remember that I am not a lawyer, a doctor, or an expert in cosmetic safety or manufacturing...I am simply a curious face painter who wants to paint responsibly, just like you.  In the end, YOU are responsible for the choices you make for your business. If you come across any other expert opinions, direct quotes from manufacturers, or personal experience with neons, please do feel free to leave a comment! My hopes is that this will be an evolving article that can be updated as any new information becomes available.”

Why are those warnings there?

The FDA has not tested the UV reactive pigments that these companies use in their paints specifically for the use in cosmetics.  However, most face paint manufacturers have had independent testing done of their neon makeups, finding them to be safe for use on skin.

In fact, the FDA actually relies on the manufacturers themselves to do their own testing to ensure their products’ safety, stating that the manufacturers themselves have the legal responsibility to make sure their products are safe.  Taken from the FDA website:

“Companies and individuals who manufacture or market cosmetics have a legal responsibility to ensure the safety of their products. Neither the law nor FDA regulations require specific tests to demonstrate the safety of individual products or ingredients. The law also does not require cosmetic companies to share their safety information with FDA.  FDA has consistently advised manufacturers to use whatever testing is necessary to ensure the safety of their products and ingredients. Firms may substantiate safety in a number of ways. FDA has stated that “the safety of a product can be adequately substantiated through (a) reliance on already available toxicological test data on individual ingredients and on product formulations that are similar in composition to the particular cosmetic, and (b) performance of any additional toxicological and other tests that are appropriate in light of such existing data and information.” (Federal Register, March 3, 1975, page 8916).”

This is why no one can claim that their product is FDA APPROVED, because the FDA does not “approve” cosmetics.  They only approve ingredients, like pigments, which go into cosmetics.  So, while some cosmetics might be labeled “FDA Compliant,” no cosmetics themselves are technically “FDA Approved.”

So what DOES the FDA do as far as cosmetic regulations go?

It acts on ingredients that have already been established as harmful.
Neon pigments have not been proven to be harmful for cosmetic use, at least as far as my research has shown. (If you’ve found facts otherwise, please let me know so I can update this post!) The FDA has not put them on the top of their list of products to test because, according to their own website, the FDA only “acts on products that are established to be harmful to consumers when used as intended.” This leads us to believe that neon face paints have not been found to be harmful enough to concern the FDA.  Although, the fact that the packages label them in such a way as being intended for “hair and special effects” renders any complaints about skin reactions invalid since that is not the intended use as printed on the package.  So in essence, the FDA is passing the responsibility on to the manufacturers, who are in turn passing the responsibility on to YOU. 

 The FDA also admits that they do “not have the resources to sample and analyze all cosmetics on the market.”

It regulates what verbiage is on the packaging.
Because the FDA has not yet tested these pigments for use in cosmetics, The Fair Package and Labeling Act requires that manufacturer label their packaging with restrictions as far as whether certain pigments shouldn’t be used around the eyes, lips, etc, regardless of any glowing reviews that they may have received with their independent testing.

This is why you will see warning labels on your neon/uv paints. It may be that the rigid guidelines for labeling doesn’t give them the physical space to clarify where certain colors are safe to be used, or to make note of their own safety test results (although some do mention their own testing on the label).  They are regulated on these things, right down to the font size describing the weight of the product, and labels only have so much space.  Here are some of the warnings you will see on popular brands on the market today:

Wolfe Neon Package: “Do not use around the eyes or on the lips” and  “The FDA recommends that all neon colors be kept away from eyes and lips.”  (Please note that Wolfe is not shipping any of their neons at the time of this posting as they are working on some new labeling requirements, so this is technically out of date now)
Kryolan UV-Dayglow: “A special effects product.  Dermatologically tested for safety, but does not meet with international cosmetic regulations.”

Diamond FX Neon Package: “For hair and non-cosmetic purpose only”

Global Neon package: “Special FX Product – Prosthetic Paint – (For Professional Use Only) – not for cosmetic use”
Ruby Red: “This product should not be used in the immediate eye area.” (keep in mind that NO makeup is not to be used in the immediate eye area, meaning the fleshy, wet part of the eye. This warning has nothing to do with the UV pigments used as Ruby Red uses only FDA compliant pigments in their UV makeup.)

Kryvaline Package: “Keep away from eyes; discontinue use if rash develops.”  I don’t believe Kryvaline uses FDA compliant pigments, yet they don’t warn against cosmetic use…perhaps as they are made in Canda? If anyone has more info on this brand, please do share!

(Do you have a brand not shown here? Please send me a photo of the package as I’d love to add it! My blog posts are living documents that I always try to update when new info becomes available.)

Why do some say “for professional use only?” I’m not certain but my HUNCH (NOT a fact) is that it has something to do with the Fair Packaging and Labeling Act (FPLA) which states that the FDA requires that a cosmetic label have a list of ingredients if they are marketed on a retail basis to consumers. “…This requirement does not apply to cosmetics distributed solely for professional use, institutional use (such as in schools or the workplace), or as free samples or hotel amenities.” But of course face paints ARE marketed to consumers as well so I’m not sure if this is right. If anyone knows more about this warning, please let us know!


What About Other Words Like ASTM Conformity, Hypoallergenic, and Non-Toxic?

ASTM stands for American Scientific Testing Methods.  ASTM conformity does not equal cosmetic safety or FDA compliancy as a cosmetic.  It only means that it meets a certain standard, as defined by the ASTM number.  Most face paints have some note that they “conform to ASTM D-4236.”  This standard means that the product has been tested for toxicity, and that the paint is required to list anything hazardous if applicable.  Sharpie markers and acrylic paint are labeled with the same number.  As we all know as professionals, acrylic paint is NOT intended for or safe for skin and neither are permanent markers.  ASTM designations are there to note that a product is safe if it is used for it’s intended use as described on the label.

The word “hypoallergenic,” meant to convey that a product is less likely to cause allergic reactions, is really just a marketing term used to sell.  It does not mean that it won’t cause allergic reactions, or that it is gentle on your skin.  A package may or may not say why they consider it hypoallergenic.  There is no regulation of this term, and no science behind it. Manufacturers are not required to test and prove that their product causes less reactions in order to use this term…for these reasons, it is nothing more than a buzz word.  NO cosmetic company on the planet can claim that their products will not cause a reaction on anybody, neon or otherwise.  Everyone’s body chemistry is different.

Non-Toxic does NOT mean that the product is safe to be worn on the skin.  It basically means if you accidentally eat some of the product, you won’t die or have any adverse, long term effects.  According to Consumer Reports’ Eco-Label Guide, “Non-toxic” is not meaningful and can be misleading. There is no definition or standard used for judging whether a consumer product or its ingredients are “non-toxic,” and no assurance that such a claim has been independently verified. A product that does not meet the definition of “toxic” according to the Consumer Product Safety Commission should not necessarily be considered non-toxic.”

  Check out this blog post for more info on using “non toxic” paint like Acrylic, tempera, etc for face painting.


So what do the face paint manufacturers have to say on this topic? 

 This is what a Diamond FX representative said on the topic, via Face Paint Forum:

“Neon paints have a special pigment that allows them to shine under the black light. They are considered for special effects only because that pigment is not considered a cosmetic in FDA standards. It is accepted as a cosmetic in other parts of the world, but it costs too much money for our government to do the testing to approve it as such. Independent testings have proven them to be safe and there have been no reports of any reactions.”

The following was found via Face Paint UK:

“With Day Glow Colours, the dye is embedded in a resin and has no direct contact with the skin.

…Regular Neon colours have never been officially approved for cosmetic purposes, only so called phosphorescent colour pigment is used. This paint contains a low percentage of Free Formaldehyde. (Under the approved percentage) In 2000 it was approved by the FDA for use as a cosmetic item. USA is the only country in the world where such an item may be distributed labelled as ‘for cosmetic purposes’. Diamond FX had to be certain this colour additive was free of any hazardous materials. Supplier data sheet and independent laboratories confirmed this. Diamond FX Aqua Colour was given to a dermatologist, to verify skin tolerance and to make sure, that the product would not harm when brought into contact with sensitive skin. The conclusion was that DFX Neon colours are harmless to human skin. The statement ‘not a cosmetic item, not intended for cosmetic applications is applied to our products for legal reasons only.”  (Click here for the full statement from DFX regarding neon pigments)

So what Pigments ARE FDA approved, and what are their restrictions?

Also from the FDA site:
“There are eight fluorescent colors approved for cosmetics, and like other colors, there are limits on how they may be used. None of them are allowed for use near the eyes. (Check the Summary of Color Additives again.) These are their names: D&C Orange No. 5, No. 10, and No. 11; D&C Red No. 21, No. 22, No. 27 and No. 28; and D&C Yellow No. 7.”

Regarding makeups that actually glow in the dark (as opposed to blacklight):
“Luminescent colors glow in the dark. In August 2000, FDA approved luminescent zinc sulfide for limited cosmetic use. It’s the only luminescent color approved for cosmetic use, and it’s not for every day and not for near your eyes. You can recognize it by its whitish-yellowish-greenish glow.”

Okay, so let’s check out that summary of color additives, specifically looking at the neon pigments that have been approved by the FDA for cosmetic use, and what their restrictions are:

D&C Orange No5 – may not be used in the area of the eye.
D&C Orange No. 10 – may not be used in the area of the eye.
D&C Orange No. 11 – may not be used in the area of the eye.
D&C Red No. 21, – may not be used in the area of the eye.
D&C Yellow No. 7 – may not be used in the area of the eye.

I have checked all of the lists and links on the FDA site and cannot find D&C Orange No. 22, No. 27, or No. 28 listed anywhere. If anyone has this info, please do tell! The FDA’s site says they are approved for cosmetic use, yet these aren’t listed on their own list of approved dyes so I’m not sure of their use restrictions, if any.

SO, in researching the FDA’s site, we can learn that the words “FDA Approved for use on skin” does NOT even necessarily mean that it is approved for use around the eyes. However, this is easy to work around when face painting…many artists who do use neon paints simply keep them away from the eyes and lips.  I tend to do this anyway with all of my colors.  I don’t believe that any face paint manufacturer recommends using paint on or too close to the fleshy, wet part of the eyes though.

See what the FDA has to say about face paints here. 
“FDA has to decide how they may be used, based on safety information. A color that’s OK on your tough fingernails or your hair may not be OK on your skin. Colors that are OK for most of your skin may not be OK near your eyes.”

When studying your package labels, to determine if your UV makeup is in fact using FDA approved pigments, they legally must list the following before the list of pigment numbers: “Bis(glycidoxyphenyl)propane/Bisaminomethylnorbornane copolymer, Aluminum Hydroxide”

back of Ruby Red’s neon makeup package

 So What Brands ARE FDA Compliant?

Snazaroo and Ruby Red are the only brands who’s neon paints use only the FDA approved neon pigments.  Their neon paints do not look bright and fluorescent under normal light, but they do glow under black lights.  So, if you are doing a black light event and using it purely for it’s appearance under black lights, then it’s a safe route to go, if you still keep it away from the “immediate eye area,” which Ruby Red defines as that fleshy, wet area around the eyes.  This is because the eyes absorb things into your bloodstream much faster than your skin.  For this reason, it’s a pretty common warning that all makeup manufacturers make on their products.

 Above is an example of Ruby Red’s UV makeup, shown under normal daylight and black light. As you can see, the colors do not appear super fluorescent under daylight (that’s because they don’t have the day glow pigments that other brands use, which are not approved for use in cosmetics by the FDA).  However, they do glow under black light. 

How Do Various Brands Compare?

The images below show swatches of various brands of neon makeup under normal daylight and black light.

As you can see, the makeup that uses non-approved pigments appears brighter under daylight, and also has much more defined colors under black light.  (For more sample swatches and more info on each brand and neon makeup in general, check out this neon post.)

Can’t Manufacturers Just Pay For The FDA Testing?

Another rumor floating around cyberspace is that the reason these pigments are not tested, is because nobody is willing to pay the FDA to do the testing which is very expensive.  Here’s what one manufacturer had to say about this:

“The FDA does not approve colors for us, nor approve any company.  Not how it works.  The FDA has a list of pigments that we have to pick off of, they also have a list of pigment manufactures that are certified by the FDA to make those pigments and these companies do have random testing on the pigments.  Not sure where this rumor got started, but we are unaware of any way  for us to pay to have a pigment get approved that is not on the list.  We can submit pigments to see if they will test them eventually to see if they would pass, but the waiting list is years and years (we submitted some 7+ years ago, still waiting).  DayGlo has had some of its colors approved, and I think that was a very long and expensive process. They are the manufacture, so they have the ability to submit colors to the FDA for approval.  We buy pigments from them and use them in our products. (One of their products we use is the FDA approved Clear glow pigment)  I have been told that bigger cosmetic companies pay independent testing labs to do full toxicology reviews/tests for them and then simply tell their customers that even tho the government hasn’t tested/approved the chemicals their own labs have. This may be what the rumors originated from.”

So what’s a Painter to do?

I have found that most professional face painters fall into one of the following 3 categories as far as how they react to this information:

1 – “No Way!”  – These artists assume that because a color is not FDA approved for use on skin, it is dangerous, not worth the risk, and they don’t use any at all.

2 – “Meh…So-So” – They use some neon paints, in moderation.  They keep it away from the eyes and mouth, and remind their clients to wash it off after the event or at least before bed.

3 – “Warnings? What For?” – These artists believe that since the FDA has not deemed it harmful enough to test, & has not been tested and shown to be dangerous, that the risk is minimal, so they use it however they wish.


“With great artistic talent comes great responsibility!” 

At least until the FDA decides to finally test the super bright, day glow pigments for cosmetic safety, everyone will continue pointing their fingers back at one person…YOU.  The FDA puts it in the manufacturer’s hands, and the manufacturers who use non-approved pigments with their labeling loopholes put it right back into yours.   Regardless of what category you put yourself in, you are the one responsible for the outcome.  I hope that this blog post will help you to choose wisely!

What if I Witness a Reaction to Neon Makeup?

The law does not even require that bad reactions to cosmetics be reported to the FDA.  So, if you do in fact ever hear about someone having a bad reaction to neon paints, please contact FDA’s problem-reporting program, MedWatch, on the Web or at 1-800-332-1088; or contact the consumer complaint coordinator in your area.

Want to know more?
A few more links if you’d like to dive deeper into this research:

– The FDA’s Summary of Color Additives
– Not even tattoo inks are FDA approved, according to this article. (via)
– How the FDA regulates cosmetics
– JestPaint’s Blog Post on Neons and FDA Regulations
– Paintertainment post on Dayglow vs UV vs Glow in the Dark

Posted on — Leave a comment

And The Winner Is…

TAMINA MUHAMMAD!

Painting by Tamina Muhammad

Congratulations!

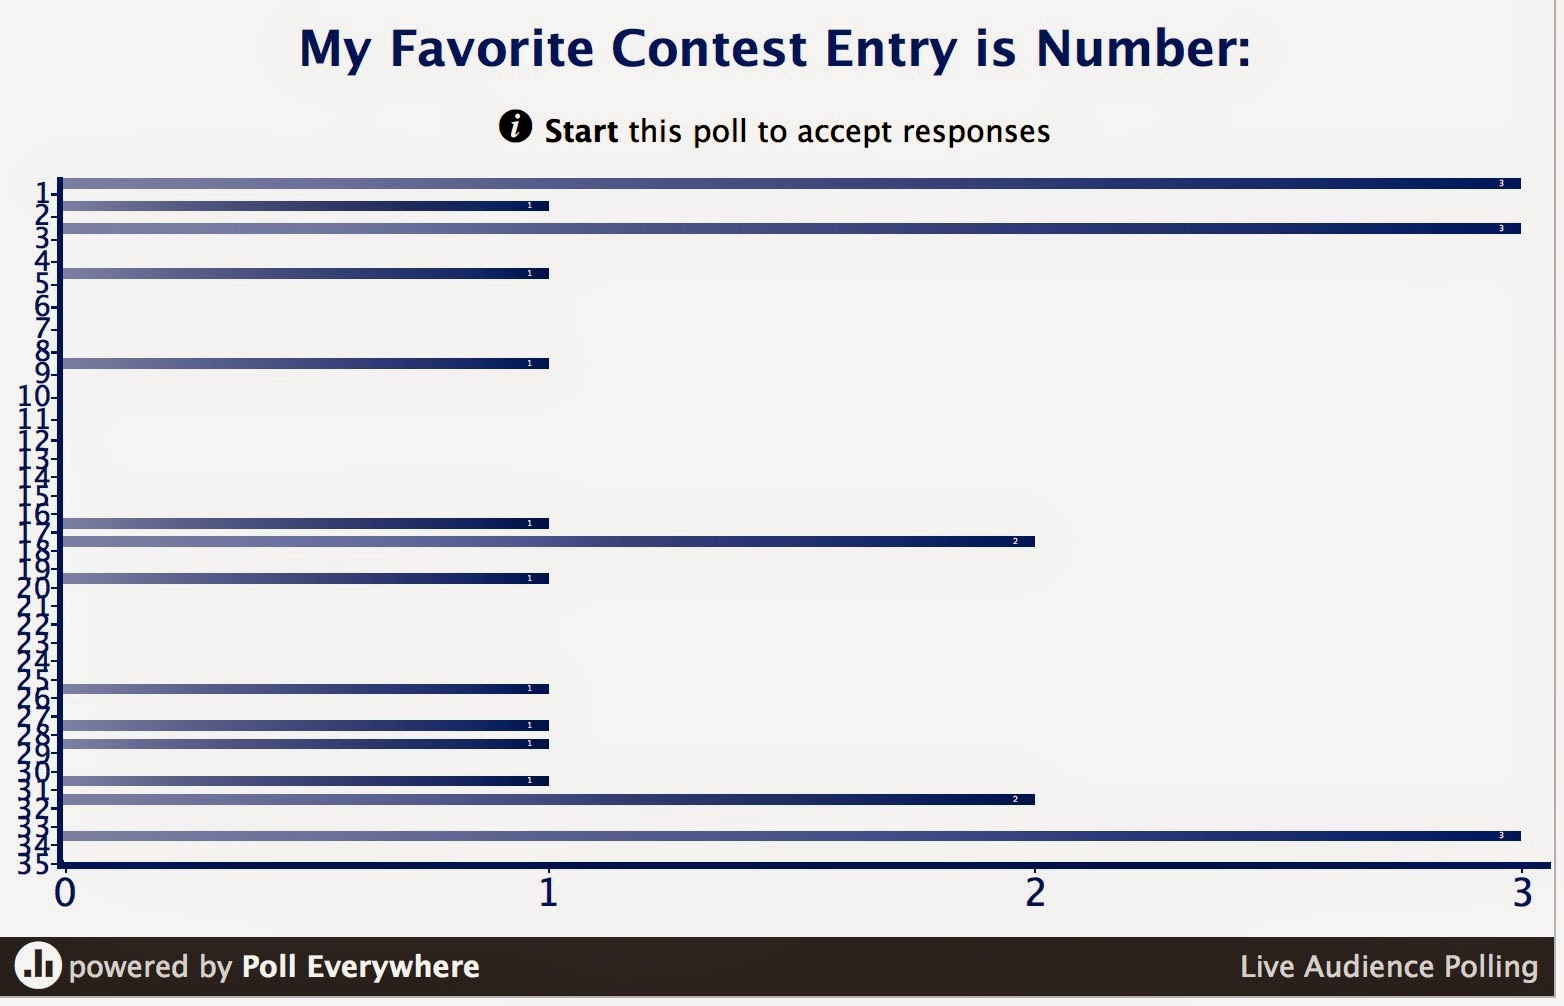
We had a three way tie for our Halloween cheek art contest, between #1, #3, and #34.

Poll results

The numbers were written on three identical sized pieces of paper, folded in half, shaken up in a pumpkin, and #34 was drawn!

Tamina, congrats on your winning entry…please PM me your address and I’ll get your prize out to you!

I enjoyed running my first ever contest, and hope to do it again in the future, so keep an eye out in the Cheek Art Face Painting group!!

Happy painting everyone!

Posted on — Leave a comment

Halloween Cheek Art Contest – VOTE for the Winner!

Hey everyone! I was just amazed by all the fantastic entries to our Halloween cheek art contest, held via the Cheek Art Face Painting Facebook group this past month!!  Thank you all for bearing with me as I fumbled my way through hosting my first ever contest! I’ve finally figured out how to enable the public to vote, right here! In the event of a tie, the winner will be drawn at random among those tied.

Have a look through the awesome entries below.  Choose your favorite…which one would you add to your design menu at your next Halloween gig? Which artist did something you’ve never thought to try? At the bottom of the entries, you can select your favorite and vote.  

Voting will be open through Thursday, November 6, 2007.  The winner will be announced on Friday, November 7th!

The winner will receive an awesome Global Body Art prizes: orange, dark green, silver, and holographic glitter gel!! 

THE PRIZE!!!

 THE ENTRIES…

Posted on — Leave a comment

New Paint, Balloons & Stencils Now Shipping!

We have added loads of new products to the shop lately!!  I’m a little behind in updating so here’s what’s new in case you haven’t been following us on Facebook!

Paint…

I’ve just recently started carrying Cameleon! I’m really excited to have some Cameleon in my shop, and plan to gradually grow my selection in the coming months.  For now we have a selection of Color Blocks, as well as some of their metallic paints and black & white.

We’ve also recently added an assortment of Global neon colors!

Stencils…

As for Stencils, we’ve added quite a variety of new designs!

Single palm tree – $4.99

Cityscape – $4.99

Pair of palm trees – $4.99
sample swatch of the above palm trees

Tiki – $4.99

TAP Stencil Selection – $2.50 each

BAM 1027 – Great for Minecraft! (sample below)
Alex Hansen – $6.00

Alex Hansen Spider Web – $6.00 (sample swatch below)


Alex Hansen Paw Prints – $6.00

Alex Hansen Circles – $6.00

Alex Hansen Brains – $6.00 (sample swatch below)

Great for zombies and skulls!!

City Stencil – $17.00

Jewelry – $17.00

Balloons…

We’ve added a few new balloons and balloon related items to our selection too!

Avengers Assortment

Orange rounds – Great for little pumpkins!

Blush Link-o-Loons

These are SO fun for making Gru!!  🙂 They also work great for princess heads, giving you a place on top to tie on some hair.

Clown Heads

NEW Holiday Set of Pocket Balloon Menu Cards!

White geo blossoms

Orange bee bodies

These orange no-tip bee bodies are great for carrots!!
Balloon Cups

…and a CONTEST!

If you join our Cheek Art Face Painting Group on Facebook, you have until October 17th to enter as many fun Halloween cheek art designs as you like, for a chance to win some awesome Global paints and glitter gel!!

Hope you’re having a good start to fall…happy painting & twisting, everyone! 🙂

Posted on — 31 Comments

The Great White Marker Matchup: Which Brand is Best for Balloons?

If you’ve been twisting balloons for any length of time, chances are you’ve come across the debate on which white markers are the best for writing on balloons. White markers come in handy when you want to add details to a dark colored balloon, or when you’d like to add white eyes to any balloon.  Of course, you can always go with stickers for quick and clean eyes, but many of us like to have the ability to customize our balloons’ eyes.  SO, I thought I’d do a little test and compare a bunch of white markers!  I’m going to start by just giving you the facts…photos of how things turned out, and then at the end I’ll chime in with my own experience and thoughts on each marker.

It took me a while but I assembled a lineup of 11 different kinds of white markers.  I not only scoured my own stash, but shopped on Ebay and Amazon as well.  I didn’t just purchase the markers that I had heard balloon twisters talking about…I did a lot of searching to find every type of white marker I could.  After all, who knows, there could be some hidden gem out there that nobody has tried on balloons!

Price:
To make things easy for you to find, I’m including Amazon links with all of these markers along with their Amazon prices (not including shipping), except for the Toyo marker which I could only find on ebay. However, you may be able to find these cheaper in a local store or by shopping around online…

(A) Marvy Uchida “Deco Color” Marker – $4.99
(B) Galaxy Marker – $5-$7
(C) Sharpie Water Based – $5.44
(D) Sharpie Oil Based – $5.78
(E) Pentel White 100W S – $4.59
(F) Super Chalks – $6.39
(G) Duct Tape Marker – $3.97
(H) Glaze Pen – $7.04 (2 pack)
(I) Elmer’s Panters Pen – $2.79
(J) Toyo Marker – $5.60 (ebay; free but long shipping from China)
(K) Edding Marker – $7.99 ($16.18 with shipping!)

All in all this little experiment probably cost me somewhere around $70.00. 

Preparation:
Most white markers require you to shake them (mixing up the paint inside), and pump the tip to fill it with paint before writing.

Lines:
All of these markers made decent lines.  As you can see, there is quite some variety in line weights out there. There are also a variety of tip sizes within several of these brands as well, so check that if you like the coverage but not necessarily the line weight.

Coverage & Pulling In:
When testing coverage I’m referring to how even and opaque the white is, without having to repeatedly color over the same area.  Some markers also tend to “pull in” around the edges. You can kindof work around this by going over your lines a second or third time, but that all adds time to the process.  Here is an example of what I’m talking about:

…the paint sortof shrinks on the balloon, leaving rough edges.

Here are all of the circles I drew. I realize that one could repeatedly go over an area in layers to get better coverage, but I tried to only spend the amount of time I’d normally want to spend when doing lots of balloons for lots of kids, and did one layer, to give a more accurate representation of the difference in coverage and time required:

The ones that did NOT pull in and left the cleanest lines were:
A, D, F (just slightly pulls in), G, I, J, K.

Smear Test:
While this might not matter if you are creating sculptures ahead of time for an event, the length of time it takes for markers to dry is really important when you are twisting for a big line of kids and need to move quickly.

For this test I wrote one letter, re-capped my marker, blew on it from maybe 1-2″ away for 5 seconds (top row), and then very lightly swiped my fingertip across the letter.  This is meant to simulate a kid maybe bumping the balloon with their hand or against their clothes…I wasn’t rubbing hard.

The bottom row of results are after blowing for 10 seconds.  Some actually seemed to smear MORE after more blowing…my only thought is that this must have been an inconsistency in the amount of paint that came out when writing the letters.  I did my best to write with an even pressure on all of them, but some did get more gloopy than others!  Either way, it still is pretty clear that some smear a lot more than others.

I’d vote A, E, and G as the least smeary.

Eyeball Test:
When you’re drawing an eyeball on a black balloon, chances are you’ll want to go over the white with a color, to make an iris. For these I used a regular blue Sharpie for the iris.  If you use another paint pen on top of the paint pens for color, you run the risk of re-activating the white underneath and smearing. I could probably test dozens of combinations of pens here but for the sake of testing out the ability to draw on top of white, I just stuck with a colored sharpie.

You don’t have to worry about this test if you are the type of artist who plans out your eyeballs in a way that you don’t overlap colors, of course.  If I were drawing an eye on a blush balloon, I leave space for the iris so I’m not coloring on top of another marker.  But if you have to draw an eye on black, this might be useful!

Stretch Test:
If you’re going for longevity in your sculptures, you might want to steer clear of the markers that crack and peel under pressure.  After drawing the eyeballs above, I tried just bending the balloon into a curve, and stretching the latex a little.

H and I completely cracked and peeled.  D crumbled a bit, and J cracked a little as well. C, E and F cracked a little but didn’t seem to crumble off.  The rest stayed just the same.  I really wouldn’t worry too much about cracking for any of the markers except for H and I as they were the worst (Glaze pen and Elmer’s pen).

My Summary:
I am still new to twisting, so I am not set in my ways as far as any white marker goes.  I only started twisting last year, and was curious which marker would be best for white, which is why I did this blog post.  So, I consider myself pretty un-biased! I know many of you SWEAR by your brand of marker, and that’s great! In the end, use whatever works best for you!! I hope if you’re new to this, that my little test results will help you to at least narrow it down to which ones you’d like to try.

Here are some thoughts that I had on each of these markers…

(A) Marvy Uchida “Deco Color” Marker – $4.99 
This is the only paint pen I had already in my studio.  I bought it in a set with other colors at a craft store. It was fine…requires shaking and pumping.  It gave decent coverage, didn’t “pull in,” was pretty darn good for coloring on top of, and was one of the quickest to dry in my smear test.

(B) Galaxy Marker – $5-$7
I really, really wanted to love this marker, after all the rave reviews I had read about it online.  The great thing about the Galaxy Marker is that it doesn’t require any shaking and pumping. Just pull off the cap and start drawing! However, I was quite unimpressed with it’s coverage. If you have the time to draw, blow until dry, and repeat until you get good coverage, that’s great…although I’m not sure if that saves you any time in the end vs the shaking/pumping variety. It did also tend to “pull in,” giving me rough edges.

(C) Sharpie Water Based – $5.44
This one requires shaking and pumping. I did like how nice and bright the white is with this marker!  However, it did pull in, and also took too long to dry for me to do a good eyeball iris on top.  It might be a nice option still for made-ahead sculptures if you want a really white white.

(D) Sharpie Oil Based – $5.78
This one requires shaking and pumping.  The oil based version did not pull in, leaving nice, crisp lines.  In the stretch test, though, while it wasn’t the worst for flaking, it did crumble a little.  It dried pretty quickly, and was pretty good for drawing on top of for eyes.

(E) Pentel White 100W S – $4.59
This was unique in that it required shaking, but no pumping.  The marker actually came without a tip in it, but with 3 tips included in the package. When you first open it, you have to pull out a little plastic plug, and insert your marker tip.  Then you shake, shake, shake (a LOT), until the little paint well near the tip fills up with paint and soaks the tip.  It took a lot of work to get this to the point of being able to use it, but once it was ready to go, it performed okay. It had a very fine point tip, and dried pretty fast which was nice for eyeballs.  It did just slightly crumble in our stretch test, but not really enough to matter to a kid.  It does pull in a little.

(F) Super Chalks – $6.39
This is one I stumbled upon in my internet searches and had to try it. It does require shaking and pumping.  It had the widest tip of the ones I tried.  This marker did pull in a little bit. It does have good, white coverage.  But, it does take a while to dry, and was one of the worst performers in my smear test.

(G) Duct Tape Marker – About $5-$6?
This marker was kindof awesome. It does require shaking and pumping. It didn’t pull in, leaving nice, crisp lines.  The coverage was great, and it dried pretty fast, making for nice looking eyeballs with blue on top.  I think this might be my favorite.

(H) Glaze Pen – $7.04 (2 pack)
This is a strange pen for balloons…I bought it because it said it would even write on ceramic and glass.  The pen comes with a little drop of plastic dried on the tip, so you have to pick that off before you use the pen.  It’s a ballpoint, so there is no shaking/pumping. When you first draw with it on a black balloon, the ink comes out clear.  After it dries, it turns white.  You can see on the eyeball test results, the outside edge is white while the center was still clear, as it takes a while to dry.  It smeared really easily, and was the worst performer in our stretch test, totally flaking off.  I’d consider this pen not to be practical for balloon twisters.  But, I thought it was fun to try and I wanted to be thorough! 😉

(I) Elmer’s Panters Pen – $2.79
This pen requires shaking and pumping. It was the cheapest of all the pens I tried. I really liked this one for it’s great coverage, and it does not pull in, so it leaves nice, clean lines.  It was sortof in the middle ground as far as smearing, so it takes more than 10 seconds of blowing to get it dry.  Sadly, it was the 2nd worst when it came to flaking off with just a little bending of the balloon.

(J) Toyo Marker – $5.60 (ebay; free but long shipping from China)
The Toyo marker requires shaking and pumping. I read about this marker on a message board somewhere, and ordered a couple on ebay.  They aren’t bad price-wise, with free shipping, but it does take a while to get them from China. So, don’t order these if you are in a time crunch.  The first one I ever used seemed to work fine. But, I’ve only had it for a few months and even with the cap on tight, the tip is all dried up and crusty now 🙁 Luckily I bought 2 so I could crack open a fresh one for this test…which unfortunately gave me the biggest gloopy mess whenever I pumped it:

These markers don’t pull in, which leaves a nice, clean line.  These I think were pretty good for drawing over the top of, and dried pretty quickly!

(K) Edding Marker – $7.99 ($16.18 with shipping!)
Oooh, boy, did I ever want to love this marker.  It’s the one I seemed to hear the most rave reviews about online.  I had to order one on ebay to get a fairly decent price, as Amazon only had them shipping from overseas for $16.18 with shipping.  So, I ordered a 2-pack for about $10 on ebay. I got all of my other markers. I waited for my Edding. And I waited.  50 days later I contacted the seller and got a refund as they never made it to me.  So, I bit the bullet and paid $16.18 for ONE marker via Amazon. I’m sure they are cheaper SOMEWHERE else online, but I really wanted to include this one in my test. Finally, 2 months after setting out to do this test, I had my Edding and was able to start testing! The Edding does require shaking and pumping.  Much to my dismay, this one was almost as gloopy as the Toyo when pumping…I had white paint spills everywhere and most definitely couldn’t shake it here and there without having the cap on, unless I wanted polka dotted walls and carpet.  It doesn’t pull in, so it leaves nice clean lines.  It wasn’t the fastest for dry time, but was still among the fastest few markers to dry so I’d say it’s pretty good on that front.  I also worked really nice for drawing over the top of once it was dry.  I didn’t see any issues with cracking or flaking when stretched. It wasn’t horrible, but wasn’t my favorite.  I think maybe it was hyped up so much, I was expecting the world from it.  It was an extremely expensive, average oil paint marker to me.

I tried to diagram all of the results into some sort of chart for you below.  Of course these grades are purely based on my own opinion, so take them for whatever they are worth for you! I gave my overall opinion in the far right column as good, bad, or okay for general balloon twisting use.  You may, however, find that some markers are better for certain tasks than others, so don’t completely count any out unless you try them and consider your project (line work vs make-ahead, etc).

 
 Got another white marker you LOVE, but I didn’t test it here? Please feel free to leave a comment! We’d love to hear about it! 🙂


Posted on — Leave a comment

Learning to Face Paint: Where Do I start?

Need a little help getting started face painting? Been asked to face paint at your church or school event and you just don’t know where to begin? This blog post is for you. I’ve been face painting professionally for over 19 years and love helping others learn how too. 

What Supplies Do I Need to Get?

It is easy to get overwhelmed with all of the products available on the market today.  The most important thing is to make sure you get quality paints that are specifically designed for skin.  For a really easy way to get started, check out our “Smile Painter Set” package deal, which includes quality makeup, brushes, a design sheet and a book full of tips and tricks! But if you’re interested in picking out all of the supplies yourself individually, read on for some suggestions and advice!

Paint:

A few things to consider when shopping for paint:

  • Safety should be your TOP deciding factor, not price. Stay away from cheap craft store paints made in China.
  • Never, EVER use craft paints or acrylic paints on skin! Here’s why. “Non-Toxic” does NOT mean safe for use on skin!
  • Use only professional makeup that is FDA approved for use on skin. (Kryolan, Wolfe, TAG, Paradise, Snazaroo, Cameleon, Mehron, etc…)

Check out this blog post for more information on how much paint is needed, and how long it will last.  For someone starting out or just doing a small event here and there, I would recommend a multi-color palette. These sets enable you to try a variety of colors without spending a fortune. When you run out of a color, simply purchase a refill and keep using your set for years to come! Or, if you plan on using a lot of certain colors, you can purchase larger cakes of colors individually that will last a LONG time!

Brushes:

A few things to consider when shopping for brushes:

  • Are you doing mainly smaller designs known as “cheek art?” I’d recommend a #1 and #4 round brush for you.  Synthetic fibers will be more forgiving for beginners.  Use the #4 for your main color areas, and the #1 for outlines.
  • Are you doing larger designs like full-faces or masks? Get the above PLUS a larger flat brush and/or sponges.  Most artists cut the round sponges in half, and use the flat sides.
  • If you plan on using sponges, get a spray bottle to wet them with.
  • Short handled brushes are easiest for storage & face painting. All of our brushes have short handles.

Designs:

You will need some designs for the children to choose from that you are comfortable painting. I prefer to use a board or sign that is on display so that everyone in line can see it and have their design chosen when it’s their turn. Start by displaying only designs that you are comfortable painting. I have several heavily laminated design sheets available that work great…they are small enough to put in your tote bag of supplies, and sturdy enough to wash off at the end of your event!
 Never painted before? Then I’d recommend getting my companion book of full-color photos showing you how to paint every design on my Classic design sheets in 6 steps or less!

If you’d like to design your own menu and don’t want to tie yourself down to an exact image on a visual menu yet, we have a service just for you.  Choose the type of designs you’d like and we will create a custom word menu for you to print out!

Other Supplies:

  • Glitter: Not a requirement, but glitter sure does add a lot to a design! ONLY use glitter that is approved for cosmetic use by the FDA. Metallic craft glitters can scratch the cornea and are extremely dangerous!
  • Rhinestones & Adhesive: Definitely optional, but if you are doing a fancy princess party, they are a HIT!
  • Split Cakes: If you’re familiar with one-stroke painting, rainbow cakes can really add that WOW factor in little time! If you’re not familiar with this technique and want to learn, check out our book, “One Stroke Face Painting!”
  • Mirror: To show the kids the finished product. Bring an extra in case it breaks! Or better yet, get an unbreakable mirror.
  • Wet wipes: In case of mistakes and to clean your hands. Makeup remover wipes work especially well!
  • Water jar: To rinse your brushes and wet the paint.  We sell a variety of great brush tubs with ridges in the bottom, which really help get your brushes clean!  But to be honest, you can get by just fine with any old jar or cup of water!
  • Towels, Chairs, Hair Clips, etc…

How Do I Learn How to Face Paint?

We have many resources available at Paintertainment:

Feel free to email me any time as well! I love to help fellow artists!