Posted on — Leave a comment

New Shop Additions: Balloons and Feathers!

Hello everyone!  Things have been VERY busy in my studio and online shop these past couple weeks!!  Let’s just say I had to order more peg hooks to store all the new goodies being added to the shop this month.

New Halloween Package Deal!

First up, posted a little while back but I forgot to mention on my blog, is our new Halloween package deal!  This year’s Halloween deal has been totally re-vamped to include coagulated blood gel, liquid latex (for realistic flesh wounds!), spider and “blood drip” stencils, your choice of tooth enamel (choose from gold, blacked out tooth, or nicotine/decay), and the Wolfe Brothers’ “Horror” book!  It’s a $32.00 value for just $28.99!  (And don’t forget we also still have our “Spooky Set” of BAM stencils!)

Paintertainment’s New Halloween Package Deal
Now Selling Twisting Balloons!

It’s been a while since I’ve sold balloons…originally I tried them out as a part of our clown section, which I later decided to discontinue and placed everything left in our Clearance section.  However, I have decided to take on balloons again, this time offering a larger assortment!  Many face painters offer balloons in addition to their painting services, and I myself have even started doing balloon twisting in the last few weeks.  It is a LOT of fun, and these days there are so many great tutorial videos online, it’s almost a no-brainer to give it a try! 

Qualatex multi-colored assortments currently offered by Paintertainment

All it takes is a hand pump and a bag of assorted colors to find out if you are interested in adding balloon twisting to your repertoire.  If you decide you’d like to do more, you can purchase individual colors in bags of 100!

Qualatex twisting balloon colors currently offered by Paintertainment

 Did you know that Qualatex balloons are made right here in the USA from natural latex, and they decompose at the same rate as an oak leaf?

Be sure to keep an eye on our balloon section, as it will be growing right along me in my endeavors to become a balloon twister!  Got requests or other suggestions for more balloon items to add?  Please let me know!

New Bling: Feathers!

Last but certainly not least…our “Bling” section just keeps getting better and better!  We’ve JUST received our first shipment of feathers!  Feathers are perfect for adding that extra fancy touch to your designs, and their super light weight make them easy to attach with our assortment of adhesives. 

For just $2.50-$3.00 per package, you can really add that wow factor to your mask designs!  Check out the new feathers just added…

Black with assorted bright colors – 6 pieces for $3.00

Assorted brown/black/white 5″ feathers for $2.50

Assorted cream/brown/black 5″ feathers for $2.50

Assorted “Guinea feathers” in bright colors, 3 grams for $2.50

Mardi Gras feathers in a big 14 gram bag for $2.50

Big 14 gram bag of assorted natural colors for $2.50

Gorgeous peacock feathers, 2pieces, 5″ for $3.00

I have SO many more ideas in my head for more products to add and special package deals, so I’d better go and get on it!  Be sure to follow the blog and “like” our page on Facebook to stay up to date on our new products, tutorials, and posts… and our next free e-newsletter will be coming out in the next couple weeks too, so subscribe today to make sure you get the latest coupon codes!

Posted on — Leave a comment

Garage Sale Remake: My $13.25 Custom Kit!

I’ve had so much fun lately seeing what other artists have done online, tricking out empty wood boxes and turning them into awesome kits!  So, when I saw this wood box at a garage sale for $2 a few weeks ago, I snatched it up!  With my background as a product designer and a retail display designer, I was really in my element with this project!

 All of the dividers were just pieces of cardboard, which came out very easily to reveal a nice, sturdy box:

I removed ALL of the hardware (handles, latches, hinges, and metal corners), sanded the whole thing, and then primed it with white…

…then I used some paint that I already had on hand from previous projects to paint the box.  The outside I painted a really dark gray, and the inside is sortof a blue-ish purple.  You can see here that I also put in a couple eye screws and a chain so that the lid would stay vertical when open, making a perfect design menu surface!  I spent about $5 on new screws to re-attach all the hardware. (the old ones were pretty rusty)  So, at this point I’ve invested $7.00…

I really loved the old-tyme-ie suitcase look that it had with the leather handles and hardware, so when it came time to decorate the outside, I let the box itself inspire me!  

design sketched out with a white colored pencil

starting to paint it in…

I used acrylic paint to add some “leather” straps (that align with the case’s latches), and then painted some “patches” on the case.  If you have ever traveled with me, you would know my suitcase is covered with patches that I’ve collected from my travels.  There is never any mistaking my luggage for someone else’s!  So, for my paint kit I did a big patch for my business name (Paintertainment), a happy face patch (because hey, my job is to make people smile!), a patch with a brush and paint blob to match my brand, and then a triangular patch with my home city’s name.  I could keep painting patches forever but stopped myself….think it turned out pretty cute!

I debated for a while whether I should put some sort of folding legs on the bottom to make the case it’s own table…possibly adding wheels and a handle.  But, then I realized that my little folding cart (similar to this one) works perfectly to add these functions without having to add more bulk to the box itself…

…this cart folds down to just a couple inches thick which is great for transport.  When opened up, I can simply set my case inside and wheel it to my gig.  Then, when it comes time to set up, I can just set the case right on this cart and I have my table!

The box sitting on my cart is just the right height!

I found this great little set of battery powered LED lights on Amazon for $6.25 and attached them around the inside of the cover with hot glue.  It works great to both attract attention to my services and light up my design menu.  So that’s where I’ve reached my whopping $13.25 investment.  Of course I did have a lot of materials on hand already that I know most people don’t have lying around, but I was so happy to have spent so little for this little experiment!

Battery box and switch for the lights…attached with velcro to the top corner in the lid

The white background of my design menu is made using some magnetic receptive vinyl.  I had scraps left over from one of my old county fair booths.  It’s not a magnet itself, and is not metal, but magnets stick to it.  It was a super expensive purchase for my booth years back, but I’ve gotten so many displays out of it. I had a couple scraps left that were just enough to cover the inside lid of my box. All of my designs are magnets so I can always change my boards in seconds. The vinyl is so much lighter than the old sheets of steel I used to use.  Next, I needed something to cover my designs but didn’t want any heavy plastic or glass.  So, I cut a piece of clear vinyl, attached ahesive-backed magnet strips all around the back edges, hid the magnet from the front with a nice piece of ribbon that matches the inside purple color, and it simply sticks onto the vinyl, covering and protecting my designs from any water splashes.  (and weighing next to nothing!)

Clear vinyl sheet attaches to the magnetic receptive vinyl backing to cover design menu.

I love this business card holder…I think I got it years back as a freebie from a vendor while I was working as a display designer for Best Buy….

Business card holder, velcro’d to the lid

…The spring holds my cards up and fans them out so it’s super easy for people to grab them.  I put some velcro on the bottom so it attaches to the top of my lid when it’s open.

I cut a piece of black towel to fit inside the bottom of the case, which also attached with velcro so I can pull it out and wash it.

Set up and ready to use!

I’m thinking about putting some sort of sign on the front of my cart.  But, I’m also thinking that I can maybe attach my balloon twisting apron around that case if I’m doing both.  I just started twisting and I’m still waiting for my new apron to arrive!!  You can see my tray of paints sits nicely on the edges of the box, but I put that on my lap when I paint.  So, underneath I have my laptop case full of all my TAG one strokes and base blenders.  On top of that is my hand mirror.  My glitters always look nice and organized in their little jars!

I keep my paints in screw-together jars (less lids to worry about), and when I’m painting I set them on a towel lined tray that sits on my lap.  In the spirit of re-designing my kit, I thought I’d cut a couple towels to exactly fit my tray too, and add velcro.  They look really nice and neat…

I have a double layer of towel along the right side of the tray because I tend to dab off my brushes and lay them there after rinsing them.

Case with all my paints packed in

Everything fits nicely in the box.  My little Loew Cornell brush well ($5.49) is great for compact kits like this. You can see it on the far right…I covered mine with some funky duct tape that matches my Fatmax.  But, it works as a brush holder that protects all the bristles, AND the cover acts as a rinse water jar when opened.

SO, there you have it!  I have tried many different things in my 18+ years as a professional face painter, and I am excited to try out this new kit.  I’ll have to stop back and leave a review once I’ve painted with it.  Last year I purchased a Fatmax after reading so many rave reviews about them.  I kindof have a love-hate relationship with my Fatmax.  I love that I can bring just about EVERYTHING I own and have it all instantly accessible for the gigs that require this.  But it’s also murder on my already bad back getting it in and out of my car.  My other setup, which consists of a grocery cart with a custom fitting tabletop and fabric wrap, works really awesome, is super lightweight, and takes up very little space.  But, it doesn’t have quite enough tabletop space now that I’m carrying a kit of one strokes.  So, we shall see how this kit fits into my spectrum!  I still find myself choosing certain kits for certain gigs, and I think this will be a great one when I need to be super compact.  It can also work great just sitting on any existing table if I’m provided one.  So, stay tuned…I’ll try to post about how it worked once I’ve used it at an event!

Posted on — Leave a comment

Carver County Fair 2013 Recap

This year marked my first year at the Carver County Fair!!  It was a GREAT week.  The weather was awesome, business was booming, and I was really pleasantly surprised by how wonderful ALL of my customers were!

Booth set-up day! The boys were really good while I spent about an hour setting things up.  Especially being that we had just found out my littlest one has Lyme’s disease and his special order meds were due to arrive later that day!

The booth all set up!  So glad we got another outer corner like we’ve had at the Dakota fair previously, so I could still use my banner with the cute airbrush art my sister did.

The commercial building….as you can see, the banner is nice and visible from the outside!

My Princess castle design!

New cupcake design this year!  This was a super adorable yet super wiggly little boy but still turned out okay!

Monster High skull!

Purple flower – oldie but goodie!

Another oldie but goodie that’s always been popular with the boys!

My mom painted all day Thursday! My boys and I went with her in the AM to show her the ropes of the new fair and then I got to enjoy the fair with the kids too!

Quick stop in the poultry barn for a little inspiration….

Toby petting a miniature horse – they have an AWESOME free petting zoo complete with monkeys, a kangaroo and camel!

Petting the sheep!

 Friday through Sunday it was back to work for me! Here are a few paintings from rest of the fair…

I always love to paint my arm at the fair.  This one was inspired by a design on my shirt.

One stroke ice cream cone on my leg

I entered some art in the fair this year! Here’s one of my acrylic paintings on display.

Another arm painting

Hummingbird arm design
Cheek art!

My arm on the last day…

Got to paint a logo on the woman at the Lions Club booth! 🙂

One stroke rose cheek art

Vikings logo

First attempt at a “mini muzzle” style cat!

Horse cheek art – always popular at the fair!

Double dip flower eye design

My owl this year

Got to paint the fair’s mascot “Tippy the Cow” on a member of the fair board of directors! 😉

Painting my own leg!

 Many thanks to the Carver County Fair for welcoming me this year!  Thanks so much to all of the wonderful people who stopped by to get painted…I hope to be a new annual tradition for your families for years to come!  And last but not least, thank you to my mom for manning the booth on Thursday, and my fabulous husband for being so supportive and playing “mister Mom” for a weekend!

My wonderful husband who came by to help me load up my booth the last day of the fair!

Posted on — Leave a comment

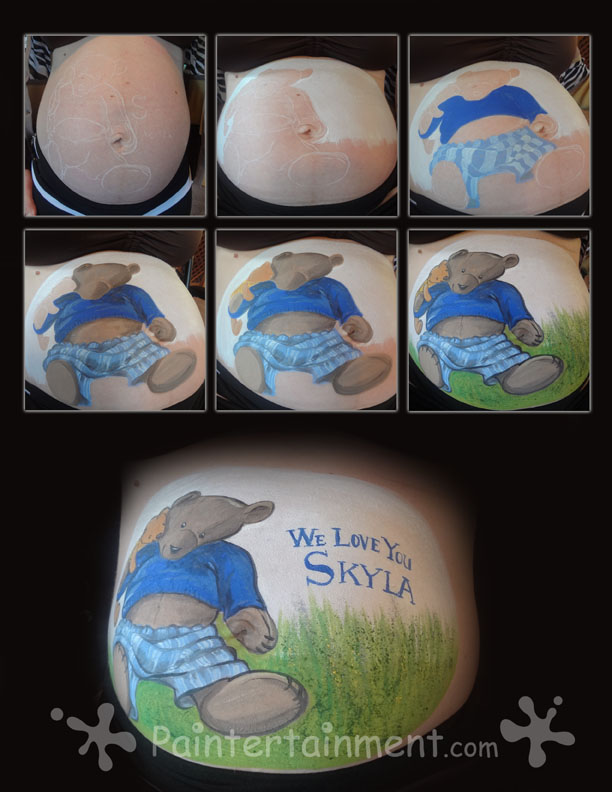
My Latest Belly Painting: “You Are My I Love You”

I had the honor of painting another baby bump this weekend! 

Such a beautiful Momma!!

The image chosen came from this adorable book, “You Are My I Love You.”  I ordered a mini version on Amazon so I could read the story and see some more images…very sweet book if you haven’t seen it!

I thought I’d utilize my front door which I painted with chalkboard paint last fall…

Here are the tools and supplies I used.  For belly paintings I like to use this round tray lined with a towel.  It has nice, tall sides for me to easily carry my kit around without dropping things!  I get out only the colors I know I’ll need since we work out the design in detail before we begin.  

You can see my Photoshopped rendering of the belly design above, which I use for reference, but mostly to nail down the design ahead of time with the mom. 

Here are some progress shots!  I start with a white makeup pencil while mom stands, and then have her sit while I paint, so that the design isn’t distorted later when she stands up.  You can see below how much bellies change shape standing vs sitting by comparing the 1st and 2nd shots below. All the paints were Kryolan, except for the white which was Wolfe.

 I used a combination of sponge and brush to lay down the white background, and did the whole painting with three different sizes of Wolfe round brushes (#1, #4, and #8.), except for the stripes on the bear’s shorts where I used a small flat brush.  I added some texture to the grassy field using my black pore stipple sponge and that worked great! 


Are they not the cutest couple ever?!?! 

Thank you so much for letting me paint your beautiful bump!!

If you’re thinking about having a baby bump painting, you can find out more on my belly FAQ page!

Posted on — 4 Comments

Final Farewell to the Dakota County Fair!

It is with a heavy heart that I must say goodbye to my faithful customers at the Dakota County Fair this year, after spending the last 15 summers painting there!  While I am excited for my new ventures this summer, I am most saddened by the fact that I was not able to let everyone know last summer that it was my last year, as I myself didn’t even know at that point.  So, in an effort to offer an explanation to my customers and bid them a fond farewell, I am doing this blog post!

Over my past 15 years painting at the fair, many times there was at least one other face painter who would show up in one of the commercial exhibitors’ as a freebie…meaning companies would hire a face painter by the hour (or get volunteers) to paint kids for free as their way of drawing people into their booth (representing a completely unrelated business).  When this happened, I would simply check with the folks in the fair office to see if they were “legal,” and they have always taken care of it right away if they weren’t.  As vendors, we are all required to list every item that we have available at our booth in our contract, whether it is for sale or free, and not everyone necessarily complied.  While a huge state fair may be able to support multiple face painters, a county fair just cannot.  For my first 14 years the fair authorities have been totally understanding and wonderful at enforcing this.  Of course, they’ve added temporary tattoos and henna since I started the fair, and I’ve enjoyed working with these other vendors too! There are plenty of customers to go around for all the different types of “body art,” but it just is not fair to anyone to have multiples of the exact same offering.

In 2012 a face painter was allowed into the fair as another commercial vendor’s “freebie,” and for whatever reason, after my repeated attempts to warn them of the dangers of unsafe paints and my inquiries as to whether they had listed this in their contract and ensured it was safe, the fair authorities simply did nothing, or at least never responded to me either way. Now being that they never answered my questions, I’m not sure if this painter was listed in the commercial exhibitor’s contract or not.  They could have been documented and following the fair rules and the fair simply looked the other way, not concerned at how they were affecting my business. But by allowing them to stay and continue painting for the entire week, they were basically letting every commercial exhibitor know that it was okay to bring in free face painters to draw in people to their booth, opening the doors wide to unlimited free face painters in the future. And let’s face it, face painting does bring in a lot of people so I can see why other vendors would love to use it to get people into their booth!

Before I go on, I must make something very clear. Keeping other “free” painters out of the fair was NOT solely for the purpose of ensuring that I make ALL the money.  Of course that is one factor…if everyone were to offer free face painting, I simply would be run out of business.  I pay close to $500 to be at the fair for a week between booth fees, parking, entrance fees, supplies, and liability insurance, not counting the gas I guzzle driving 3 hours a day to get there and back home.  The unfairness is pretty obvious to people in this regard.  It would be like a gym opening up an office right next door to a flower shop, and then offering free flowers as a way to get people to come into their gym.  They surely could offer literally anything else for free that doesn’t eat away at their neighbor’s business.  But of course the flower shop is stuck…they can’t just turn around and sell something else the next day.  Just really tactless. 

The biggest reason besides sheer numbers (which I know I can’t deny…a business must make some profit to exist and I am already teetering on the line of just breaking even), is my company’s reputation and liability.

Reputation My company‘s reputation for top notch quality is something I have spent nearly 18 years building up.  People come back year after year for my face painting at the fair.  Every year I have painted teenagers who still remember me painting them as toddlers. (boy that makes me feel old!)  A reputation for excellence is not something that you can buy or achieve overnight, yet it can be quickly broken down in the wrong environment.  Yes, those teenagers know exactly where to come in Building 22 for an awesome face painting each year at the fair.  But as new families and younger kids come in each year and are snagged by a free painter before they reach me, other new families see them walking around the fair with really poorly done face paintings.  Then they walk by my booth and naturally think, “oh, that must be where they had their face painted.”  And there’s a blow to my reputation for quality, and a guarantee for it to continue to erode year after year. 

Liability and the Safety of my Customers
The average customer has no idea of the dangers of inexperienced face painters.  I know if I weren’t so steeped in knowledge of the business and the products themselves, I too would think, “well they are here painting for the general public…surely they know what they are doing!”  I am shocked at how many times I have seen people painting at events with dangerous products.  Inexperienced face painters, most often seen where face painting is being offered for free, often use acrylic paints, craft paints, or tempera paints, none of which are safe for use on skin.  I even know of other “professionals” who add tempera paint to their “real” face paints to stretch them farther. The words “non-toxic” mean nothing on a jar of paint when it comes to putting it on your skin!!  Parents, please read this previous blog post to educate yourselves further regarding the dangers of “non-toxic” paints, and be an advocate for your child’s safety.  And if you are not sure, don’t be afraid to ask the painter if they are using paints and glitters that are FDA approved for cosmetic use. If they reply, “oh, it’s non-toxic, I have been using it for years with no problem,” there is a huge red flag!!
I ONLY use high quality, professional paints and glitters, FDA approved for cosmetic use.  Glitters too can be very dangerous if they are using metallic glitters found at craft stores.  These glitters can scratch a child’s cornea and cause serious damage. 

So now that I have explained some of the dangers, you can see where the liability comes in.  If someone comes to the fair and gets their child’s face painted for free, and that child has a severe reaction or injury, they will call the fair to find out who their face painter is to point blame.  And where will their research point them to?  The face painter who has followed the rules and registered their product with the fair in their contract….Paintertainment.  I simply cannot in good conscience support an organization that is not showing regard for the safety of my customers or respect for my business in general.

Ever Shrinking Margins
Now the money thing does come into play still as everyone knows the purpose of a business is to make a profit.  But with the cost to be in the fair going up every year, and my total sales remaining pretty much the same every year for the past 15 years, an inability to afford being at the fair was bound to happen eventually.  This whole free face painter thing just put it into fast forward, shoving me out the door before I was quite ready or prepared.

For the past few years I have been just teetering on the line of making some profit, getting so close to a break-even point, that I just can’t afford to have anything else eating away at my business or threatening me with lawsuits.  I’d love to be able to hire artists who live closer to the fair to keep it going, saving me the time and money of driving from Mound to Farmington and back each day.  But the profit margin is so small now that there just isn’t any extra income to be able to pay people to man the booth.  And so, as you can see, I am stuck.

My Final Farewell and Thank You’s!

Newspaper article announcing
our new booth in 1998

As I said, I really wish I could have done something extra special for my last year, had I known it was coming so quickly!  I did put hundreds of dollars into re-designing and updating my booth last year to help commemorate my 15th year.  But I would have loved the opportunity to have personally thanked each and every one of you one last time as I painted your children last summer!  So, I am sad to have had to leave the fair in such an abrupt manner, and just want you all to know how much I have enjoyed seeing and painting your faces these past 15 years! I have truly appreciated your support year after year.

Me (left) with my siblings
at the fair as a kid

There will always be a special place in my heart for the Dakota County Fair! I have attended this fair EVERY year since my BIRTH!  I have entered countless pieces of art in the art show and still have a box full of ribbons from kindergarten through adulthood.  I have tons of happy memories of visiting the fair with my family as a kid, collecting freebies in the commercial buildings, and Dad treating us each to a sucker at the heavenly smelling booth “Lollies by Lee.”  It was where Paintertainment began, and where I returned each summer even after getting married and moving away to Ohio for 4 years.  It was a family labor of love, as my dad built the first booth that I shared with my caricature artist sister, where my brother worked as a cashier, and where my mom has helped keep the booth running as my face painting partner for the last 9 of those years.  It is where I spent several summer date nights with my boyfriend, now husband of almost 14 years, and where we now take our own two little boys for summer fun!

So, I leave with no hard feelings towards the fair as I know that all good things must come to an end.  If you are a commercial exhibitor and would like to hire a legitimate, insured, safe and quality face painter as a freebie for your booth guests, feel free to contact me!

I am excited to embark on a new adventure this year, painting faces at the Carver County Fair in Waconia, much closer to where I now live.  If you’re up for the drive, come on out and visit me in the commercial building!  And if you live in Carver County and are regular attenders of the Carver County Fair, I hope to see YOU this year and start a new annual tradition for your family!!

Posted on — Leave a comment

Paintertainment How-To: Japanese Beetle!

Hello my painty friends! Today I put together a new step-by-step of a Japanese Beetle for you.

When we moved to our current home a few years ago, I saw them in the yard and thought they were so pretty, I took close-up photos of them.  And then I learned that they were thriving because they were feasting on my roses.  Arrgh!  Well, while we have been spraying the roses to keep them away this year, I still think they are kinda pretty.  So I painted one on my leg.  Here’s what I did….

1) Paint the body with Kryolan Metallic Copper.
2) Add the green…I used TAG Pearl Green.
3) Add some shading to the shell.  I used a watered down Kryolan black with a #4 brush.
4) Outline the body with Wolfe black and a #1 round brush.
5) Begin adding the legs and antennae with Wolfe black & #1 round brush.
6) Finish off the legs. I also added some highlights to the green parts with Kryolan metallic gold.
7) Use a dry, fine rake brush with Wolfe white to add the fine hairs on the legs and all around the back.
8) Now block out the white hairs on the back end that shouldn’t be there with your Wolfe black to form the spotted white pattern around the back.
9) Brighten up the white “spots” and add highlights with Wolfe white and your #1 round brush.
10) Finish off with a shadow.  I use a watered down Kryolan black.

I like to use Kryolan black for the shading and shadows underneath because I feel that it behaves more like a watercolor paint, allowing me to blend it and have transparency.  Wolfe is just SO nice and solid black, and super bright white and I simply must have both brands in my kit! 😉


Posted on — Leave a comment

Rita Daisies!

Cheek art on my “GramRita,” done about 10 yrs ago

If you follow me on Facebook you already saw these photos of my gramma Rita, who passed away last week.  She used to visit my booth at the county fair and would always let me paint her!! 

So, today I thought that I would paint daisies in her honor!  Her middle name was Daisy, and they were of course her favorite flower!

My original intent was to do a step-by-step of just a single daisy….

 …but then I added a little bud.  And then thought I’d add another daisy from a different angle, with another bud.  And then thought I’d add a sky blue background with curlies and swirlies and dots and sparkly bursts.  And then I realized my boys were done with their naps and I had to start some dinner.  Aah, well, I think I went just crazy enough with it in the end!  Here are the steps of the whole design…

I didn’t do anything fancy with this one….no stencils, one strokes, or fancy brushes.  Just used two round Wolfe brushes (#1 and #4), Kryolan Aquacolor paints for the colors and Wolfe Hydrocolor paints for the black and white!

And since I’m showing some flowers, I’ll include my tried and true hibiscus how-to that I posted last week on Facebook as well…another one done “au naturale” with just simple brushes and paint!

Posted on — Leave a comment

New Business Starter Kit Now Available!

We have an all new Business Starter Kit available now in the shop!  I have totally re-vamped the old kit and am really excited to introduce the new product selection worth over $150 at a special discounted price of $125.  You save over $21.00! 

The kit comes with all of the essentials you need to get your professional face painting business up and running.  You will receive 8 Paradise Makeup AQ colors in the large 1.5 ounce professional size.  You’ll get great line work out of the Wolfe black and white paint that comes in the kit as well.  The three sizes of Wolfe round brushes are great for main color areas, larger areas, and fine outlines.  You’ll also get a taste of the one stroke technique with a genuine TAG one stroke brush and TAG rainbow cake!  The round makeup sponge and round foam daubers are great for large color areas and will also come in very handy with our two most popular BAM stencils, the swirls with tiny hearts and leopard print!  Top it all off with some FDA approved cosmetic glitter in pink, blue and white from Amerikan Body Art. Finally, you’ll receive a Loew-Cornell brush well, which functions as both a storage container to keep your brushes in tip top shape, and a rinse water container!

Here is a list with links to each of the items included in the kit:

I am confident that you will love all of the products in this kit, and they will give you a great taste of the professional products available!

Posted on — Leave a comment

New Package Deal: “Ultimate Red, White & Blue Package!”

Memorial day is just around the corner, and 4th of July will be here before you know it!  That’s why we have just put together this special “Ultimate Red, White & Blue Package Deal!” 

Ultimate Red White and Blue Package Deal

For just $39.99, you get a TAG red, white & blue pearl one-stroke cake, three BAM star pattern stencils, a package of 45 star shaped acrylic rhinestones, a bottle each of Amerikan Body Art cosmetic glitter in red, white, and blue, a tube of Amerikan Body Art Body Glue to adhere them! You save $4.25 versus purchasing everything separately.  Order today and you’ll have it before Memorial day!

And don’t forget, we still have our new BAM Stencil “Patriot Package,” which includes 5 awesome stencils for your patriotic parties for $18.00, saving you $2.00!

BAM Stencil Patriot Package!