Posted on Leave a comment

Step-by-Step: Googly Ghost

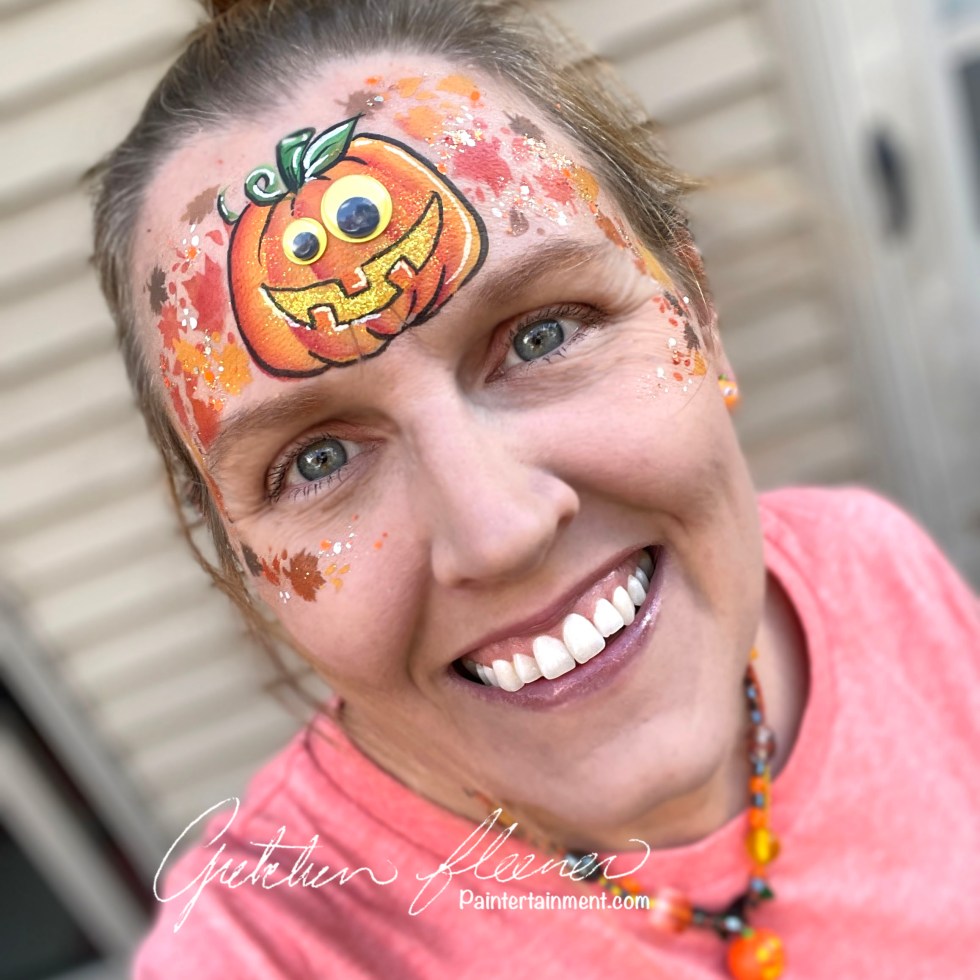
Let’s have some more fun with googly eyes!!

Want to offer some googly eyes to your designs but don’t have a lot of them on hand? You can make them stretch twice as far by making your characters WINK! 😉

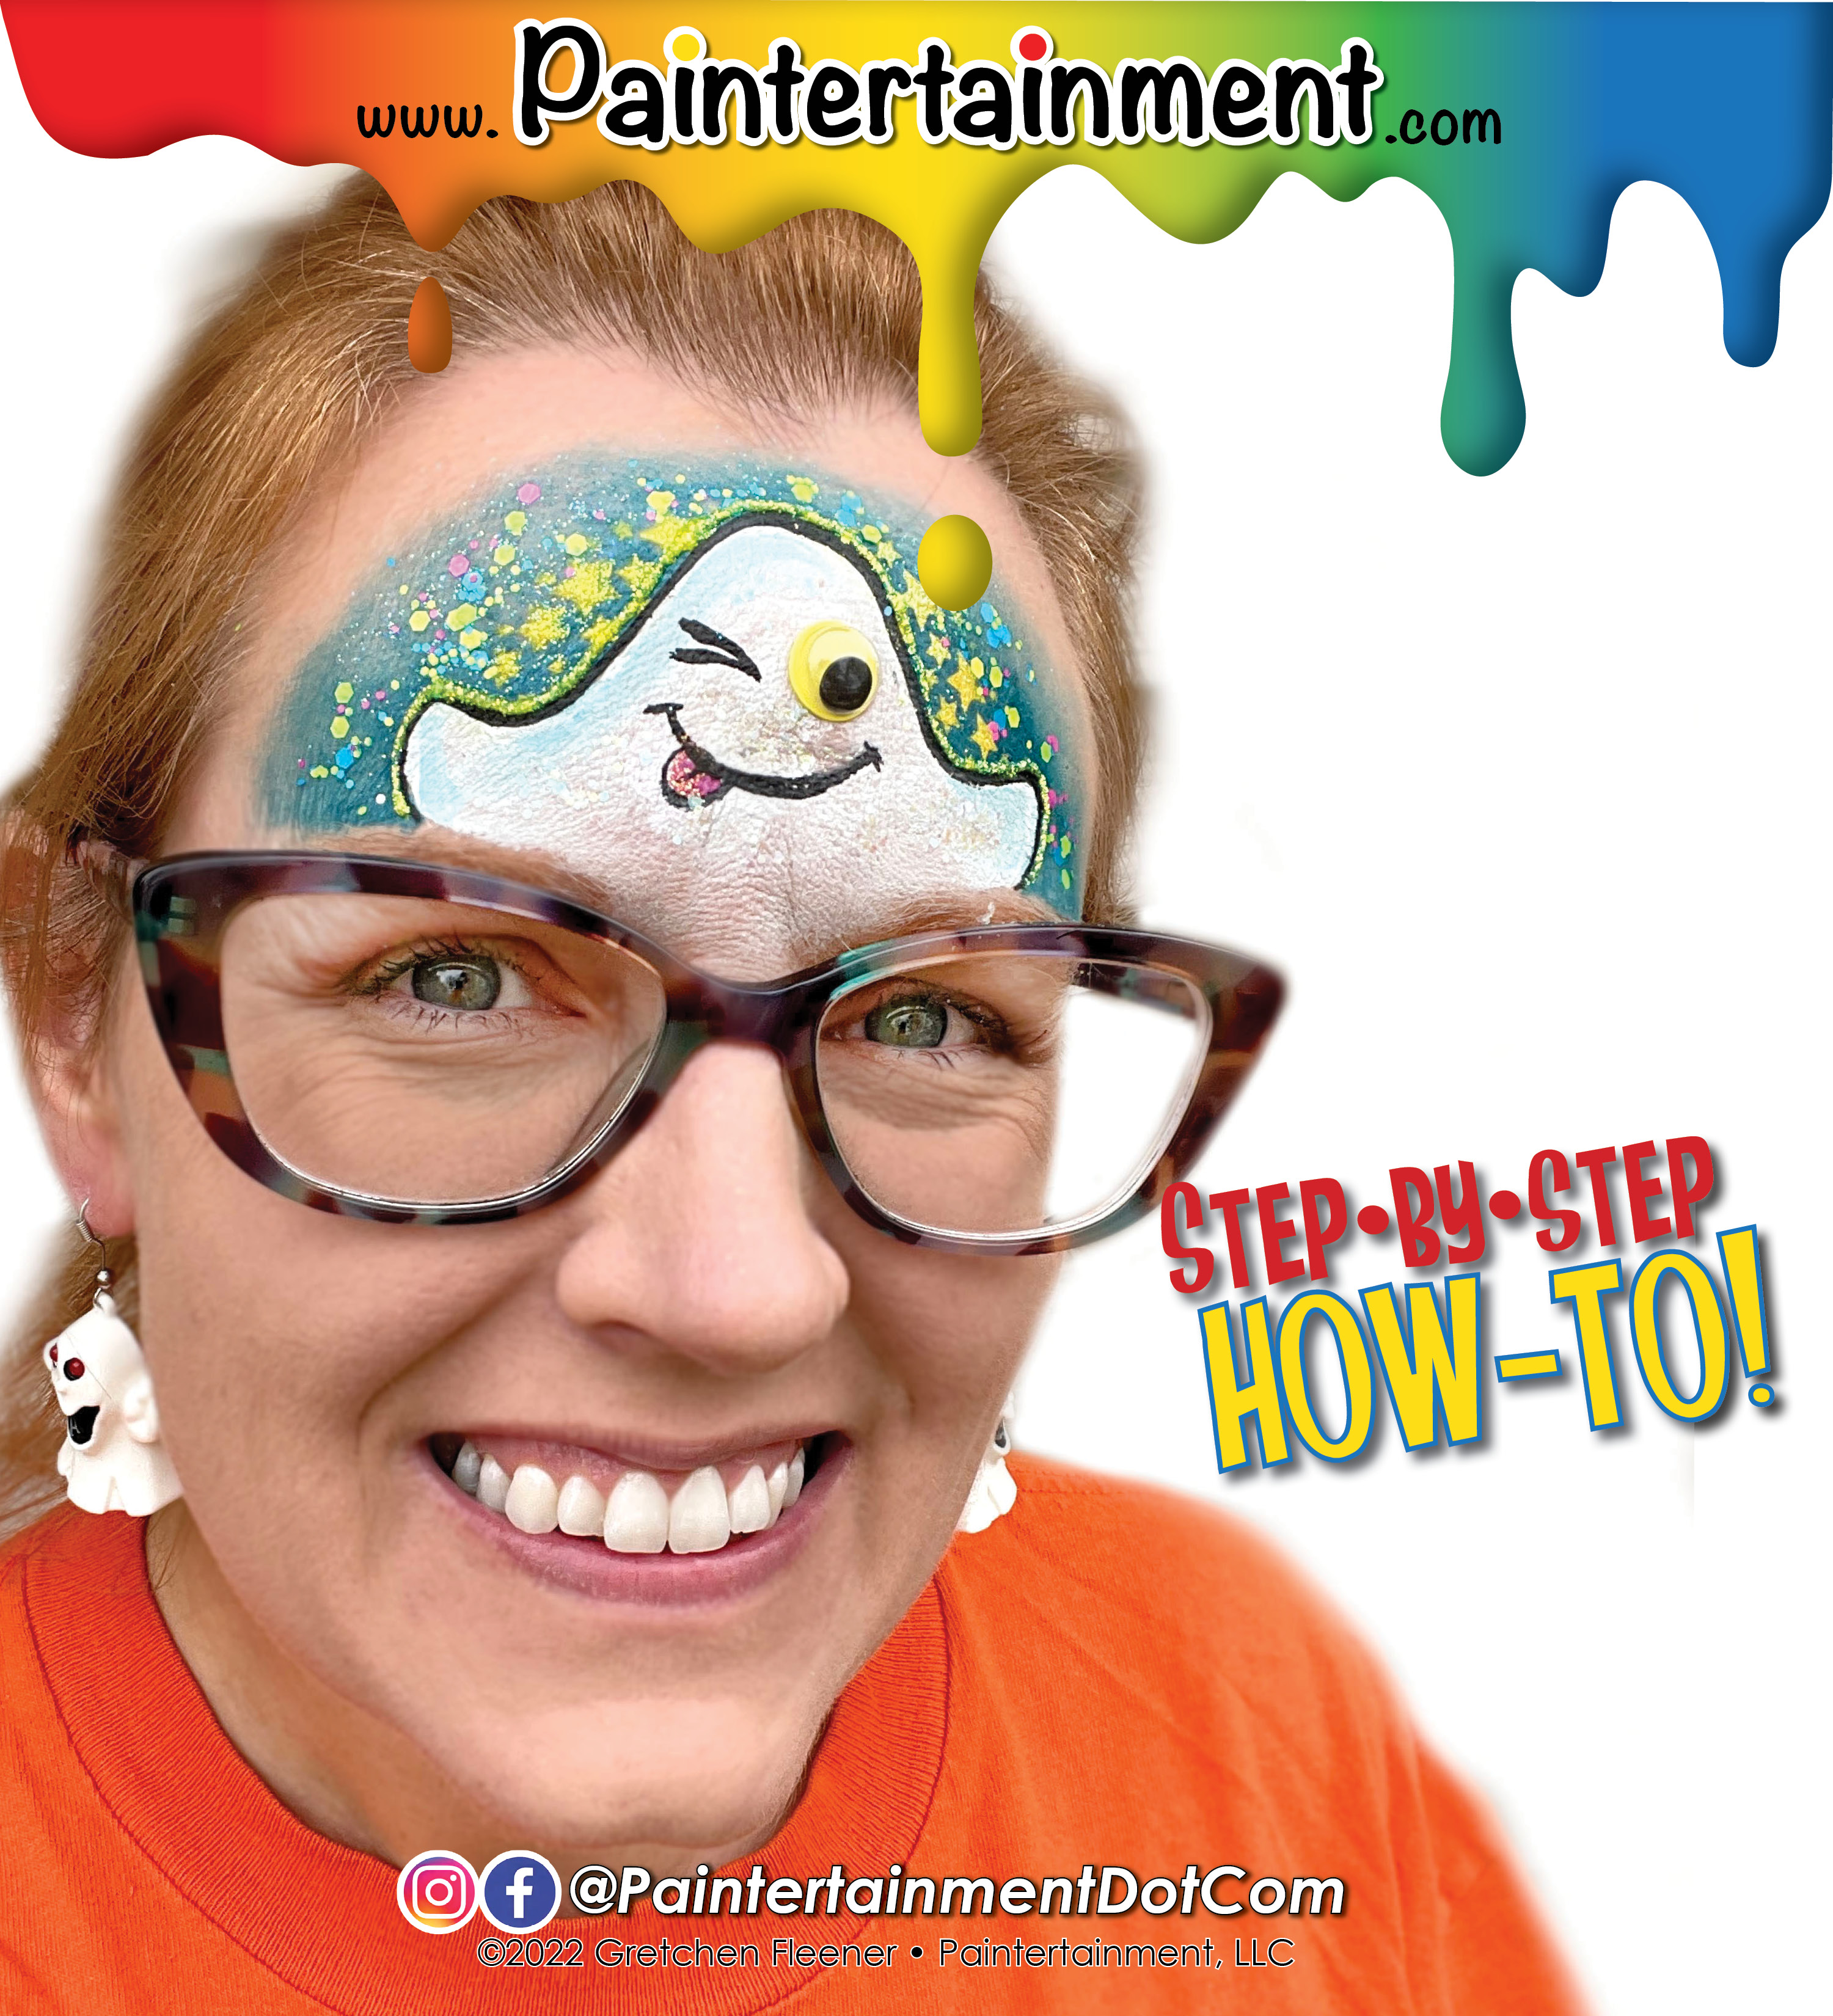
This little ghost is SUPER simple and only requires ONE googly eye!

Step 1:

Using a round brush loaded with your favorite blue (I’m using FAB Shimmery snow petrol!), outline the curves of your ghost, and then paint around that for a background.

Step 2:

Fade the edges of your blue background. I love to use my Cameleon large blending brush for this!

Step 3:

Add some stars! I’m using my Ooh! Star Flip stencil and a finger dauber loaded up with yellow. First I lay down the stencil and use a makeup remover wipe to wipe away the blue, then apply the yellow paint, and finally tap on some yellow glitter before removing the stencil. This gives me crisp, clear, bright yellow stars that are glittery only ON the stars!

Step 4:

Fill in the ghost with white. I’m using Wolfe white and a round brush. Add a little dimension with some light blue if you wish!

Step 5:

Clean away a spot where your google eye will go. I use mini daubers to do this but a wipe works too, or a clean brush. Using a small round brush loaded with black (I’m using Wolfe black), outline the design and add the mouth and winking eye. Add a little tongue if you like!

Step 6:

Adhere one googly eye with Pros-Aide II (it is easier to remove than the original Pros-Aide, which I reserve for glitter tattoos), and finish it off with some chunky glitter! I used Vivid Candy Cosmos up in the sky, and Amerikan Body Art Biosphere on the ghost.

  • Vivid Gleam Glitter Cream – 30g Jars
    Vivid Gleam Glitter Cream – 30g Jars
    $14.99
  • Ooh! Star Flip
    Ooh! Star Flip
    $5.00
  • Wolfe Hydrocolor Makeup 45 gram
    Wolfe Hydrocolor Makeup 45 gram
    $11.00
  • Neon Google Eyes - 160 pieces
    Neon Google Eyes – 160 pieces
    $2.00
  • Pros-Aide II
    Pros-Aide II
    $14.70$74.50
  • Amerikan Body Art Glitter Cremes
    Amerikan Body Art Glitter Cremes
    $10.99
  • Amerikan Body Art Loose Cosmetic Glitter
    Amerikan Body Art Loose Cosmetic Glitter
    $4.00
  • FAB Shimmer 45g Makeup
    FAB Shimmer 45g Makeup
    $13.00
Posted on Leave a comment

Step by Step: Google Eye Bat

I’ve been on a google eye kick lately! Here’s a fun bat design that uses “human-style” google eyes! These eyes have fun colored irises, as opposed to your typical google eyes with just a black “pupil.”

Step 1:

Load a 3/4″ angled or flat brush with a pink & purple split cake. I pulled the neon pink & purple from my Superior Sunset base blender. With purple on top, paint the outlines of the wings.

Step 2:

Use a fluffy brush to blend the pink down over the eyes, and feather the purple. I love using my Cameleon large blending brush for this!

Step 3:

Paint some pink for the insides of the ears. I left a couple little tears in the edges of his ears!

Step 4:

Add a little texture to the inside of the wings. I used my mini stencil kabuki brush and purple with a HAS 5701 stencil (from the “Alive” set) to create a little texture, and wrapped it around and under my eyes a bit.

Step 5:

Using your favorite round brush and black, paint the bat’s head, tuft of hair, and wings.

Step 6:

Using a small round black loaded with white, add a smile, fangs and highlights. I also used a halftone stencil to fade the head onto the bridge of my nose. Finish it off with google eyes applied with Pros-Aide II, and some fun chunky glitter! I used “Valley Girl” Pixie Paint!

  • Short Kabuki Stencil Brush
    Short Kabuki Stencil Brush
    $4.99
  • Human Style Google Eyes - 90 pc
    Human Style Google Eyes – 90 pc
    $3.99
  • Pros-Aide II
    Pros-Aide II
    $14.70$74.50
  • Amerikan Body Art Pixie Paint
    Amerikan Body Art Pixie Paint
    $7.50
  • HAS Alive Set
    HAS Alive Set
    $22.00
  • Wolfe Hydrocolor Makeup 90 gram
    Wolfe Hydrocolor Makeup 90 gram
    $19.00
Posted on Leave a comment

Step by Step: Google Eye Jack-o-Lantern

It’s OCTOBER! We face painters LOVE October for obvious reasons! I’ve been getting my usual flood of requests for painters at events this month and am doing my best to fill them, but if you happen to be looking for a face painter for YOUR event, make sure to plan ahead! We start booking Halloween events up to a YEAR in advance! So, if you think you may be having a Halloween party even next year, make a note in your calendar at least as early as June if you’d like to book the BEST before their schedules book up!

Now that my public service announcement is aside, I thought I’d share this fun and simple pumpkin design with you! I LOVE to play with google eyes, and they look especially fun when you mismatch the colors and/or sizes.

Step 1:

Load up a 1/2″ flat brush with a red/orange/yellow split cake. I used my TAG Dragon cake, and only loaded the yellow-to-red section. Paint the curved outer edges of your pumpkin, then repeat the strokes working your way towards the center. Make sure that you are consistent with which side is your shaded side (darker red) and lighter side (yellow) to get the best dimensional effect! I am assuming my light is coming from the upper right side here.

Step 2:

Use the lighter yellow corner of your brush to fill in the center area of the pumpkin.

Step 3:

Using a mini kabuki brush and an Ooh! fall leaf wrap stencil, surround your pumpkin with a variety of fall leaves! A mix of yellows, oranges, red and brown add some fun variety.

Step 4:

Load a small round brush with yellow and add a smiley mouth. I like to dab on a little yellow glitter here. Don’t worry about outlining teeth, you’ll whip those out in seconds in the next step!

Step 5:

For the teeth, just load a small 1/4″ flat brush with orange, and paint on three short strokes over the top of your mouth!

Step 6:

Outline the pumpkin with black and add a few highlights. I love Wolfe black and white for all of my outlines and highlights! Use a face wipe, Q-tip or clean dauber to remove paint on a couple spots where the eyes will stick. Apply some Pros-Aide II to these spots, and the back of your google eyes, let dry clear and stick. I use Pros-Aide II for gem clusters (original formula for glitter tattoos) because it is designed to break down easier for removal! Top. it all off with some sparkly Vivid Gleam glitter cream…I used “Trick-or-Treat!”Harvest!”

  • Vivid Gleam Glitter Cream – 30g Jars
    Vivid Gleam Glitter Cream – 30g Jars
    $14.99
  • Ooh! Fall Leaf Wrap
    Ooh! Fall Leaf Wrap
    $5.00
  • Short Kabuki Stencil Brush
    Short Kabuki Stencil Brush
    $4.99
  • Huge Pack of 500 Google Eyes
    Huge Pack of 500 Google Eyes
    $9.99
  • Human Style Google Eyes - 90 pc
    Human Style Google Eyes – 90 pc
    $3.99
  • Neon Google Eyes - 160 pieces
    Neon Google Eyes – 160 pieces
    $2.00
  • Pros-Aide II
    Pros-Aide II
    $14.70$74.50