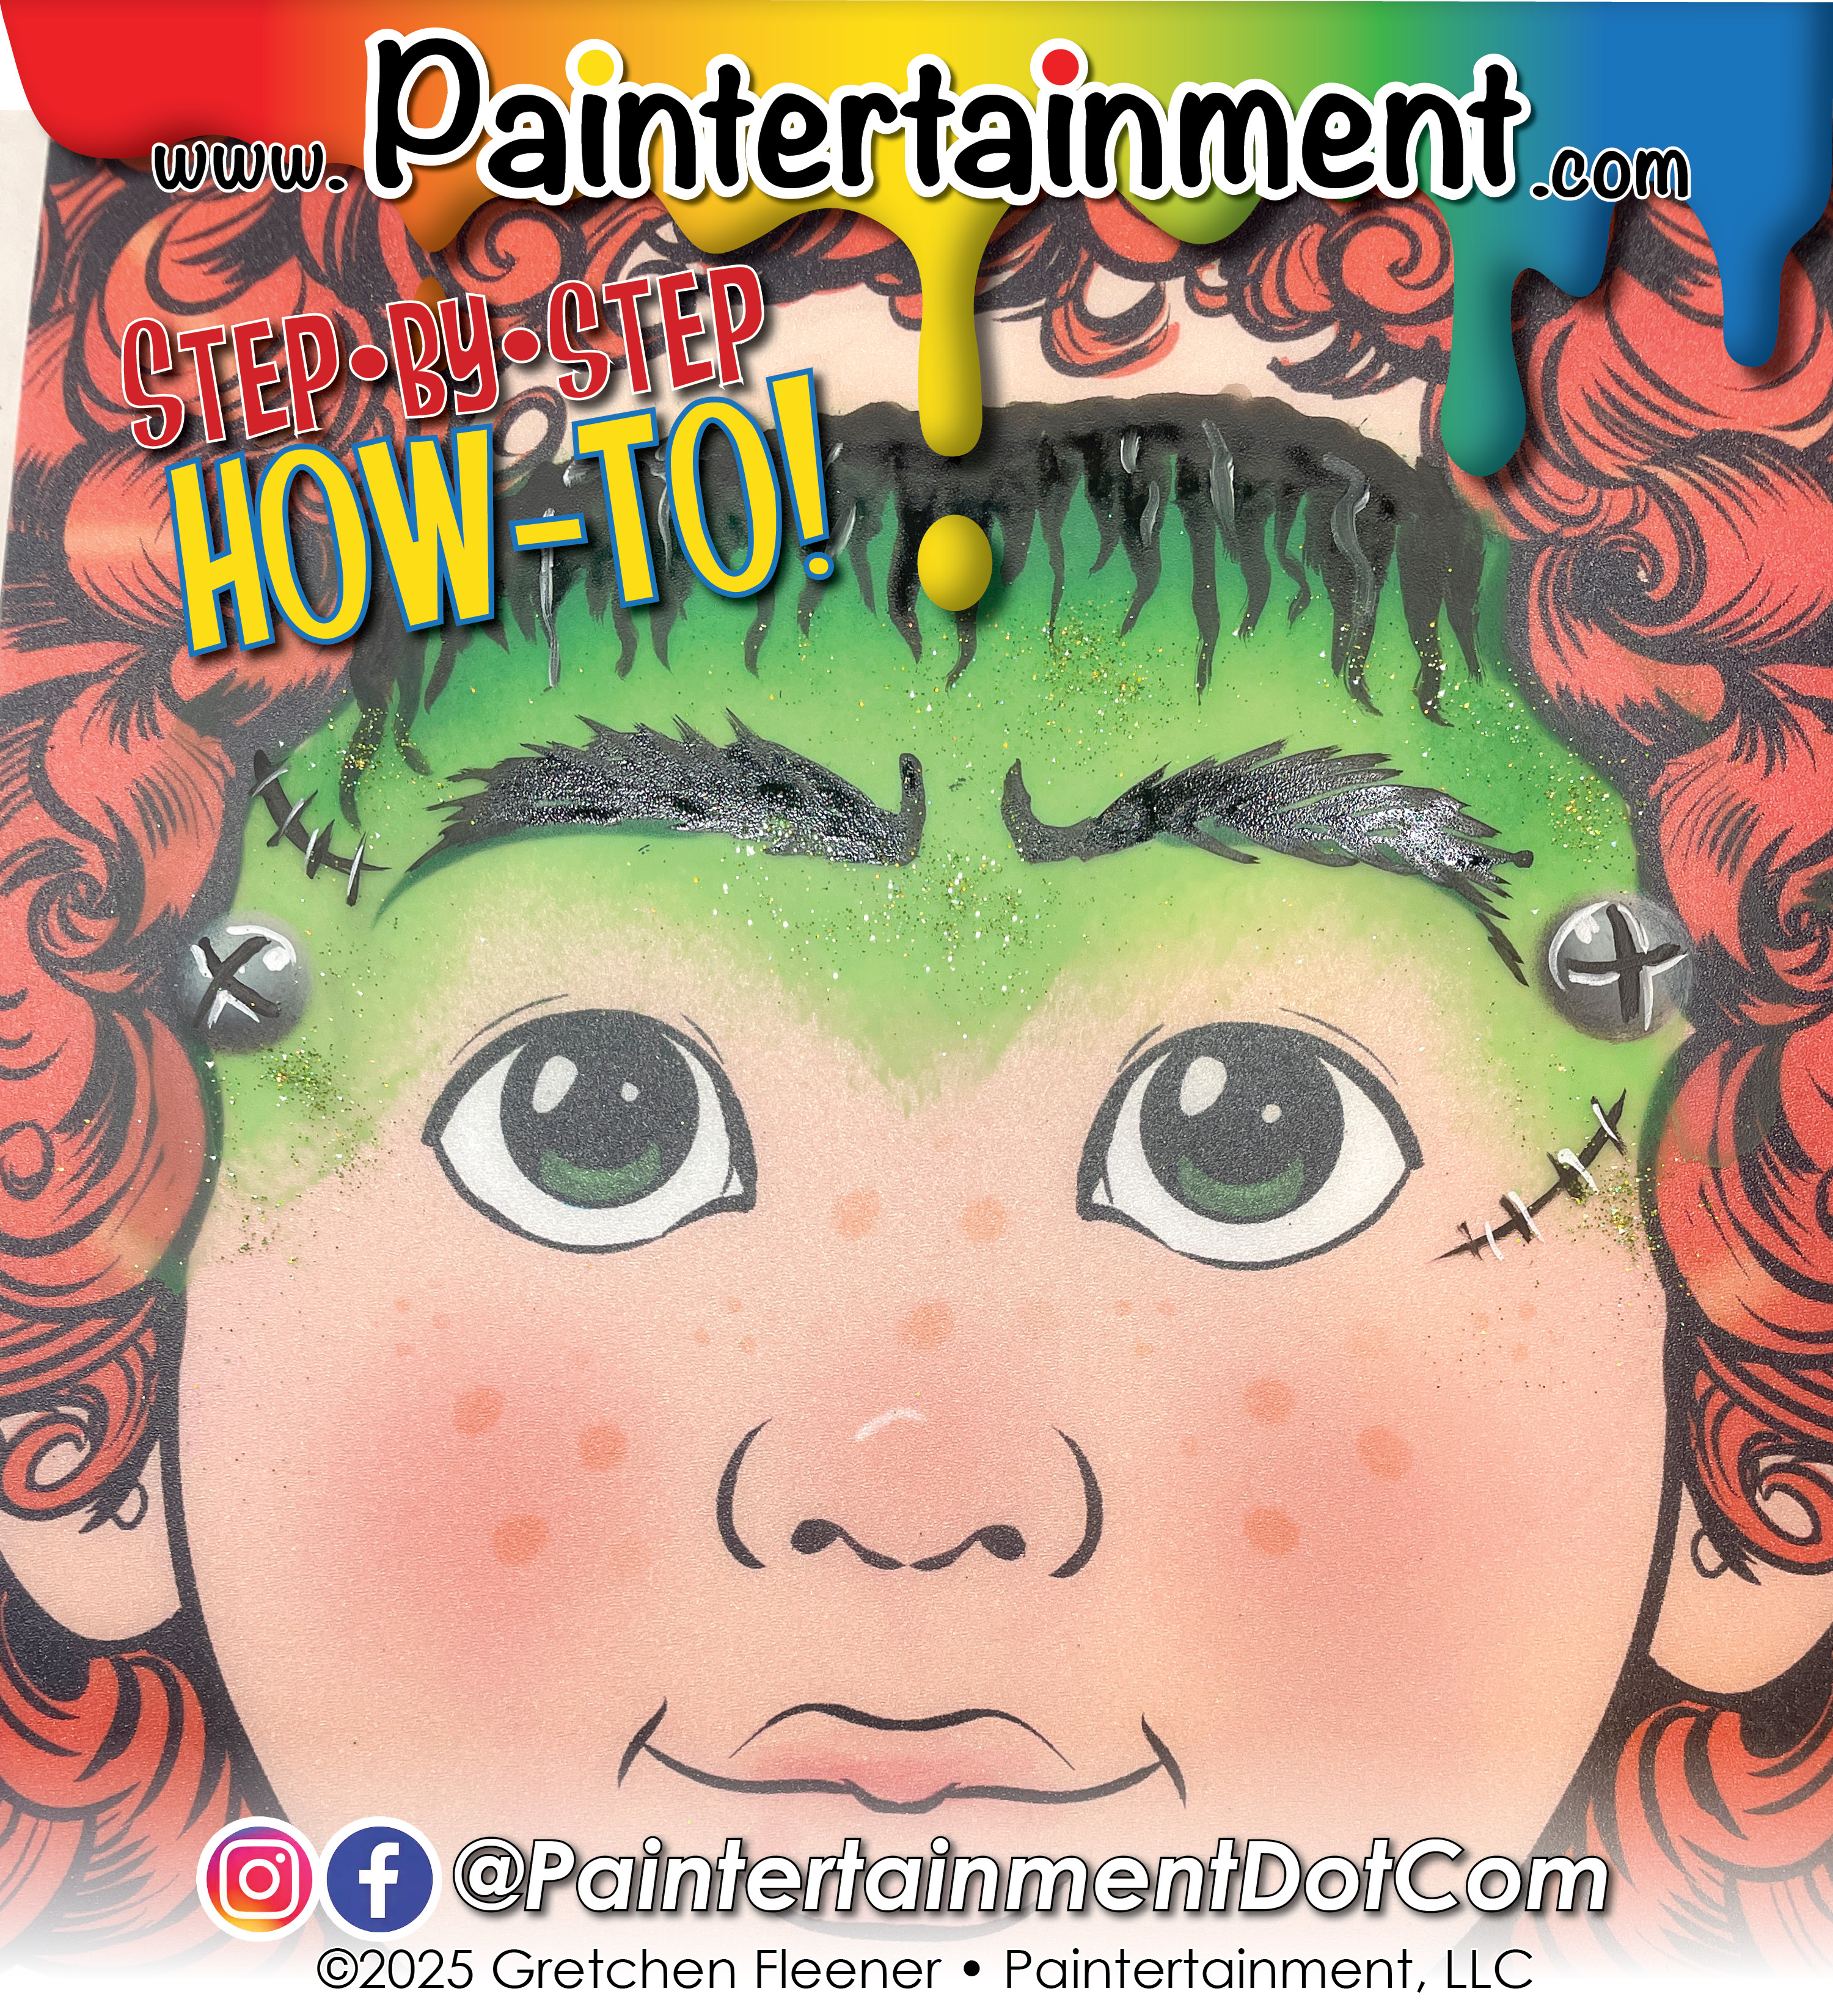
Happy Tuesday! Today’s tip is for iPhone users who find the need to trim their photos from the background, whether it’s to create design menus, banners, business cards or other graphics for your business. I’m very proficient at Photoshop so I’ve always trimmed photos myself on my computer, however, my son showed me this awesome trick that’ll instantly trim photos for you! Check it out!
Happy Tuesday! This week’s tip might be more for beginners, but could still be worth a watch if you’re an experienced artist who sometimes has trouble with one strokes…today I’ll show you how I load up my flat brushes with a one stroke split cake!
This week I came up with a fun idea for some headband balloons that I have been calling “head huggers!” These are SUPER easy and fast to make, and there are SO many possibilities to mix them up with different characters! I put together a little tutorial, and I can’t wait to see what YOU do to take this idea to the next level! Be sure to share your own creations…we love to see your work!
Since the standard heart shaped cat prints that so many twisters love to use have been hard to come by lately, I thought I’d try something different! The cat heads I used on my kitty head hugger I purchased on Amazon. They come with cardboard ears and a roll of glue dots. So for parties, what I did was cut apart pieces of the glue dot roll so I had short pieces with two dots each, stuck them in place on the ears, and then when I need to attach them at a gig, I can just peel off the backing and stick them on. I think they look pretty cute, and a great alternative to the heart shaped cats!
So this is quite the blast from the past…last weekend my mom gave me two old photos (yeah, the kind you had to wait to be developed from real film) from my first ever hourly paid gig on my own!
I’m wearing two different outfits because this was a weekend-long gig! My mom has her acrylic paintings printed and published by a company who was then called “Wild Wings,” based in Lake City, Minnesota. Every year they’d hold a “fall festival” at their headquarters where people could come and meet the artists and enjoy food, fun and the gorgeous fall colors of Minnesota!
I believe this would have been 1995 or so, when I had just started painting, because I didn’t have my own set of paints yet. In the bottom right corner of the first picture you can catch a glimpse of my first kit, which my Dad built for me for this gig!
My first face painting job was at an amusement park, which of course being in Minnesota only ran into the fall and then closed for the winter. My boss at this job provided all the makeup we used (Kryolan), so I didn’t have my own kit. I can’t recall if he let me take some of his paint for this job, or if that was the first time I started buying my own paints. The first paints I bought were purchased from a family friend who owned a costume shop at the time, and carried a small assortment of Kryolan makeup.
This little box my Dad built was designed to hold 10 plastic film containers (Yup, the kind that held film canisters those old photos were taken with!), because that was what we had on hand at home that was small and water tight! It has a drawer pull for a handle on one side, and a plexiglas sliding coverI think he did a great job with this kit…I still have it to date! I painted it with the same bright, primary colors that I use in my business branding today!
Back then when I started, we’d stir up our Kryolan paints with water to get them more liquid-y, so these deep pots worked just fine for my cheek art. Today of course I prefer larger cakes that I just activate with water as needed.
Anyway, I thought some of you might get a kick out of this little blast from the past and my humble beginnings! Heck, I’m still in my humble continue-ings if you ask me…I learn new things every day from all of the artists I get to interact with now online, at conventions, classes and jams…my how far our industry has come!
Happy Tuesday everyone! This week I will show you another cheap thrift store find that can be great for storing and organizing your stencils: Visor CD holders!
Not a thrift shopper? Here are some Amazon links to a few holders like the ones I show in this video:
This week’s tip is on the subject of bling clusters…how to store them and how to display them! I’ll share with you my method…please feel free to comment with your own storage and display method! I’m always looking for more ideas!
Well, I just realized my post from LAST week didn’t post! Grrr…well, if you’re ever looking for my Tuesday tips here on my blog and they don’t show up, be sure to swing by our Facebook page as so far that seems to be the only place they regularly work! But for now, here’s lat week’s tip as well!
I made this mini pocket sized kit many years ago, but gave it a facelift this week! I love experimenting with the extremes of how small and portable I can get with things. I’ve had kits as huge as the rolling Fatmax and a guitar case, and have settled so far on something much more practical, but this little kit was a fun experiment!
The case itself is metal covered with duct tape…I probably found it at a thrift store but it’s been over 10 years so I can’t remember! The collapsible water cup has a strong magnet on the back so it can stick to the case itself, or can be left out, but inside has a tiny jar of glitter as well. Yes, I sawed off one of my Bolt brushes to use with the rainbow cake, haha! The round brushes are travel brushes designed for plein air artists, and the paint containers are full watercolor pans (links below) secured with small neodymeum magnets. I cut my own stencils to fit inside, made a mirror-slash-brush holder with duct tape and a plastic mirror.
This is just a fun thing to have on hand, whether you want to surprise kids in a boring waiting room or at a party, or just need a backup in your glove box! How small can YOU go with your kit?
Have you checked out our event page lately? We have a lot going on! Besides teaching at the MAX Convention in St Louis this April, I’ve just posted THREE upcoming jams for March and April! I LOVE jamming and try to host a jam every month in my home. I have hosted 51 jams since I started opening up my home to jamming in 2015! Covid was the only thing that forced me to stop for a while, with everyone working from home in our house!! Now I have one day a week when I can host jams and that’s Tuesday, so for the time being that’s when my jams will be! 😉 HOWEVER, I’ve decided that I couldn’t decide this time and in March I’ll be hosting TWO jams. One for balloons, and another 1 week later for face paint! In April I’ll be hosting a GEM jam where we’ll spend some time making bling clusters!
But there aren’t any jams in my area!
I hear from a lot of artist lamenting that there are no jams in their area. And to this I say, “then make one!” Hosting a jam is not hard. You really just need a time and a place, and a way to get the word out! If you prefer to start small, start with just having one creative friend over to work on projects with. Don’t want to host in your home? Check out your local community rooms. Most libraries have rooms you can book. Many local restaurants and even grocery stores have community rooms! Just be sure to get approval to use glitter or bring your own vacuum!
What do you DO at a jam?
You can make a jam as focused or loose as you like. I’ve been to jams where everyone works on the same things together. I like to keep mine super casual. While I may pick a general theme like face paint, balloons, gems or henna, they are always open to whatever people want to work on…I don’t ever want a twister to feel like they can’t come to a paint jam, or vice versa! Most of the fun is just in hanging out with fellow entertainers and eating pot luck, am I right?! Sometimes as artists in this field, we just need a place to go connect with like minds and practice something we don’t make time to practice when we’re at home.
I have incorporated some other fun topics into jams. One time I did a belly painting jam and invited pregnant moms to be painted which was SO fun! A couple times I’ve invited people to bring their gear and supplies they don’t want anymore and set up a “garage sale” table where we could buy stuff from each other. Another time I did a “photo jam” where I set up a photo backdrop with lighting in the garage and invited some kids over to be painted. We were able to get some nice photos for our websites, menus, etc!
What about the food?
Feeding people doesn’t have to be hard either, but it does help if you jam for a long time! (The time FLIES way too fast at my 6 hour jams!) For my jams I just have everyone bring some sort of food item to share and we do pot luck, which is always fun and easy. I used to just pick up a couple Papa Murphy’s take-n-bake pizzas for my jams, but then ours closed over Covid. Boo! But pot luck is always good. If you host your jam at a local restaurant’s party room or grocery store, people can grab their own food there too which the venue always appreciates! If you’re lucky enough to live in a place with predictable good weather, you can even do an outdoor picnic jam at a local park!
Here’s a photo from my paint jam earlier this week! I may have been painting faces for 27 years, but I LOVE that I learn something new EVERY time I hang out with my artist friends. One of my favorite sayings is, “If you’re the smartest person in the room, then you’re in the wrong room!” We ALL have so much to learn from each other, no matter how long we’ve been painting. If you live within driving distance of Minneapolis/St.Paul MN, join us sometime!! If you don’t, I hope you can either find a jam in your area or host your own!!! I decided when I started hosting these, that even if nobody showed up, I would still just utilize the time to work on whatever I needed to practice. If one person showed up, I had a friend to practice and be creative with! It’s really a win-win!
Today I got the opportunity to paint on the interior for a new Dunkin’ Donuts location! It was a fun job…two windows to do. One has a “now hiring” message and the other “coming soon!” It’ll be a challenge to remove the “coming soon” window next month when they open, being in a tight spot, but hopefully it’ll be warm enough to paint outside by then! This set of windows took me roughly 6 hours to complete, from when I arrived to when I left. Check out the time lapse below!
You must be logged in to post a comment.