Posted on — Leave a comment

Tip Jar Security: How I Secure my “Fish Bowl” Tip Jar

My new tip jar!

I almost never use tip jars.  Well, there was one Christmas gig where we agreed with the client to put out tip jars just because they refused to hire enough artists for the crowd and we worked our hineys off.  Other than that, I only tried using a tip jar once this past week at my county fair.  I do pay per face at the fair and never have had a jar out.  I always get good tips anyway, with no tip jar and no hints of tipping visible.  But, this year I experimented and tried it just for one day.  I had one of those cute plush “Teddy Tank” fish bowls burning a hole in my closet that I had gotten for $5 at Walgreens and had to at least try it!  I don’t know if I’ll use it again or not, as I feel I charge enough already.   But, I get SO swamped at the fair, and being located right by the building entrance, I figured it would be awfully easy for someone to grab the jar off my table and run.  I actually know one painter who was mugged after a face painting job, and have heard multiple stories of others who’s tip jars were stolen, which makes me extra leery.  So, I set out to find a way to secure my jar so that it wouldn’t be an easy target. 

I took photos along the way and thought those of you who have these same fish bowl jars (they seem super popular lately) might find it useful!  This can likely be adapted to any plastic tip jar but here’s what I did with my fish bowl! (you can skip all the rivet/eyelet stuff if you just have a plastic jar!)

Remove the plush piece from the plastic bowl. Cut a small hole in the center of the bottom of the fabric piece of your plush animal.

Slip a rivet through the hole, with the finished side on the right side (outside, furry side) of the fabric.

View of the rivet poking through the inside of the fabric.  Point to it with your henna’d finger…ha!

Use your hammer and rivet tool to secure the rivet in place.   You can buy these large eyelets/rivets at craft stores and they come with the little tool to hammer.

Finished rivet. This now enables you to run a bolt through your fabric, without causing it to run, frey, etc.

Finished rivet

Now drill a small hole in the center of the bottom of your plastic bowl.  I am using my dremmel tool here but you can use a drill bit as well.

Now you need a little hardware.  Get a washer, bolt and nut.  You also need something to secure the jar to.  I happened to find a great bent metal piece that came from a towel rack that hooks over a door.  You could find a metal bar or a piece of wood and drill a hole in it as well.

Reassemble the fish bowl by placing the plush back over the bowl, aligning the eyelet with the hole in the bowl.  Thread the screw through your securing bar/wood/whatever, then through the rivet/eyelet in your fabric and hole in your fish bowl.

Inside view of the fish bowl, with a washer and then bolt threaded on.

Now you have a bar that is securely screwed to the base of your tip jar.  Like I said, this can be a metal bar, a wood piece, or whatever you have on hand.  The point here is to have something that you can then clamp or screw right to your tabletop.            
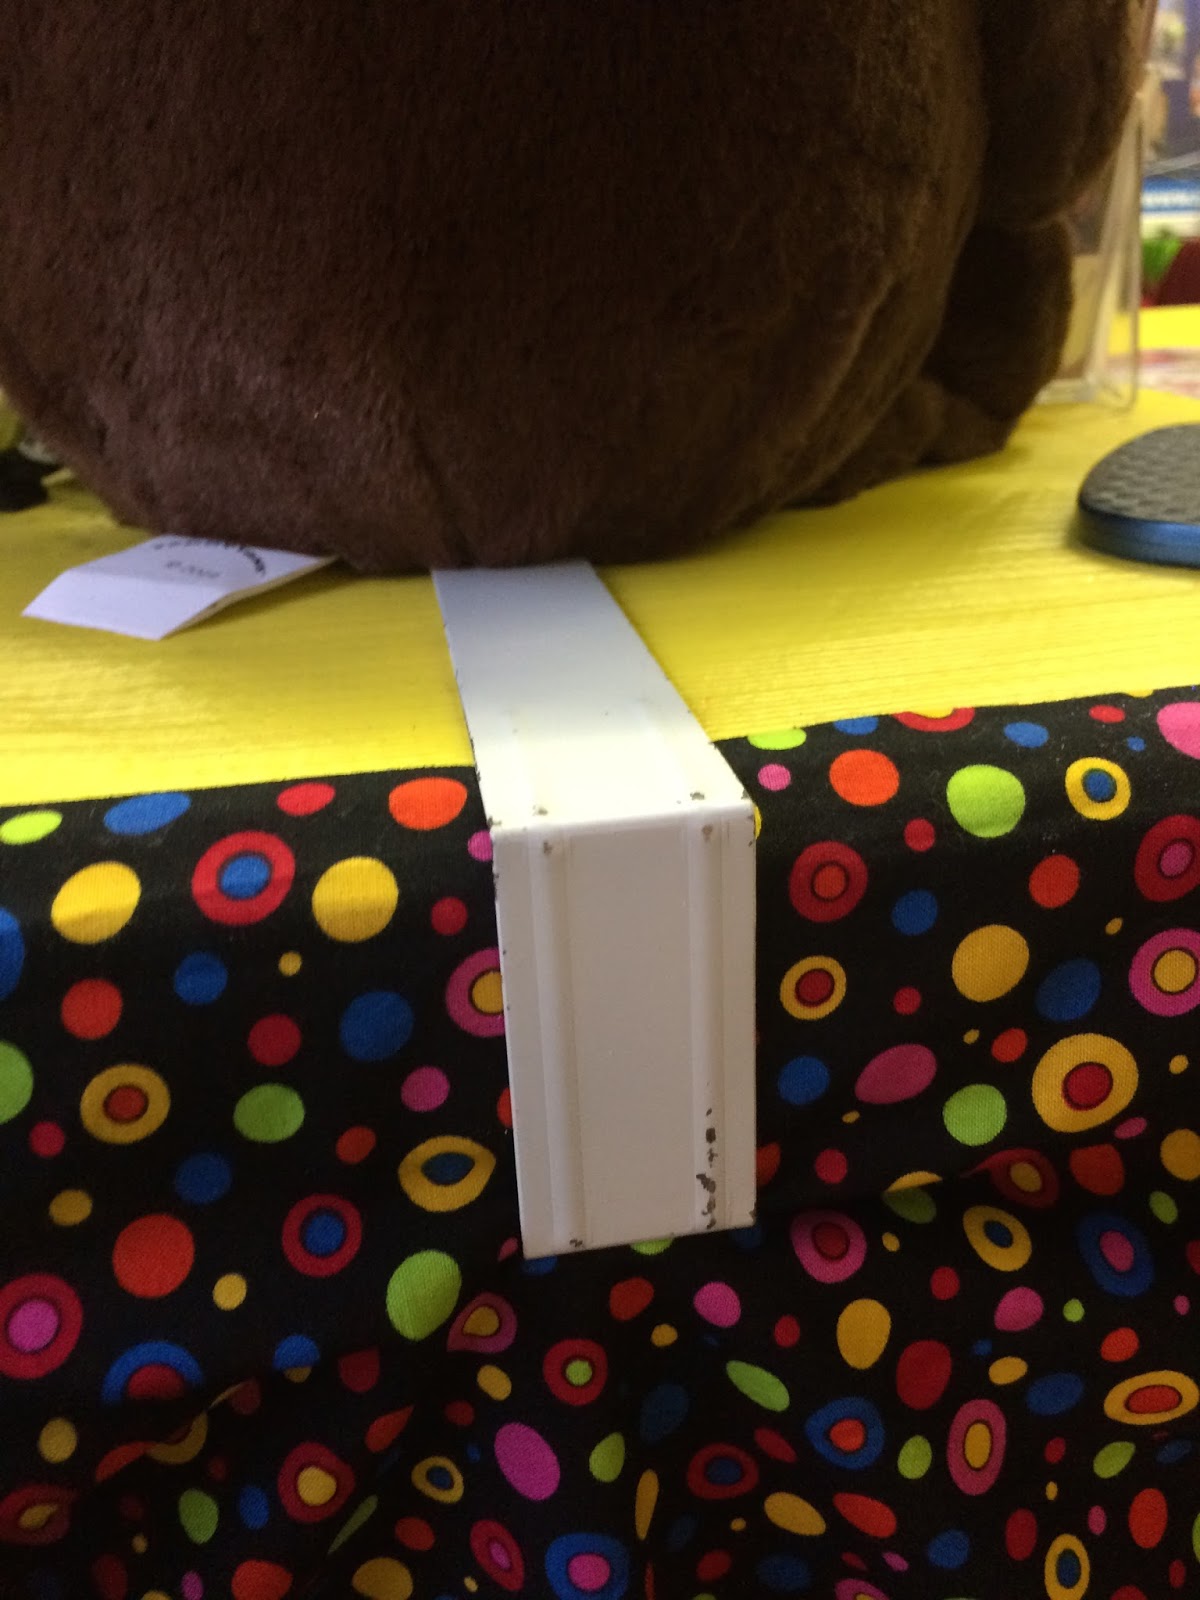
Now I got lucky to find this piece of metal that was already bent like a hook, which fit just right over the back edge of my table!  I then took a large clamp and clamped this bar to the underside of the table, which you can’t even see here as it’s behind my tablecloth.  Even a flat piece though could be clamped down to the table with a simple C-clamp.  Or, screwed into the table if you are okay with drilling a hole in your table.
I like how this looked in the end.  It doesn’t look like my jar is bolted down…it’s just sitting there nicely, but if someone were to try to grab it and run, I would definitely notice and it would not be easy for them to remove it.

I did notice that with this particular tip jar people had no idea how to put tips in.  I just put sticker letters that say “thank you,” as opposed to what some do, “feed me.”  I’m thinking if I ever use it again, I may put a cardboard tube or something in the monkey’s mouth to spread his mouth open just a bit, so that people notice that the money goes in his mouth.  Most of the time people just handed me tips and I stuffed them through the hole in the back.  (Which also made me think I’d like to make some sort of flap to cover the hole in the back for security as well)

I hope this is helpful for some of you, or at the very least gives you some ideas to secure your own tip jar!  Thanks for stopping by, and happy painting! 🙂


Posted on — Leave a comment

New product additions this week…

We have a few new additions to the shop this week!

Our rainbow of Cameleon makeup feels much more complete now, with the addition of Orange Juice, Clover Green and Purdy Purple!  We’ve gotten a nice stash of Pure White back in stock as well.

The assortment of filberts in the shop grew by three! We now carry Cameleon’s small, medium, and large filbert brushes.  These brushes have thick, soft bristles and a short, wood handle. You also may be happy to hear that we now have more of Cameleon’s popular petal brushes in stock again as well.

For our balloon twisting friends, I’ve added an assortment of 646q’s! Sometimes all it takes is an extra HUGE balloon to turn your standard designs into something spectacular!

Still on the way to us is some of Mehron’s white liquid makeup, which I tested out last week and mentioned in my recent post comparing the different white’s available. Stay tuned and happy painting!

Posted on — 3 Comments

White Paint Comparison


I had a really fun day today, hosting a 7 hour jam at my house!! I don’t care how long you’ve been in this business, you can ALWAYS learn something from your fellow artists, no matter how new or veteran they are.  I host a lot of jams and always learn something new!  This time I took advantage of the fact that we had 9 painters in the house with diverse kits, by sampling everyone’s brands of white…

 I painted a quick rainbow strip with my Tag Rainbow Four cake, and then did a line of Wolfe black along the side.  After allowing my base colors to thoroughly dry, I loaded up my brush with various brands of white and painted a stroke of white across everything.

The “1st Coat” picture shows my first pass at the white…these I actually swiped across one way, then back again to get consistent ends.

In the “2nd Coat” picture, I went back over the white with another coat after it had dried.  (Note that after making the graphic, I realized I did NOT actually second-coat the Mehron liquid in the photo.)

I was surprised how most of them became more transparent as soon as they dried.

These sample strokes may not match up to your own work, so keep in mind that there are many factors that affect white’s opacity.  There really is a big difference between taking your first load of white on a new or dry cake, vs a cake that is already moist and has been worked up during a gig.  Also, how dry the paint underneath is plays a huge role.  (or if there’s any paint underneath at all, of course!)  How long it STAYS nice and bright depends on how concentrated the paint was when you put it on, as well as the person wearing it and how much or little they are moving around and stretching their skin.  So, while this is not meant to point to one surefire winner, hopefully it will help to get an idea of where to start in your own search.

I had tried Tag before and wasn’t all that impressed with it, but it seemed to do pretty well here over the other colors.  Global and Cameleon are both pretty good whites as well.  We all know how great Wolfe is…if you can find it anywhere.  I’ve been waiting probably more than 6 months to get more Wolfe white in stock, with no sign of getting any more any time soon. So, we’re all really looking for alternatives! I’d recommend Cameleon, Global or Tag, depending how you work, for linework in white.  (base coats I prefer a glycerine based makeup like Paradise or Kryolan) On another note, if you’re looking for an alternative to Wolfe black, I highly recommend Global‘s strong black!!

One artist had found that she got the best opaque white coverage by adding Mehron’s liquid white makeup to any other brand of white.  (no water, just the liquid makeup mixed with your other whites) This you can see as the final stripe on the bottom of each photo, where I mixed it with Wolfe.  I do like the idea of someone being able to purchase a favorite base white, and then have the option of turning it into an opaque linework white by adding the liquid…

Thanks for stopping by, and happy painting!! 🙂

Posted on — Leave a comment

New Products for June!

Our shop is continuing to expand! Check out these latest additions:

Photo Prop Boards!

The moment I shared my new photo prop boards on Facebook, I was inundated with requests to sell them.  I now sell the digital files, which you can then have printed by VistaPrint.com. You get two boards per file, and they are built to be printed on Vistaprint’s LARGE lawn sign material. (corrugated plastic)  You then cut the two boards apart, and cut out the face hole. Right now they have 40% off all signs and banners! While I’m working on more designs, right now I have three pairs of designs available for purchase at $14.99 per pair:

“Adventure” set: super hero and pirate

“Fantasy” set: fairy and mermaid

“Spring” set: bunny & flower (great for butterflies, ladybugs & flowers!)

Here’s how it works.  First, you order on them here. (I will refund you for any shipping costs that you are charged, if you are only ordering digital files, just like I do for my word menus and balloon menus.)  You will then receive an invite to a website called “SendItOnTheNet.com”  This is the online file sharing service that I will use to get the high quality print files to you. Once you sign in/sign up with them,  I can then upload your files and send you a personalized link to download them, and you can have them printed at your leisure! Feel free to email me with any questions!

More Cameleon Products!

Cameleon UV makeup, $11.00 for 32 grams

I’m beginning to expand our assortment of Cameleon colors, and have just added their UV line, as well as an array of their baseline colors, both in 32 gram cakes!  Soon I will be filling in a few more missing colors, such as orange, purple and another blue…

Cameleon Baseline colors, $8.25 for 32 grams

 We have also added Cameleon’s brush and body soap to our assortment of brush cleaning tools:

Cameleon 100gr Brush Soap, $12.00

 I’m really excited to be able to offer Cameleon’s petal brush that everyone is raving about.  Unfortunately I only received a few, so if you click the link and see it unavailable, they are already sold out. However, I will be stocking up just as soon as they become available again by the manufacturer!

Cameleon large petal brush, $10.00

New Word Menu Options!

I’m always looking for more suggestions to add to my selection of word menu designs, and recently added seven new designs! For just $1 per design, I will build a custom word menu for you and email you the file so you can print it however you wish. Check out the full selection here!

Thanks for stopping by and be sure to keep watching our blog and Facebook page, as we have more brand new items coming in very soon!

Posted on — Leave a comment

The Kit Obsession Continues: My Gutted Guitar Case

I admit it. I have a problem.  I love garage sales and thrift stores, and I love re-vamping my face painting kit. The two together can be a deadly combination as I keep finding the PERFECT case for CHEAP! However, I have decided to embrace my obsesssion with re-designing and improving my kit and stop fighting it or feeling bad about it.  With my passion for and education/work background in product design, I am just never going to stop trying to improve my tools and work station! So, the next best thing I can do is share my projects with my fellow kit addicts! 😉

But before I share, I just can’t stress enough that when it comes to kits, one size most certainly does NOT fit all.  My setup may not work for you, and vice versa. The important thing when looking at others’ kits is to simply find ideas for storage, and then filter those ideas through your own work style.  When deciding what to put where, think about things like:

  • Where will I be standing and facing while working out of this kit?
  • Where will my customer be standing/sitting or facing while being painted?
  • What items do I use the most, and want closest to me?
  • What items do I want with me, but can be hidden away when not in use?
  • What items am I worried about kids getting their fingers into, and how can I avoid this with their position in my kit?
  • Do I sit or stand when I paint?
  • Where am I most messy when I paint, and will my kit be clean-able?
  • How will everything shift when this is packed up and turned on it’s side? Will anything get damaged? If so, how can I protect it?
  • What sort of venues to I work in and what is my transportation to these venues? Is the size and weight practical in these situations?
  • Where is the best place to put personal valuables?
  • What areas of my kit do I want customers to interact with (ie buisness cards, mirror, design menu, etc) and what areas do I want them to stay away from (paints, brushes)? How can I make the boundaries clear to my customers?
  • How permanent do I want everything? Will I move anything from one kit to another, or re-arrange things depending on the type of event?
  • Will my kit need to be able to endure weather such as wind or rain?
  • etc, etc…

If you’d like to look back at some of my other kits, you can see my wood “suitcase” style box kit here, or  my smaller aluminum case kit here!

Last year I found a guitar case for about $20 bucks at Goodwill.  After seeing so many cool guitar case kits on Facebook, I couldn’t turn it down.  In the same shopping trip I found a perfect mirror for it, a practice head, AND an ice tube mold (aka brush holder)! Score!

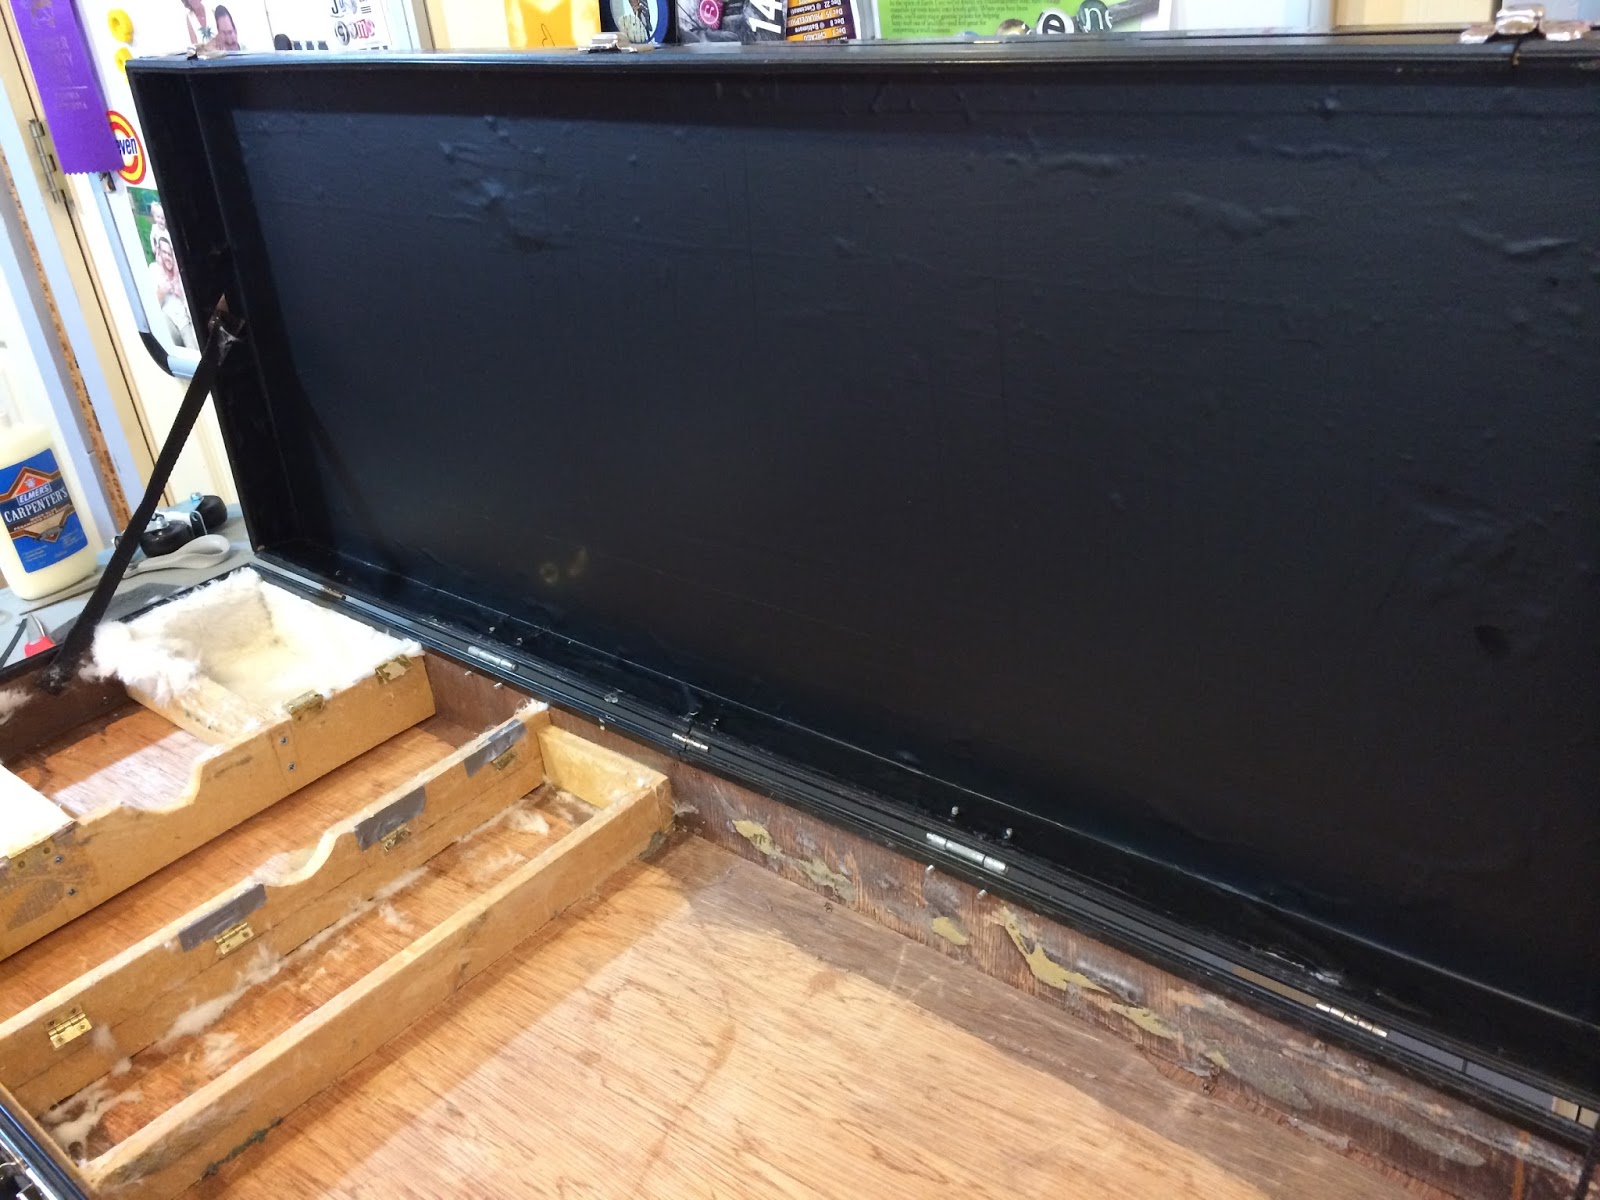
The first thing that had to be done was gutting the case…taking out all the white fur, foam, etc.

Peeling out the fur and foam padding
Fur removed…as much as I could do with my hands  

Removing all of the fur was probably the most time consuming part of this.  Sometimes liners pull right out, and sometimes they are more stubborn.  This step took several days. I had a lot of staples to pull out, and there was a lot of chunky, crusty glue left all over the box. 

Using my dremmel to remove old glue, fur, etc

My dremmel tool (which I purchased just for this project…shhhh, don’t tell…I needed one anyway, right?) worked great for quickly removing old glue with the sanding wheel.

The next issue to fix on this beaten up guitar case was the corners.  The corners of your kit will take a lot of abuse, so it is important to make sure they are reinforced.  On my kit, some of the corner molding was missing or cracked.  So, I actually broke off any remaining pieces and realized the corner molding was the only thing really holding this kit together:

Corner molding removed

After taking off the broken molding, however, I still had metal nail heads/rivets all around.  These had to come off to prepare the surface for new molding.

Pulling out old hardware bits

I started with my needlenose pliers, just pulling out whatever I could. Some of these popped out…others needed more help…

Cutting off nail heads with a Dremmel

 The Dremmel tool again? Twice in one project? Yeah, I’d consider it paid for itself now! 😉  I used the cutting wheel to cut off the rivets that wouldn’t pull out. Watch out for sparks!

But beware of cutting metal with your Dremmel as it gets hot….

Accidental carpet “bling!”

Don’t do this with little kids in the room …above is a hot nail head that flew off and melted it’s way down into my FLOR carpet square! I now have a few of these little buggers in my studio carpet! 😉

Now I had to basically re-assemble the thing with new corner guards.  Naturally, my retail fixture design background told me to my faithful friend and supplier of all things hardware: McMaster-Carr.  I ordered some black plastic corner guards with peel-n-stick adhesive backing that matched the remaining corner guards on the case.  This was thin enough that I was able to cut it to length with a pair of scissors, and was able to slip the ends right back under the existing metal corner guards.

New molding!

Okay, now that I have it all gutted and structurally sound, it’s time for the best part: making the inside look cool!

I decided to line the inside with adhesive backed black vinyl.  Black because it hides dirt/paint, and vinyl because it is easy to wipe off and can be purchased in huge rolls.  (less seams in your surface means less places for dirt and glitter to collect)

Starting with the corners

I started with the vertical corners. That way I could be sure they were covered, and then when applying the larger sheets I didn’t have to worry about there being any gaps in the corners.

cutting around the strap

Then I did the sides of the case, leaving enough to cover the bottom corners too.  Here I am cutting it to fit around the nylon strap before peeling off the backing.

Inside of the lid all covered

Above you can see the completed lid.  Now, this case is already a year old, and I now have my paints transferred to trays and magnets on the back of all my split cakes.  If I were making this kit again, I would put a thin sheet of steel in first (I prefer to peel the face off of a thrift store whiteboard), and then apply my vinyl. This would give me a magnet surface to attach things to.

I don’t have a photo of this, but I took out some of those wood dividers. I left the two closest to you in the photo, and took out everything to the left.  That left me with a section just the right size to snugly hold my laptop case, and the narrow section is where I put my stack of screw-together paint jars.  If it doesn’t work for your kit, take it out! But if it fits your supplies perfectly, why not use it, right?

Left side: underneath is my TAG laptop case. On top I have more paints, spray bottles and supplies. CENTER: My stack of screw-together paint jars and re-potted Starblends, wrapped in a padded fabric piece I made to cushion them.  RIGHT: Larger, open area to hold supplies and function as my work surface for water, glitter, etc to sit on.  
Vinyl logo

 I utilized the lid of my case to create a huge sign.  All of the letters and paint blobs were hand cut out of colored adhesive-backed vinyl sheets.

Inside my lid I mounted that mirror you saw in the first photo from the thrift store. I decorated the edges with my graffiti patterned duct tape.

Inside the case when packed up

At the time of making this kit, I worked sitting down. So, I needed something that would hold up my kit but at a height that worked for my chairs. I found these great little folding camping stools, which held a lot of weight and were very sturdy. One under each end worked great and they fit inside the kit when not in use (see the greenish-gray pouches on the right side of the case in the above pic)

Stools in use

Of course, the funny thing is, I’ve only used this kit at one gig and I put it on my folding table. But, these are good stools if I ever don’t want to haul my table, or for their original purpose, camping! 😉 I later found a great keyboard stand for $2 at a garage sale that holds the whole kit up higher, which works great for my new director’s chair setup.

In the center of the lid I attached a piece of steel from a thrift store, covering the sharp edges with red duct tape, to create a magnetic design menu board…

Magnetic design menu board

 I have a lot of my designs mounted to magnets, so I can attach them here for a menu.  I then attached a piece of clear vinyl with duct tape along the top, and put a magnetic strip along the bottom. This works as a lens to protect my design menu from splashing water, and help hold them in place.


 To the right of my menu I made a custom panel that attaches to the kit with velcro.  It’s basically a cardboard rectangle covered in fabric, and then I sewed on elastic strips and velcro strips right through the cardboard.  This is the same thing I did in my smaller aluminum kit, so now I can swap containers and paints from one kit to another using the same velcro.  Check out my aluminum kit post to see more details on how I sewed these custom panels.

I know this box was a lot larger than my previous kits, but I still wanted to keep my ongoing requirement of being able to carry everything I need in one trip from the car.  At this point I already have my tools, table, design board and stands all in one case.  The last piece is my chairs.

Like I said, at this time I was working sitting down. (I now use a director’s chair and I stand)  My own chair that I sit in is in a bag with a strap so I throw that over my shoulder. But, the chair I put the kids in is a folding chair from Ikea. Since it has a bent metal bar rather than 4 separate legs, I had a nice bar to connect to. I decided to get a couple little wall hooks at the hardware store and mounted them to one side of the lid, as shown:

Now, I can simply set my chair in those hooks, and use one bungee cord to hold it around the top:

….but then I still needed a way to transport the whole works.  On the other end of the lid I attached a long, metal cabinet handle:

…and on the bottom I attached two (NON swiveling) casters:

 Now I can simply pick it up with one hand and wheel it behind me wherever I go, with my other chair over my shoulder, all in one trip.  Quite a nice setup!

I don’t use this kit for birthday parties because I feel like it takes up a lot of real estate for someone’s potentially tight living room.  However, I think it’s great for larger or longer gigs, and bigger events like festivals where guests are paying per face and you want to wow them with your full smorgasbord of colors. I have taken this to a couple of community baby showers to paint bellies and it was great.  I liked having a surface to work from and a LOT of supplies, all in one handy place.

My belly setup, with the kit sitting on a cloth-covered keyboard stand.

Of course my “regular” kit has already evolved quite a bit since I built this guitar case kit.  I currently still use my smaller aluminum kit to hold all my extras, and a separate box with all my paints in jewelry trays.  It all fits inside a little folding cart. I’m experimenting with some roll-top aluminum camping tables and have switched to a director’s chair.  One of these days I’ll post my current setup…although, it may be different tomorrow! 😉

Working on your own custom kit? Be sure to check out our custom kit design section in our shop! We have all sorts of great stuff, including unbreakable plastic mirror sheets, funky duct tape, magnetic tape, Gorilla glue and Velcro!


Posted on — Leave a comment

NEW Products Now Shipping and “coming soon!”

We have a variety of new, fun items across several categories that I’d like to show you today, now available in the shop!

For Face Painters:

Global FunStroke Palettes:
Can’t decide which one stroke cakes to start with? Why not start with 6 at once?! For just $33 you can now purchase one of Global’s two brand new FunStrokes palettes! These are the first ever one stroke palettes on the market, and we’ve got them right here in the shop!

Empty poofer bottles:
These are the same 1/2 oz bottles that our glitter comes in, but now you can purchase them empty to fill with whatever you wish!

For Balloon Twisters:

We were out of a few balloons for a little while, but by next week we’ll have them all back in stock, and then some! These balloons are on their way to me right now, and I expect to have them ready to ship early next week! Here is a sneak peek:

Batman balloons:
We’ve finally completed our assortment of super heroes by adding Batman to the selection! (You can also still find the Avengers assortment and Spiderman in the shop)

Qualatex Smiley face mustache balloons:
Wouldn’t they make super quick and fun wands, hats or “hitchhikers?”

Qualatex 160Q’s in green and red:
I love having these in my assortment for twisting elegant, long stemmed roses! So, I thought I’d add them to the shop! Go any other individual colors in 160 size that you just can’t live without? Let us know! I love to take suggestions for products to add, and am constantly adding more! 


For Henna Artists:

Rotary Cutter:
This cutting wheel makes cutting your own cellophane triangles a breeze!

Be sure to check back often as we’re always adding new items! Happy painting, twisting, and henna-ing! 🙂

Posted on — Leave a comment

NEW Book Now Shipping: “Painting Boys!”

I am SO excited to announce that my latest book is now in my possession and ready to ship! (Click HERE to go directly to it in the shop.)

I have risked my boys never letting me paint them again to bring you this latest book: “Painting Boys!”  I really had absolutely NO intentions of starting another book after my Realism book came out, but oh how soon that changed when the wheels started turning! After noticing a need for more boy design books out there, I decided to set out and create this book to offer something beyond the usual gore, skulls and tribals for boys.

Looking to add more fun boy designs, but you’re not all that into gore and scary stuff?  This is the book for you!  Packed with full color step-by-step photography of 24 fun, fresh, cute and cool boy designs, this book is sure to add some more fun to your boy design selection. In addition to the 24 designs, you’ll also get some tips for painting boys, as well as ideas and suggestions about how to sneak some glitter into your boy designs without getting too girly.

As I’ve mentioned, my two boys (age 5 and 7) were painted a LOT for this book.  Since they inspired so many of these designs, I thought it only fair to let them be my models throughout the book! After sketching up countless boy design ideas, I let my boys choose the ones they really wanted painted on themselves. Only those that were chosen by boys AND elicited the most exciting “mirror moments” were chosen for the book!  So, you can be assured that all twenty four designs in this book are boy approved!

For the price of $14.99 you get 24 designs…that’s just $0.62 cents per design! Check out this fun new reference today, currently available ONLY at Paintertainment.comPaintertainment.com!

Posted on — 5 Comments

“Ka-Ching! Face Paint Your Way to Extra Cash!”

I recently was quoted in a magazine article. Normally I’m really excited when this happens, but this particular article I had some mixed feelings with.

I was contacted back in February 2015 by a reporter from Woman’s World. She stated,  “…I’m doing a piece for Woman’s World on how to make extra money as a face painter and wonder if you’d be available for a brief interview….”

Hmm…”extra money?” These words made me fear that this article may go in a direction that I and other professional face painters may not like.  I had two reactions. First, “Don’t reply…you do NOT want your name attached to this.”  Then, “Hey, this might actually be a great opportunity to build up the credibility of our profession and really give aspiring face painters good advice.”

First, let me mention that I have NO problem with competition…good, healthy competition makes us all better!! The other artists in our area will even tell you that I LOVE getting to know my “competition,” love to jam with them, learn with them, and LOVE to help out new face painters! That itself is clear from my website too, which may be why I was contacted.  So, my reaction has nothing to do with that aspect…but about building up my fellow painters and our profession.

What I did NOT want to encourage are the ideas that:
– Face painting is easy
– It doesn’t cost much to start face painting
– Anyone can face paint and earn extra cash
– Face painting is something people just do “on the side” for “extra cash.”

My response was a really lengthy email that I will paste below so you can see my attempts to spread the word about our profession.  I actually had to think about this for 2 days before I finally replied because I wanted to be really careful that I wouldn’t come across as endorsing the above points and make it clear that my participation hinged on how things were presented. But more importantly, I wanted to make sure to take this opportunity to actually educate the public about what it really takes to be a good face painter without making a lot of local enemies! This is why I said that I would agree to an interview ONLY if they were not portraying face painting in this “extra cash” light.

“…I would be super honored to be a part of your article! However, I’m afraid my participation will depend on how you’re handling the subject. Let me explain…

There are many, many face painters out there who have a solid career in this field, and even support their families on face painting alone.  I know you’re aiming you article at moms who want to do it on the side, which is great, as most professional face painters start in this way!  But, it’s really important to dot some i’s and cross some t’s along the way….

In my opinion there are two types of face painters who do it “for extra money” while also working other full time jobs or full time motherhood:

1 – Those who paint for free or cheap for charity, school & church functions, and may charge a little money to paint for some birthday parties here and there…they buy a set of paints, whatever they can find cheap at the craft store, and do it more as a hobby for some extra cash…in our area these artists are anywhere from free to $50 per hour.

2 – These are artists who also do face painting on the side for extra cash, but treat face painting as a legitimate business, not just a hobby. At a very minimum, they invest in FDA compliant face paints and cosmetic glitters, and they purchase liability insurance for their business.  If they really want to do well at it, they invest time and money in publications, conferences, workshops, certifications, and subscriptions to online learning (like http://www.fabatv.com).  These artists typically charge as low as $75 for a brand new artist, to $200 per hour.  Most in my area are around $100-$175 per hour but it depends on the market somewhat.

…[inserted the story of my face painting career here]…

As professional face painters we are constantly struggling to educate our clients about our worth as professionals and face painting as an actual profession.  Those who fall in the 1st category are extremely damaging to our business and our market, and unfortunately can cause us to back track a lot in this “education.”  We work very hard to explain the fact that this is a profession, that there are certain standards that should be followed, and why we are worth what we charge.  There is also a lot of time involved in events outside of the hours that are spent actually painting, and most new painters don’t think to consider all of this time and expense. Here is a post I did explaining how a $100/hour rate doesn’t mean the artist is pocketing $100/hour: http://paintertainment.blogspot.com/2014/03/you-charge-how-much-per-hour-why-its.html

Many who fall in category 1 simply don’t think about these things. They aren’t aware that by charging so little, their “extra cash” is actually eating into someone else’s only paycheck.  They don’t make much at it, so they can’t justify putting in the needed investment in quality, safe supplies and insurance. Sadly, many even use homemade face paint with things that are not meant to be worn on the skin for a long period of time, or worse yet, they use tempera, acrylic or other “non toxic” craft paints which can cause horrible reactions.  Here’s a blog post with more info on that topic and why it’s SO important to use the right products: http://paintertainment.blogspot.com/2011/10/paintertainment-faq-is-any-non-toxic.html  Our kids’ health and safety is worth a little research for sure! Over time they can learn, of course, but in the meantime, we are left to pick up the pieces, get our clients back, and remind them why they get what they pay for.

SO, all of that being said (sorry so long…you can tell I’m passionate about this!), I would absolutely jump at the opportunity to be in your article if the intent is to not just encourage moms to do this on the side, but encourage them to be sure to at a minimum:

– Purchase ONLY FDA Compliant face paints
– Use ONLY glitters that are FDA compliant for cosmetic use (metallic craft glitters can scratch the cornea!!!)
– Research what the going rate is in their market and charge in that range. If you want to be cheaper because you are new, let your clients know that this is an introductory rate while you get some experience, and then raise your rates as you get better.
– Purchase liability insurance as soon as you can afford it, at least if you expect to keep face painting, because many larger events actually require this for you to paint.

(I could give a lot more tips for beginners and things to do, watch out for, etc, but these are the bare minimum anyone should consider)

I absolutely love to help out beginners to get them the right start!!  In fact, years ago when I opened my online store I put together a little starter set that has a small palette of quality, FDA compliant paints (that can be re-filled, unlike the cheap ones at the craft stores), brushes, a sheet of designs, and a book I wrote full of tips for those who have never painted a face. It was meant as a solution to those who either couldn’t afford to hire me, or had been asked to volunteer at their kid’s school and didn’t know where to start. It gives them a great start with safe supplies and helpful instructions: http://www.paintertainment.com/StorePackageDeals.html  If you scroll down to the next package deal, this is what I recommend for those really wanting to turn this into a real business.  Beginners also will find a wealth of FREE information on my “learn” page, http://www.paintertainment.com/Learn.html …and by subscribing to my free monthly e-newsletters.

Anyway, if this sounds like the direction your article will be going in, I’d love to do an interview! …..”

I thought I was pretty clear and thorough, and had my bases covered! Just 10 minutes after I sent this email, I was sent a reply that stated she had already interviewed another face painter, and she no longer needed to talk to me as she had enough information to use between the two of us. I was told that she would “focus on being a quality face painter,” and that was that.

2 months later I saw a photo of this article show up on Facebook, shared by SillyFarm, since they too were mentioned in it.  I was excited at first, and then saw the headline…I fount it to be really a punch in the gut to professional face painters in general.

Since my name and my company were quoted in this article, I felt it important to clarify MY position on some of the things mentioned in the article:

  • “…you can earn up to $100 for the first hour and $40 to $50 for each subsequent hour…”  I’ve been painting professionally for 20 years, and not only have I never heard a price structure with a 60% discount for the 2nd hour, but on another note, I didn’t even charge $100 per hour until I was going on 18 years of experience.  Most painters actually require a 2 hour minimum, and I’ve never met an artist with such a strange structure as this.  Secondly, a beginner face painter shouldn’t be charging $100 per hour.  While under-cutting is seriously frowned upon in our industry, a new painter should get to know her local competition and the going rates.  She should start out at a rate that matches her experience and skill, make sure clients know that this is an introductory rate while she gains experience, and then work her way up to the going rate. It really does help EVERYONE in the market this way.
  • “…buy a simple face-painting kit at Party City…” I would never recommend Party City for face paints.  This is probably the place your most likely to find those super cheap “Made in China” sets that can’t be refilled, which a little research will show you are less regulated and more likely to cause reactions.  And the word “craft store” should not even be mentioned without clarifying that you should only buy actual face paint…too many beginners use tempera or acrylic which is dangerous! I WOULD recommend that if you go to a craft store, you look for Snazaroo because it at least is a legitimate, safe face paint.  I often suggest that newbies and volunteers take their 40% off coupon to Michaels for a set of Snazaroo if they are on a super tight budget. Not the best, but still safe!
  • Do street fairs and “get a lot of exposure.”  There it is, folks…the “e” word that makes us all throw up in our mouths a little bit.  If you’ve been a professional face painter for a month you’ve gotten requests to work for “exposure.” Unpaid gigs get you more unpaid gigs.  There is nothing wrong with gaining exposure, we all need that! And I know the article mentions paying a booth fee to do this, it does not say we should paint for free which so many clients ask us to do.  But, I suggest that you attend events yourself first and make sure they are actually well attended, and a place where people go intending to spend money on their kids, before you can even think about making a profit.  Also, make SURE there are not already artists there painting!! Taking an established hourly paying gig from an artist who is there every year by offering it for free or offering to pay for a booth will gain you one mediocre gig and many local face painter enemies.  Play nice, it really does pay off!!

Okay, that about sums up my rant. I mainly just wanted my original email to get out there so that everyone can see all of my recommendations, not just the tiny snippet that was published. 

As you already know, I LOVE to help out new artists!! If you are a mom looking to start up face painting on the side, please feel free to email me any time. I would love to give you any advice and help needed, recommend a place to start with products, etc. Also, feel free to peruse my “learn” page which is FULL of sound advice and step-by-step’s!

Posted on — Leave a comment

New Items Just Added: Invisible Glove and Belly Blessing Gifts!

 
We have a few unique, new items added to the shop! Check them out and click on the links below to go right to them in the shop…

Invisible Glove, $7.75

Invisible Glove works just like it’s name describes! Apply it to your hands like a lotion before your gigs, and it will protect your skin and nails from being stained by paint. Finally a way to protect your hands without wearing an actual glove! When you’re done, simply wash it of with soap and water, along with any paint on your hands.  Comes in a large 5oz tube for $7.75.

Pewter charm, $3.00

 Have you ever done henna for a belly blessing, and seen each of the guests bring a charm for the mom-to-be? These little henna hand charms are the perfect little thank-you gift for your belly henna clients! We have an assortment of designs now available in the shop, ranging from $1.50 to $3.00 each. 

Gold toned charm, $3.00

 These charms are also perfect to turn into earrings to wear to your henna gigs!

Hand charm, $1.50

 Looking for a cute way to package your henna client gift? We now have these little silver organza bags for just $1.00 each.  These are just the perfect size to hold a tube of henna balm, a charm, and a business card or personalized note!

Organza bags, $1.00 each

Thanks for stopping in! Happy painting!

Posted on — 5 Comments

Face Painting Client Contracts…What Do I Write?

It’s that time of year when quote requests are coming in and your inbox may be filling up with leads from gig sites.  If you’re still new to operating as a business, this time is exciting but also scary, as you realize you need to get your act together with a contract!

Face painting is a fun and colorful profession…I try to make even my contracts reflect that! 😉


You start out face painting and give all of your clients the benefit of the doubt…you trust that they want you when and where they say they want you, and that they will pay you for your work.  Then comes the day you learn your lesson the hard way that you should have gotten a contract and deposit because:

  • You show up and the event has been cancelled.  
  • You do an event and then never get paid.  
  • The client found someone cheaper at the last second.
  • The client hired someone else and forgot to tell you.
  • You’ve turned away several other gigs for this one and now have none.  
  • The venue has changed and nobody informed you.
  • It started to rain so they rescheduled the party.
  • The client told you there would be 10 kids and there are 30 but they still expect you to paint them all in 1 hour.
  • The client told you there would be 10 kids and only 5 showed up so now they want to pay you half.
  • You think you have landed a gig but then can’t seem to get ahold of the client and they stop communicating with you.
  • The client argues that you didn’t do what you promised them and now they’re refusing to pay.


Yes, ALL of these things have happened to face painters that I know of!

If you’ve already had one or more of these things happen, don’t let it get you down…it’s happened to just about every seasoned professional painter out there, and it’s what nudges us all into that next step of requiring contracts and deposits, and one of the factors that will differentiate a job from a hobby. My hope is that this never has happened to you, that you read this, and learn from our mistakes.  It’s never too early and you’re never too new as a face painter to start using contracts!

First, I must note that I am in no way a legal professional.  Nothing I say here is meant to be taken as legal advice, and you and only you are responsible for what you decide to do with your business. I personally have no idea what exact terminology is best for legal things…I am only collecting and assembling verbiage from other contracts I have seen and used.  I highly recommend that you have a legal professional look over your final contract and answer any legal questions you may have, to make sure you are covered!
That said, I thought it might be helpful to just post some ideas on verbiage that people put into their contracts. This post is meant to be a starting point in deciding what you’d like to have in your contract. This is essentially a list of different ways to word things, taken from contracts that other artists have shared online, and my own.  By the way, if you have your own verbiage that you’d like to share with others, please comment below or email me! My plan is to keep adding to this post as a resource! My hope is that this will not only help you think about what things are important to you in your contract, but will enable you to easily cut and paste to get a start on your own contract.  Remember, your contract doesn’t have to be set in stone either…you may find things that you didn’t think were important, later become important, so you adjust it for the next client.
What to call it:
Booking Agreement
Event Contract 
Service Agreement

Basic Event Information:
  • Date of the contract
  • Your business name, address, email and phone
  • Client’s name, billing address, email and phone
  • Client’s contact number for the day of the event (in case you get lost or run late)
  • Event name, address & phone (if different than client’s)
  • Alternate Location in case of inclement weather
  • Event Date
  • Artist(s)
  • Time slot of your performance
  • Fees (hourly fee, flat rate, travel fees, etc)
  • Type of Event (birthday, company picnic, grand opening, private session, etc)
  • Theme of Event (Frozen, circus, super heroes, etc)
  • Number of children expected
  • Services to be provided (Be clear here, if you are agreeing to painting a certain number of kids, for a certain amount of time, etc)
  • Artist Requests (table, chairs, shelter, access to a sink, anything required by the artist to paint. Don’t assume anything! You could end up outside on a cold, rainy day with no shelter and your chair legs sinking into the mud…yes, this has happened!!)

Booking Requirements: What you require to consider the gig booked
  • A completed contract must be received ____ days prior to the event or client runs the risk of losing that date.
  • A completed contract must be received in the office at least 14 days prior to the event along with a _______ non-refundable booking fee/deposit. 
Fees: What you are charging the client
There are various fees to consider in your contract. First, there’s the fee for your work, which might be per hour, per child, or a flat rate for the party. Be clear about this in your contract, so that the client knows exactly what they are paying for, and what they are not paying for.  If you’re charging by the hour, make sure you’ve allotted enough time to paint all the expected kids. If there end up being more kids than expected (which happens a LOT), make sure you outline a plan so that you either get compensated for extra time, or the client is aware that you won’t get the extra kids painted.

Then there are travel fees. Most artists have a certain mileage radius or amount of drive time that is included, and they don’t charge a travel fee if it’s within this range.  I tend to charge by the drive time, not miles, because my time is money! If you are having to turn away other gigs closer to home to accommodate the additional drive time to an event, you may want to charge a travel fee.  Some clients won’t realize how far you are from them, especially if they found you online. But don’t assume they aren’t willing to pay for your travel time. I have had events that are 2-3 hours away one way who have paid my full hourly rate just for the drive time on a busy summer Saturday.  Make the rate whatever is worth it to you for your time and gas. Travel fees are also a great place to offer a discount for customers looking for one. I often waive the travel fees if it is a long gig, say 3-4 hours or more.

The other fee is your deposit. Some artists call this a booking fee, or a retainer. The deposit has to be a high enough amount that it would hurt the client a little if it were forfeited…otherwise there is no point. What good will a $20 deposit do you if they later find someone who costs $30 less per hour and hire them instead? The deposit is there to ensure that you are not setting aside a busy summer weekend, turning away other paying events, only to later be cancelled on and make $0.  If for some reason it’s cancelled still, you at least make something for blocking out your time and all the time you spend in communication with the client, preparing your designs and equipment, and writing up contracts.

Here are a few lines you might use to outline your fees:

  • Travel fees apply when the event is more than ____ miles from _____.  
  • An additional travel charge of ____ will be applied for each mile beyond ___ miles 1-way.
  • A travel fee of ____ is due along with the deposit no later than ____.
  • If your event exceeds the time booked and we are available to stay, any additional time will be charged in ____ minute increments at a rate of ______ per _____ minute increment.
  • Client will pay for the time booked plus any time run over.
  • Artists who arrive and are ready to paint at designated start time are not responsible for late arrivals or late start to the party.   
  • The client will reimburse artist for any parking fees, which must be paid on the day of the event.
  • A ____ Deposit/Booking Fee (percentage or flat fee) AND signed contract is required to reserve your date.
Payment: When your fees are due and what payment methods you accept

Make sure it is very clear to the client how and when all fees are due.  If accepting personal checks for deposit, make sure you require them far enough out to confirm that they clear.  Accepting fees via Paypal is a great way to get paid quickly! However, they do take a percentage. Some artists charge an extra few percent for Paypal payments or credit card swipes.  I require Paypal payment of deposits for all last minute events which are within 2 weeks of the event date.  If the event is within 2 days of the original request, I require 100% up front via Paypal.  I am not a fan of procrastinating as it always causes extra stress and opportunity for mistakes.  Some artists offer a small discount if the amount is paid in full before the event, to encourage getting all the payment done up front.  Here are a few lines you might use to describe payment:
  • All charges are due on the day of the event.
  • The client agrees to pay the full amount contracted once the artist(s) have arrived at the event location.
  • We accept cash, cashiers checks, personal checks, credit cards, Paypal… 
  • Checks can be made payable to [Your company here].
  • The client agrees to pay for any accidents or injuries caused by pets or guests, and/or any damage to artist’s equipment or supplies caused by pets, sprinklers, or guests.
  • The remaining balance of this contract is payable to [Your company] upon the artist’s arrival, prior to the designated start time.  
  •  The remaining balance is due upon the artist’s arrival on the date of the event.
  • The remaining balance due must be postmarked no later than ___ to avoid late fees.
  • We can accept Paypal payments or credit cards for an additional 3% processing fee.
  • Late payments are subject to a 5% finance charge per month or fraction thereof.
I’ve heard many stories of personal checks bouncing, but have not had this happen to myself yet.  Some artists call the bank first to make sure there are sufficient funds before cashing a check, to avoid fees. Some simply do not accept personal checks. This is entirely up to you!
Services To Be Provided:

They’ve hired you to paint faces. You’ve agreed to paint faces.  However, the two of you may have a totally different definition of this service.  Maybe the client assumes you’re going to just hang out and keep painting until everyone is painted, regardless of time or how many people show up.…while you know you have to pack up at a specific time to make it to your next event on time.  SO many issues can be avoided simply by managing your clients’ expectations. Make sure that you both understand exactly what you are providing, whether it be a certain amount of time, specific number of kids, etc.  Do you paint all of the adults who ask to be painted too?  What happens if you go over your agreed upon time? What if they want you to stay but you can’t? Does the client know that you may need a break or two to change your rinse water & use the restroom?  Do they know how much room you need for your setup?  Are you expecting them to provide you with a table and chairs? What if nobody shows up for the party? What if the party starts a half hour late? Here are a few lines to cover some of these things…

  • Artist will provide ___ hours of face painting, starting at __:__ and ending at __:__.
  • Artist will arrive ___ minutes early to allow time to set up.
  • If more guests attend the event than are expected, and the artist does not have another event to attend, the artist may stay longer and will bill client at the agreed upon hourly rate for additional time.
  • Artists cannot be held responsible for the number of attendees at your event. 
  • The artist may take a ____ minute break every ____ hours, for events that go more than ___ hours. 
  • Estimated number of children painted per hour is dependent upon all of the guests being present at the start time and ready to go one after another. For a more casual schedule, please factor in additional time.

Don’t forget the services you are NOT providing:

Sometimes artists show up and find out that they are going to be in a room alone with 20 wild children while the adults sip beverages in the other room. Are you responsible for babysitting?  Are you expected to keep fixing designs that are repeatedly ruined because it is a pool party?

  • Artists will not be responsible for supervising children. Their behavior and safety is the Client’s and/or Parents’ responsibility, and client agrees to provide proper supervision for all children.
  • Artist is not responsible for any adverse effects that other entertainment might have on the face painting, such as sweat (bounce houses), water (swimming pools), etc. Your quoted time frame does not include time required to re-do faces so please plan accordingly.
  • Client is responsible for providing _________. (table, chairs, tent, etc)


Working Conditions

I’ve heard quite a few horror stories about painters getting caught up in fights, being subjected to angry, drunk, inappropriate and unruly party guests, and even having their paints ruined by sprinklers.  While it’s sad that we even have to spell these things out, sometimes it is necessary and nice to give yourself an out if you feel unsafe!  Other conditions also may come into play such as parking, apartment buildings with no elevators, etc.

  • Artist reserves the right to stop painting and leave without refunding any monies if there are extreme adverse working conditions and the client fails to remedy the situation after it has been brought to the client’s attention.  Adverse conditions include but are not limited to destructive, violent, or inappropriate behavior of a child, pet or adult, illegal activities, or otherwise dangerous conditions including lightening and severe weather.
  • Please either leave a space open in front of the house on the street, the driveway, or a loading dock so Artist can unload equipment.
Indoor Events:
  • Artist requires access to bathroom facilities, and a minimum of ___’ x ___’ space to work.
  • Please ensure that location has adequate lighting but we can bring lights if necessary – please let us know.
Outdoor Events:
  • Client is responsible for providing an alternate indoor location in the event of inclement weather.
  • Client must provide Artist with sun/wind/rain shelter, table, 2 chairs per Artist, and adequate space (___’ x ___’) and lighting to paint.
  • Artists are not able to paint outdoors when the temperature is below ___ degreees.
  • We can bring our easy-up shelter, table, and chairs for an additional charge of $____ . We will need to set up 25 minutes prior to start / after completion of event in this case.  We require a minimum of 10’L x 10’W x 11’ H of level space, adequate lighting, & access to a rest room.  Please avoid watering your lawn on the day of your party, or soak it heavily the previous day if possible, to accommodate our tent, table & chair legs.
  • While Client can choose to pay for the Artist to bring an EZ Up shelter, for the comfort of your guests and our artists, the client agrees to provide an area with protection from extreme temperatures, sun, rain, snow and excessive wind.
  • The client agrees to pay the full amount contracted once  the painter has arrived at the event location, even if it is raining.  Please note that we do not offer refunds for inclement weather.
Rescheduling: In the event of a cancellation, rain, etc…

You’ve done your part by securing your event with a deposit. But what if they still want to cancel? Sometimes things happen that are out of the control of you and the planner and things change. Make sure you have a plan if this happens so that you don’t end up without a gig on a normally busy weekend.

  • Should you need to reschedule your event, please do so at least ___ days prior to the event and we will do everything we can to accommodate your needs.
  • We do not offer refunds for inclement weather so please secure an alternate indoor location for your event in advance.
  • If you need to cancel your event, you must do so at least ____ hours/days in advance or pay the full contract amount.
  • Should you need to  reschedule  or cancel your event,  you must provide us with an intent to cancel or reschedule notice at least ____ days in advance, in order to receive your deposit/booking fee back.  If notice is not given with those seven days you will only be allowed to reschedule.  
  • Cancellations given within  _____  hours prior to the cancellation date will be held responsible for the remaining balance of the contract.  Remember no refunds will be given due to inclement  weather so please secure an alternate indoor location for your event in  advance.
  • Deposits are non-refundable and required to hold event date. For events cancelled no later than ____ weeks before event date, the deposit may be applied toward a future date.
  • Should our Artist get sick or have to cancel, we will find a replacement artist.

Limits and Liability:
Allergic Reactions, Health and Safety
  • Artists are not liable for allergic reactions to paints.  People with skin allergies or sensitive skin should either not participate, request an ingredient list, or have artist perform a patch test at the beginning of the event.
  • Artist can provide ingredient lists for those guests who have allergies, if requested at least 24 hours before the event.
  • Artist will not paint anyone who is or appears to be sick or suffering from cold sores, conjunctivitis, ringworm, sunburn, eczema, any infectious skin condition or open wounds.  These determinations are at the artist’s discretion.
  • Artists are not liable for damage sustained from allergic reactions to face paints, products used for glitter tattoos or Henna stains.   
  • Client understands that darker face paints will linger and must be removed with mild soap, water and washcloth.
  • We strive to use only the safest materials, however, no product can guarantee that they will not cause a reaction on anyone. It is the client’s responsibility to be aware of ingredients that they may be sensitive to, and ask for an ingredient list if desired. 
  • The artist reserves the right to refuse to paint any attendees with signs of infectious diseases at any point in the event. 
  • Although we only use paints that are safe for use on skin, allergic skin reactions can occur and paint should be removed immediately.
  • For safety reasons, artist will not paint children under the age of 2 or anyone who is unwilling.
  • If the client knows beforehand of any attendees who have infectious/contagious diseases such as chicken pox, pink eye etc, the artist must be informed at least ___ before the event and the event is subject to cancellation without a refund of the booking fee. If the client does not inform the artist beforehand, and the artist’s equipment is subsequently contaminated, the client will be invoiced for the appropriate decontamination or if necessary, replacement of any affected equipment.
Subject Matter
  • Artist will not paint subject matter that he or she deems offensive or disturbing.
  • At public events, artist will not paint on any part of the body that is not legal to expose or any place he or she does not feel comfortable painting.
Photo Release

You may want to take photos for your own website, Facebook page or advertising.  I like to share photos online and usually just ask the parents if it’s okay if I take their child’s photo.  Some people bring a photo release and have the parents sign them.  You can include verbiage about this in your contract too. I don’t normally include this,  just because at birthday parties you may not have all of the parents there to get permission from and the host may not have the authority to grant you permission to take photos of other people’s children.  I do put this in my contracts for belly paintings and private sessions though, as it’s easy being only one person painted.

  • By having your guests painted and photographed, permission is thereby granted to use images for our portfolio and marketing materials, such as printed brochures, social media or website gallery images.  No names will be revealed.  If you do not agree, please inform us and you and your guests’ privacy will be respected.
  • Artists may take photos of their work. Artist retains the right to use these images for promotional purposes on the company website and social media pages. If you do not wish for photographs to be taken, please inform us in writing prior to your event.
Acceptance of Contract
  • Include a place to sign, print name, and date.
  • “I have read, understand, and accept the terms of this contract.”
  • “By signing this, you have read and agree to the above terms and conditions”
  • “By signing my signature above/below, I affirm that I have read, understand and accept the Liability Statement and terms of  this agreement.  I agreeto pay  the  total amount due  unless  I give notice to reschedule within ____ hours/days of the event date.”
  • “[Your Company Name] will contact you _____ days prior to your event to confirm all details. In the mean time, please feel free to contact us with any questions at __________.”
  • “Once agreement and deposit are returned, this event is considered booked and you will receive confirmation by _[email or phone]__. Please retain a copy for yourself.”
  • Have a line to sign on and date! If I have to send a Paypal invoice for a last minute gig, sometimes I’ll note on the invoice “Payment of this invoice constitutes agreement of the terms outlined in service contract” so it can count as their signature in a pinch.
I hope this has been helpful for you in starting to form your own contracts! Getting anything in writing is better than nothing, and it really helps to ensure that you and your client are on the same page. If you’ve left out anything important or that you just didn’t think of, chances are you’ll learn and revise the next time around.  Most professionals revise and refine their contracts many times as different situations come up, to avoid them happening again, so this is a natural process! This blog post is a living document, and I do plan to add more verbiage as I come across others. Thanks for reading and happy painting!! 🙂