Happy Tuesday! I love using all the gorgeous types of glitter creams and gels for festival glitter designs and on my face paint designs. However, sometimes I’m just not happy with the amount of glitter coverage I get…especially when that’s all they are getting is glitter around there eyes. So, today I’m going to show you how I get maximum glitter coverage with my creams and gels!
This past summer while working in my Glitter Glamper booth at the MN State Fair, I found myself not particularly loving my yellow, pink, and sometimes orange in glitter tattoos. The problem was that the kids saw my super bright looking “hot pink” glitter in my kit and always chose it, but it just didn’t come across as bright on the skin. I mean, you know how it goes…the kids still LOVE them, but we as artists are always our own worst critics, and we want our work to really pop. While it does depend a lot on the skin tone that they are being applied to, generally bright, bold and opaque colors just tend to show up better on glitter tattoos. Here are a few from the fair that showed my pink, yellow and orange woes…
I tried mixing in some orange with the yellow to capture the layering on Belle’s dress…meh…
This girl really wanted this pink and this orange…she loved it but to me it didn’t come across as bright as the jars of glitter may have led her to believe.
You can see how crisp and bold the dark green is…but as you get to the yellow flame tips, it starts to lose it’s readability a bit.
I found that I was not the only one in my booth having this struggle! But the awesome thing about working alongside so many painty friends is that you can learn from each other, share and test out other brands, and get better!
Well, now that the fair is over, I thought I would do a little experimenting with some different shades and brands of yellows, oranges and pinks…the three colors that seemed to disappoint me most! I should note, I am sharing this information simply to help my fellow artists. I don’t even sell most of these glitters in my shop yet…so it’s not a sales pitch and nobody paid me to do this. 😉 I tend to stock my whole store based on my own experiences and recommendations from painty friends, so I’ll likely be adding more of these down the road as I test them and fall in love with some!
Anyway, here are some photos of swatches on my own arm, along with some gif’s to show the sparkle factor!
Pink Glitters
I had the most shades of pink to test! The one I currently have in my kit is Amerikan Body Art’s Bubblegum Pink. It’s one that looks super bright, but when used as a glitter tattoo, isn’t quite so much. I do still LOVE this pink, and it is my go-to pink for face painting. It does tend to be a little bit more transparent which is why I think it doesn’t pop as much on plain skin. Over pink face paint though, it’s awesome and it’s sheer-ness means it won’t totally cover up my work but enhances it.
For glitter tattoos, however, I think the UV and Neon shades seemed to show the most contrast against the skin. So, if you’re going for that as your goal, I’d recommend the UV and Neon options. I’ve included some other shades of pink too, because you don’t always necessarily want the UV look, and there are applications for both. I also think that the non-neon versions do have more sparkle in the light!
Yellow Glitters
Same goes for the yellows, and the oranges below for that matter. The UV/Neon versions seem to be a lot more opaque and bold, though the more sheer, iridescent colors have more sparkle to them. I had been using Amerikan Body Art’s Lemon Zest…much like the bubblegum pink, I still think it’s the best for face painting, where the neon/uv versions are more bold and high contrast for glitter tattoos. The powders are less glittery, but I thought were worth a try in this comparison!
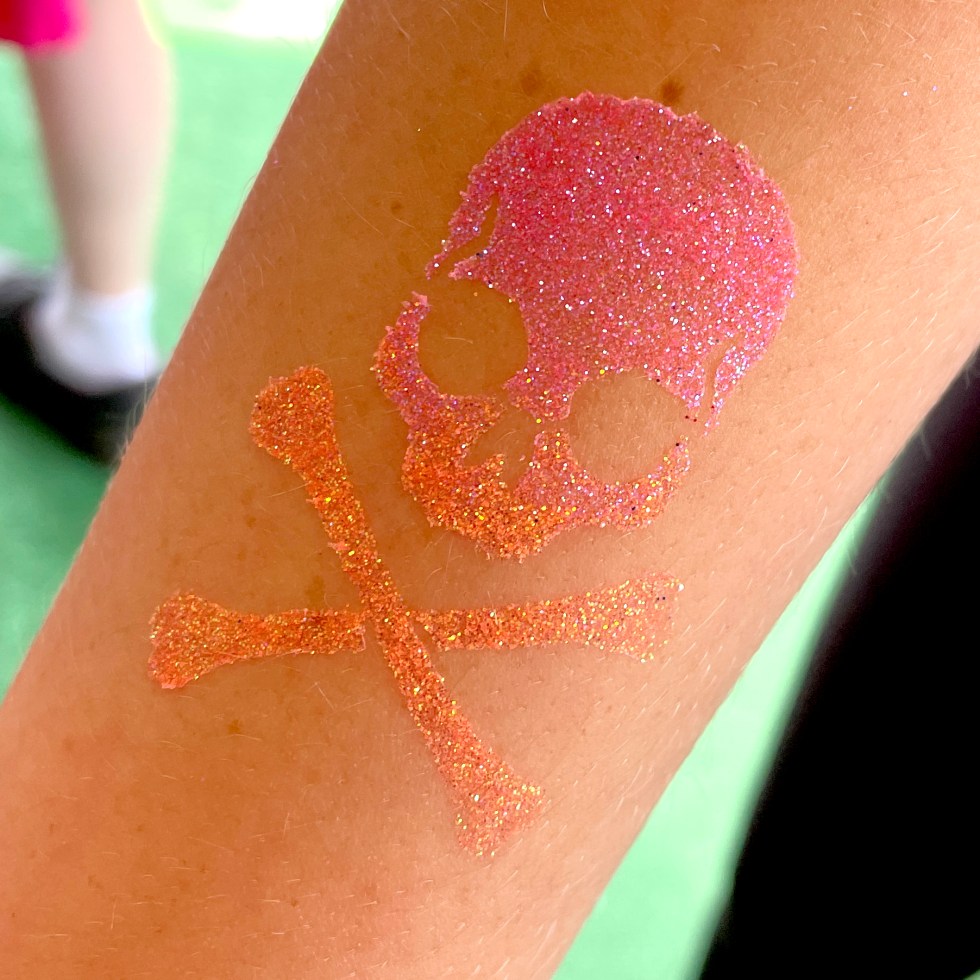
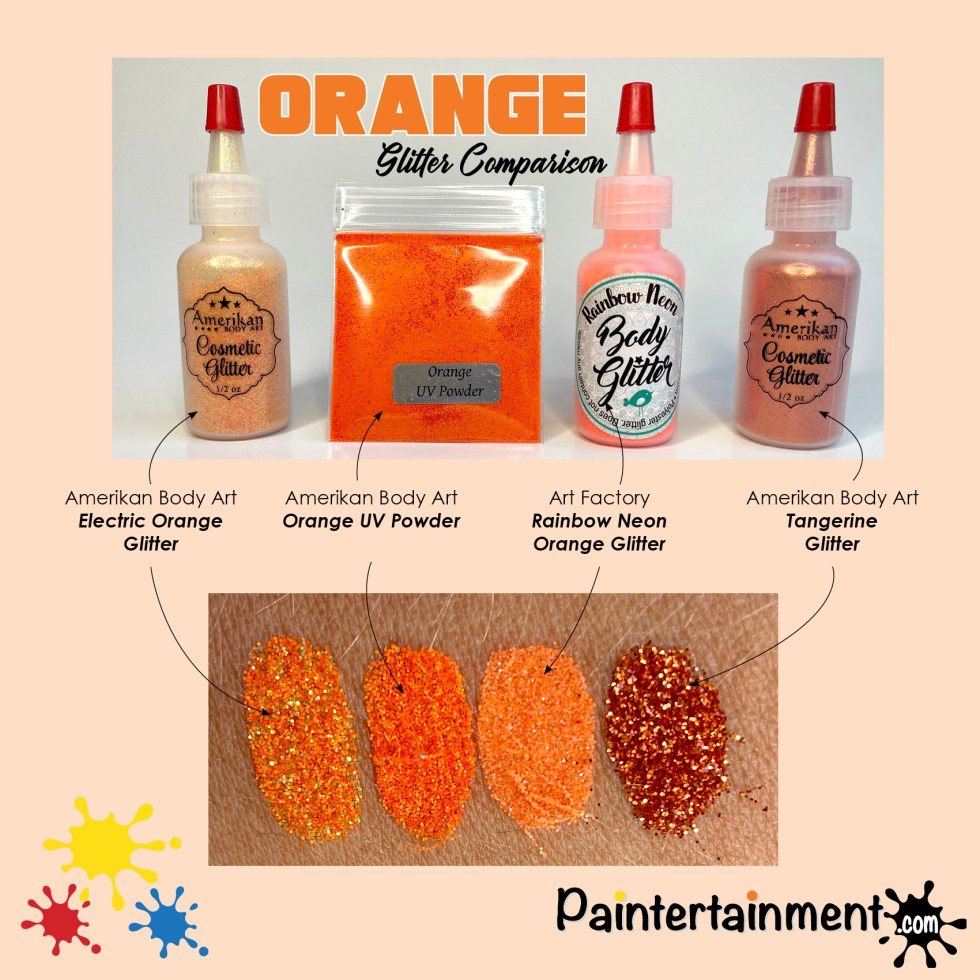
Orange Glitters
Electric Orange is my fave for face painting, again, though the UV/Neon options seem more opaque. I do like Amerikan Body Art’s Tangerine glitter too, for a darker orange!
Summary…
This is by NO MEANS an exhaustive sampling of these colors. I chose some from my existing vendors, some that looked good to me online, some that I found my fellow artists using, and some that I already had on hand. But what I’ve learned is that the more holographic glitters are best when poofed over face paint of a similar color, though the UV/Neon versions seem to be more bold and opaque when applied directly over bare skin, as we do for glitter tattoos. Neon glitters and powders are bolder, though the non-neon ones tend to have more sparkle.
Do with this information whatever you wish! For me, this has pretty much just made my kit grow, haha! I love both the more iridescent and the more opaque glitters and will keep both in my kit…just as I have both glycerine based and wax based blacks and whites in my face paint kit! They both have their ideal application.
Do you have a favorite shade of yellow, orange or pink that isn’t listed here? I’d LOVE to hear about it!!
Post it in the comments! I really prefer my blog posts to be living documents where we can all share ideas and new things as new things come along. We all know there’s a new product practically every week in our world, ha! Your comments help keep these posts relevant, so please feel free to share! Challenge my opinions and post your own! Thanks so much for stopping by and I hope this post has helped you in your own quest for the perfect glitter for your application!
As I mentioned last time, the interior of this camper is so beautifully original that, while I need and want to transform it to scream “Glitter Glamper,” I still want to achieve this while preserving the original state underneath. I need to brighten it up overall so that I can get great lighting to work in, and also create an environment that feels unmistakably and unforgettably “Glitter Glamper” to my guests. Yes, this has created significantly more time and expense versus just painting over everything with white and coating it with glitter, however, I am enjoying the process so far and loving the results!
I knew that the area between the countertops and cabinets presented a great opportunity to inject some glitter, by way of a backsplash. I explored a few options, from glitter wallpaper to a gem mosaic and everything in between, but in my mind they all started with cut panels that could be put up and removed if I wanted to later. In order to achieve the ultimate in glittery-ness (yup, that’s a word I have full authority to create as a glitterologist, haha!), I decided to go with a poured resin and super chunky glitter. This would enable me to use big, sparkly glitter but still seal it up in a durable, wipe-able surface that can easily be kept clean without glitter constantly shedding!
I started by purchasing some pressed hardboard from Home Depot, and cut panels to fit above the counter, carefully measuring to make sure it fit around outlets, the window, etc. When going for a solid, uniform color coverage with glitter, just as I would paint the skin under one of my glitter “wannabeards” before applying the same color glitter, I want to lay down some paint as a background. This gives the illusion of full, opaque coverage of glitter, even if you may have spots here and there where glitter has fallen off or isn’t as thick. I went with a white base coat here, because I’m using silver glitter. A gray would work too, but my goal is brightness and silver reflects white as well, so it was perfect! Not only did the white paint give me a more even look, but it helps seal up the wood, so it took less glue and less resin in the end. I painted the back, front and edges of each piece and allowed them to dry. Then on to the fun part…
I bought a couple 1 lb jars of chunky glitter from the craft store. (Note: we do not EVER use metallic craft glitter on skin…only cosmetic grade glitter!) I laid each piece of wood on a large piece of tagboard that had been folded in the middle (or newspaper for the longer ones), and then coated the wood with Mod Podge. School glue would work too…but Mod Podge is already watered down glue, so it spreads farther and quicker, which was my goal. After a coating of Mod Podge, I then dumped plenty of glitter over the wet glue and allowed it to dry. Then I carefully lifted the panel and shook off the loose glitter, set it aside, folded the paper and funneled the extra back into the jar.
Pouring the Resin
Before pouring the resin, there is a bit of prep work to do. You have to prepare a very level surface to work on, as gravity will spread your resin out, and you want it to be an even thickness. I used my kitchen counter, and covered it with many layers of newspaper, to protect it if any resin spilled over. (For the next round I laid out painters’ plastic, which is better as it won’t soak up resin like newspaper!) Also, make sure that you have the ability to leave your pieces there for 24 hours to set, where it will remain stable, level, and free of floating particles of dust or whatever! Making dinner was tricky around this and made me a little nervous, but it worked out just fine.
Then, you have to create some sort of “fence” around whatever you are pouring resin onto, of course, to keep it from just pouring off the edge. I used painters tape and went around all edges, making sure to fold it under and rub it tightly against the underside of the wood to contain the resin while it was still liquid.
Here is what I used for my resin:
Whatever resin you use, make sure to carefully read and follow the directions! I got out some paper cups to pour each part into, and then a cool whip bowl to mix them together in. I also got out a couple plastic knives and a foam brush to help spread the resin. Different brands will have different amounts of time that the resin is work-abe, before it hardens. Pay attention to that, as you only have so much time to spread it before it sets up.
Pour out equal parts of resin into the paper cups to ensure you have an equal amount of both resin and hardener. Then, pour the two cups together in your larger container, and mix. Make sure to mix it well…epoxy resin is a chemical process that requires equal parts and thorough mixing! Once I had it well mixed, I slowly drizzled it over the glitter, trying to distribute it as evenly as I could. Then, I used the foam brush (and plastic knives for the tighter corners) to make sure that it was spread out and covering all of the glitter.
Get down low so you can catch a reflection in your resin. This will show you where you may need to add more, spread it out, etc. The act of mixing resin will undoubtedly fill it with lots of bubbles. When doing a smaller project, all you need to do is get down close and exhale over the surface, and you’ll see the bubbles rise and pop! For this I took a heat gun and ran it over all the surfaces. A hair dryer would probably also work, though a heat gun blows less and will disturb the surface less. The heat causes the bubbles to rise and pop. Be careful not to burn your project! With this particular project, air bubbles were virtually unnoticeable anyway because of all the light bouncing around inside from the glitter. However, removing them helps it to be smooth and strong.
There is one little ledge area above the fridge where I had a lip on the panels, to hold things in during transit. Since a couple inches of the back of my panels was visible here, I glued some fun fabric on that edge. When installing each panel, I first drilled pilot holes so as not to crack the resin when I screwed it in. Everything went up beautifully with minimal screws!
There were just a few edges that showed in the end, including this little ledge where I had the fabric backer, so I covered those with some bling-y trim and a glue gun.
Overall I LOVE how it turned out. Photos truly do NOT capture the amount of depth and sparkle in this! I love it so much, that I’m toying with the idea of an epoxy resin flooring as well. We shall see…that may be a project for spring! In the meantime, this turned out exactly as I had imagined, and consider it a big win in achieving my intense glittery-ness and remove-ability!
Thanks for stopping by…Stay tuned for more updates on the progress! 🙂


You must be logged in to post a comment.