Happy new year!! I always love to look back on the previous year on new year’s day.
It’s SO hard to pick just one photo from each month, especially those summer months! But here are just a few highlights…
Window painting – My little covid pivot has really paid off this year, as I took on 4 brand new clients and got repeat work from my existing clients. Dunkin’ is definitely my biggest window client, and their locations grew from 4 to 6 stores this year, which now gives me about 24 painting jobs every year just from them! This year I did interior paint jobs, exterior, and vinyl!
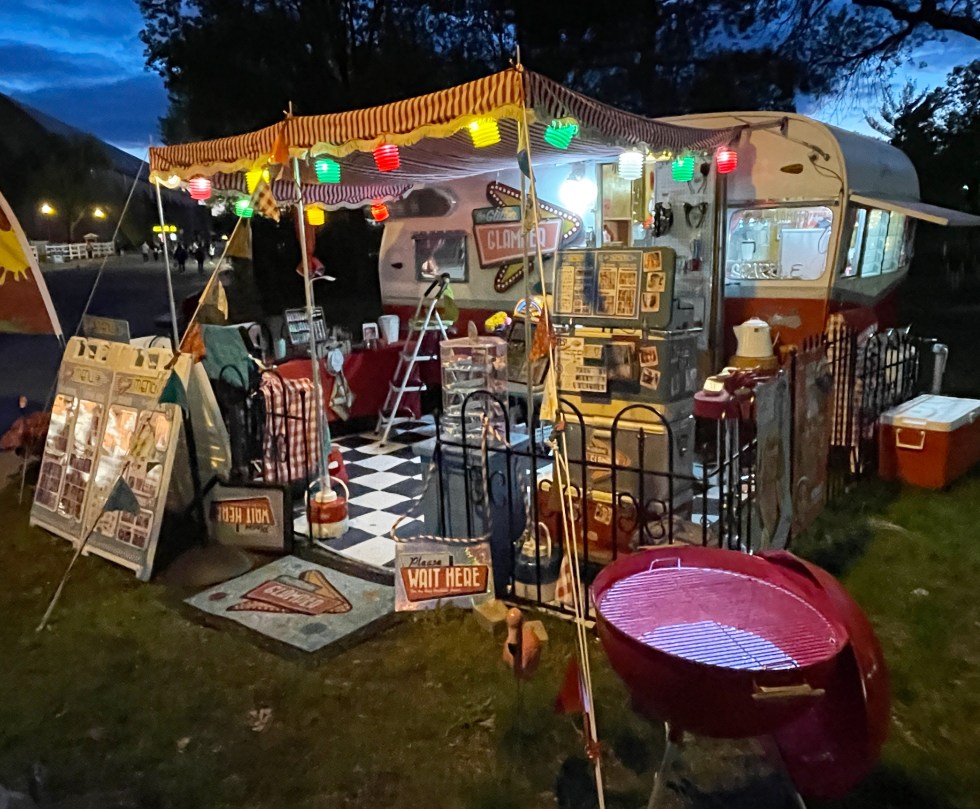
The Glitter Glamper – The Glamper had a huge year!!! In May was our first year participating in the MN State Fair’s “Kickoff to Summer” over Memorial Day weekend. We were slammed for 5 days, and I believe this was the Glamper trailer’s foot in the door to landing our new fair location, as shortly after I was offered a huge, new space to park the trailer in August at the MN State Fair! In between the two, the Glamper set up camp at Interlachen Country Club (our 2nd year with the Glamper there) for the 4th of July, and we also set up at the Carver County Fair for 5 days in early August. This was the year I really got to see my Photoshopped renderings of this Glitter Glamper concept turn to reality!
Private Sessions – I love painting for private sessions! I don’t do a lot of them but when I do they are SO much fun. This year I got to paint Rachel’s belly for the 2nd time, this time with a super cute “Up” theme! I also had the opportunity to paint Diane to complete her jester costume for Halloween!
County Fair – This year’s Carver County fair was like no other! I was able to bring in the Glamper and set it up right outside the building where my face painting booth has always been, and bringing in some of my amazing team of artists to help, I was able to juggle two booths at once! I had SO much fun having friends with me (normally I work alone here), and my boys got a chance to run the cash registers too!
MY AMAZING TEAM! – In looking back at my year’s worth of hundreds of photos, my favorites are always those of the amazing artists and family members without who’s help I would most certainly NOT be able to pull ANY of this off! Thank you all for doing such amazing work in sometimes very challenging scenarios, but always with smiles on your faces! You all make my job SO much fun and I am SO INCREDIBLY thankful for each and every one of you! Here’s to many more adventures in 2023!
Christmas time is the perfect time of year to do messy, glittery projects around the house. You can always blame the lingering glitter on your aunt who sent you that glittery card, or whoever wrapped their gifts in glitter paper, haha!
It seems we all have just a little more time on our hands this year, thanks to Covid, so why not spend some time reducing holiday waste and making something sparkly out of all those holiday cards? I remember my mom making these decorative balls out of old Christmas cards, and had one of hers in my decorations, so I thought I’d deconstruct it and make a couple of my own with an old stack of cards from previous years! My soon-to-be teenager Sam even helped me out with cutting, scoring, folding and gluing. This is a great project to do with your kids at any age. Little ones can help cut or tear the fronts of the cards off and recycle the backs. They can also help with the tracing of the patterns, and if they’re good with scissors, cutting out circles! Here’s how to make them!
Tools & Supplies Needed:
Template (see next step!)
Pile of holiday cards – You’ll need to make 20 circles to create one ball.
Cardboard – any thick stock will do. You can even use a holiday card back, or a cereal box from your recycle bin!
Scissors
Ballpoint pen or nail – for scoring the cards to create crisp folds
Glue – Any ol’ white school glue works, though thicker tacky glue will drip less
Cut out the circle and the triangle, lay it on your piece of cardboard, and use them to trace a pattern on the cardboard. Cut those out so you have a cardboard circle and triangle, as shown in the photo above. This is scaled to create about a 7″ diameter ball. If you like, you can scale these up or down to change the size of your ball!
2.Cut circles out of holiday cards
Next, lay your cardboard circles on the front of your cards, trace them, and cut them out. You’ll need 20 circles to make one ball. This is a great place to involve kids. You can have them start by tearing the cards in half and saving the fronts. Photo cards don’t work well because of their glossy surface, so we only use the paper greeting cards for these!
3. Score the triangular folds
Take one of your card circles and flip it upside down. Now take your triangle template and position it so that all 3 points are touching the edge of the circle. Here’s where you’ll use the nail…but it doesn’t have to be a nail. A ballpoint pen works, a letter opener, a toothpick, a fork, whatever…just something strong and relatively pointy. What we’re doing here is scoring the card, so that you’ll get perfectly straight, crisp folds. Press and run your nail or whatever tool along the three edges of the triangle. Put a piece of cardboard or paper underneath so you don’t scratch or write on the table! This is my son doing this part…
4. Fold
Now, flip your circle back over and fold towards the printed sides. Notice how nice it folds after you’ve scored it!
5. Glue 5 Circles together to form the top.
Put some craft glue on one of the flaps.
Glue together 5 pieces to create a domed, round top for your ball. Clothespins or chip clips work great to hold the together while they dry! Before you totally glue them all together, loop a piece of string, yarn or ribbon through the center point to hang it with. You can tie a knot here to hold it in, or just use some glue and/or tape inside to hold your string.
6. Repeat to create the bottom, and make a strip for the middle.
Now that you have the top made, do the same thing again to create the bottom. You should have two domed pieces made of 5 cards each. Next, glue 10 more together in a straight row, as shown above. This will be the middle of your ball.
7. Assemble the Ball
Take your strip of 10 cards, shape it into a ring and glue as shown above. As you can see here, I am impatient so I used a little tape on the inside to hold these together while they dry!
Now, glue on your top (above) and your bottom (below)!
8. Add Glitter!
And now for the BEST PART….the GLITTER!! When I’m using loose glitter like this, I work over a folded piece of paper, poster board, etc. This project is small enough that a file folder worked great! That way, you can catch all the loose glitter in the folder or paper, and use the crease to dump it neatly back into your glitter jar, leaving not a speck to be found. Hehe…
Doing one seam at a time, apply glue to the edge. Here’s where a thicker tacky glue might be helpful as it will be less drippy. But, you’ll want to get your glue on, and then quickly pour glitter on it before it drips away on you, which is why I apply glue and then glitter to one “rib” at a time…
This part may require some breaks to let the glue dry. I start with the top ribs, then go around to the side strip. Then, I let it sit and dry before turning it over and doing the bottom ones.
Notice my orange file folder catching every single speck of glitter?! Amazing, huh? We don’t have ANY loose glitter specks around our house…nope, not a one! 😉
Done!
Once they dry, hang them wherever you wish! These are pretty and simple, a fun way to get your kids into recycling, and a great way to honor all those friends and family who have taken the time to send you cards. If you can find glue that will work well, you can even try making these with photo cards, and have all your friends and family’s faces on them! And, like I said, you can even shrink down the template to create smaller ornaments, which would also enable you to get several circles out of one card.
As soon as I first set foot in the Glamper I knew that the furnace would end up having to come out. The doors on these vintage trailers are very small to begin with, and the original placement of this huge, old furnace impedes the entryway even more. Not to mention the safety issues…these furnaces are not as safe as what you might see in modern campers, as was evident by the burnt paneling I discovered upon it’s removal!
There were 3 big parts of this project:
Removing the furnace, fan and thermostat pieces from inside the camper
Removing the chimney through the roof and patching up the hole it left, and
Turning the ugly hole in the wall into something functional and finished.
Removing the Furnace Inside
Here are some photos of the furnace before, during and after removal. This furnace is HEAVY, and it’s important to remember these things as keeping the weight evenly distributed is important in a trailer. However, I believe that some of the cabinetry I’ll be adding later as a work station will help replace the weight I removed here. As I’ve noted in earlier posts, I did hang on to this original furnace, should someone later want to return the trailer to all original. But for my purposes it needed to go. I plan to put in a new furnace at a later date…one that takes up less space and doesn’t have to vent out the roof. If we can ever avoid openings on the roof, that is a good thing! Openings are recipes for water damage!
Original furnace. As you can see, it takes up a few inches of an already small doorway.
After removing the outer shell of the furnace.
The hole left from removing the furnace unit.
Evidence of a little potential fire danger underneath the tape.
Inside the cabinet the furnace was mounted in.
Removing the fan that sat in the cabinet and blew through a vent that was installed in the cabinet door.
Removing the Chimney and Patching the Roof
Getting the furnace out of the camper was probably the easiest part. Next up was removing the metal shaft that goes up through the ceiling, removing the chimney from the roof, and then patching up the hole to prevent any leaks. It made me a little sad to remove the cute chimney from the roof, but it was probably a good call as leaving an open hole in the roof that doesn’t need to be there just leaves it vulnerable to future water damage. Again, I saved all of the original parts if we ever want them back!
In order to remove the whole metal lining of the shaft that goes up through the roof (sorry I have no clue the technical terms for this stuff, haha!), I had to pull it up and out through the roof. But before I could do that, I had to scrape and chisel off all the rubbery sealant the previous owners had covered the seams with.
The previous owners did a great job keeping the roof very well sealed up, and this is one of those spots you want to seal well! It was a lot of work to get the old stuff off and expose the screws. I figured I’d have to drill the screws out, but luckily I was able to scrape them clean enough to back all of them out with a screwdriver. Once that was done, I was able to slide the whole works up and out!
This inner pipe slid up and out, but I had to also remove this plate that surrounds it.
After uncovering all the screws, I was able to back them all out and remove the top plate.
Everything is out!
Okay, now that everything was out, it was time to seal up the gaping hole in the roof and the holes in the floor. Needless to say, this is a job to be done on a nice, dry day! Here are a few photos looking down, through the roof and the holes in the floor where gas and I believe condensation may have dripped out…
View from the roof, down into the cabinet where the furnace was
Holes in the floor from the furnace
I filled the floor holes with expandable foam spray and cut a piece of subfloor to cover them up.
The holes in the floor were pretty quick to patch up so I did that on the same day. Next I worked on the roof. We already had a roll of tin on hand, which would work to cover the hole. However, it was pretty big and I wanted to give it a little more structure under the tin. After all, if a branch is going to fall on this roof, Murphy’s law dictates that it would likely land right on this weak spot! I cut a piece of subfloor just for something rigid, applied some caulking around the hole, and smooshed the wood over it. Then I screwed the wood panel into the roof, and added more caulking around the edges of the wood, and where the edges of the tin patch would go. (photo below, left) Next, I laid on a piece of tin, smooshed it into the caulking, and screwed it in as well (below, center). Then I added yet another layer of caulking around the edges of the tin. Caulking is your friend!! Fill ALL THE HOLES!!
I let all this caulking dry for as long as it needed…I can’t recall if this next step was later that evening or the next day. but, you want to make sure something like this is allowed to dry well, before adding anything else that will block the air flow to it. Funny how I’m talking as if I’ve EVER done anything like this before or as if I have any clue what I’m doing…I’ll just add here that I’m really winging it with most of this stuff, haha! Anyway, back to filling alllll the holes….
Once all the caulking was super dry, I coated the whole works with some Flex Paste. I’m guessing this is the same or similar to whatever was already spread around the chimney that I removed to get to the screws (only white instead of black)…I went all out and just slathered the entire tin panel with the stuff. No water will be gettin’ in here! I’ll probably paint over this again at some point, but for now, you can’t see it at all from the ground, and the roof is water tight again!
Cleaning Up the Ugly Hole
Now that the roof was all good and sealed, it was time to go back inside and figure out what to do with the giant hole I just created in the cabinet where the furnace sat. My husband really wanted a solid grab bar to help get OUT of the Glamper, so I figured this was the perfect opportunity to add that. With there being a hole now, I could set the grab bar back into the cabinet at an angle, so that it wouldn’t catch on people’s clothes or shrink the doorway like the furnace did. So, I decided to build a little shallow shelf cubby and incorporate the grab bar there.
The hole…
Cutting out the hole with my jigsaw
Hole more neatly trimmed
I started by cutting out some of the edges of the paneling with my jigsaw, so I’d have a clean, rectangular opening. I’m really just wingin’ it as I go here…
Figuring out where to put the handle and at what angle.
Removing the back panel, exposing the cabinet inside
Installing a new piece of birch for the back panel
Then I played around with the handle and figured out how I’d really make it solid, and at an angle so it wouldn’t protrude out into the doorway. Next, I cut out and removed the back panel that sat behind the furnace, opening it up to the cabinet behind. I still wanted to keep the storage cabinet, yet I wanted my grab bar to be inset, so I basically re-built the same size cavity in here…just made it look nicer and have more function. I cut a piece of 1/4″ birch plywood, and after installing a few smaller strips in the back to support it, I attached a new back to the shelf cubby.
I cut some more strips of birch and glued them on the right sides, which held the shelves in place.
The left side panel I sanded bevels on and cut out slots, so it would fit around the shelves and cover the grab bar supports.
I marked my grab bar support pieces with tape and a sharpie so I knew where to screw it in.
Next I added the shelves (above). I cut strips to cover the inner right side of the cubby, leaving spaces to catch the shelves between them so I wouldn’t need any hardware showing. I’ve really never built any kind of shelf before, and like I said, I made this up as I went along…but it turned out pretty good. Better than a burnt, jagged hole I guess, haha! Next I made the left side panel which was a bit more tricky. I had to bevel the back edges so it would sit tight with the back panel at an angle, and then had to cut out slots for the shelves. Overall I think it worked okay. You can see in the right photo above, I put tape on the door trim and marked with a sharpie where my supports were, so I’d know right where to screw in the grab bar.
The grab bar is something I picked up years ago in a little antique shop, just because I thought it was cool. I had no idea where it came from originally, or where I’d use it, but it turned out to be PERFECT for this! I then removed it so I could stain everything.
Staining stuff!
Next I stained everything. I learned that the sample swatches in the hardware store look NOTHING like the actual stain. Grr. I should have tested it on a piece of scrap first like the can says to do, but I’m not great at following instructions, haha! So, you can kinda tell the base boards here are a tad too dark. That’s where I started and said “nope!” At that point I ran back to the hardware store and bought a color called “traditional pecan.” That was a better match, so I finished off the inside of the cubby.
A few days later I made it back out to get some trim to finish it off. Yeah, it probably would have made more sense to do all this staining at once but I was figuring it out as I went, and didn’t know what I wanted to do…so after the cubby was all stained and clear coated, I cut the outer trim pieces, stained and clear coated them, and then added those.
Trim installed!
Yes, I know things will fall off the shelf. I’ll add some sort of rail.
Darn clamp left a black mark on my top trim piece. Maybe I’ll fix that.
I think it looks pretty good! Better than a hole for sure! I’m no furniture maker but I’m happy with how it turned out. Of course, with all things in a vintage trailer, the project is never really done… I realize that I can’t drive down the road with stuff on these shelves. I’m still thinking about what I want to do for some type of rail. Maybe clear plexi, maybe a wood rod stained to match, maybe something fancier…I’ll think about that. In the meantime it looks nice. When I do new floor tiles, that’ll fill in the gap on the bottom shelf as well. I also just have a hole up through the top for now…partly because I know we’re going to re-do all the electrical and it’ll make it easier to reach those switches. But I am also thinking about adding a light up in there. We shall see. If nothing else I’ll close that up with another piece of wood after we’re done with electrical stuff.
So there’s one of my big projects from the past month or so! More things are in the works, but with the temps dropping I probably won’t be able to do the flooring until spring. I want to make sure I have ideal temps for my adhesive to work. But I also know that I’m going to really miss the Glitter Glamper when I go park it for the winter in our friends’ barn, so you may see me pop in this winter with some other small projects! 😉
It’s time to show you some more progress on the Glitter Glamper!
As I mentioned in my previous Glamper renovation posts, my goal with the Glamper is to make it what I need it to be, yet still preserve the original birch paneling inside. The birch inside the Glamper is in amazing vintage condition, however, it just makes for too dark of an environment for me to work in, which is the purpose of the glamper!
I special ordered some tin ceiling tiles from Menards, which took a few weeks to get. I didn’t want the cheaper glue-up tile, because I don’t want to damage the wood with a bunch of glue or foam tape. So, I went with real tin. I also couldn’t use your standard tin ceiling tile nails, because they would be too long, and likely could poke through the roof of the camper, which would be disastrous!! I also felt that shorter nails still probably wouldn’t cut it, being that this is a MOBILE ceiling that will be riding down the freeway, bumping as it goes, and I didn’t want the nails to work their way out. So, I decided on some small screws, just 1/4″ long, enough to catch the wood. If I ever want to go back to the original birch, I’ll have some small holes to putty, but that’s a lot better than paint!
The first thing you have to do with a ceiling like this is find the center of the trailer, and start from there. I measured the ceiling and marked the center with a piece of tape. My son helped me hold the first tile against the ceiling while I drilled tiny pilot holes through the tin and attached. From there I was able to complete the rest by myself.
Definitely the trickiest part!!
Hey! It looks like it did in my head!
I used my ruler, sharpie and tin snips to cut around cabinetry where needed. I highly recommend wearing gloves…I did not take my own advice and got quite a few cuts on my hands, but hey, no pain no gain, right? This spot shown above left with the exhaust fan/window and sink light fixture was the toughest for sure! I had to take apart the fan and the light partially, and cut around two cabinets, all in one piece. But, it turned out great!
To keep the feel of the canned ham shape, I wanted the ceiling tiles to continue down the front and rear curves to the floor.
I need to replace the birch below this window, then I’ll add tiles to the floor here too.
This part was too much of a bend for the tin tiles to handle. Kicking myself here because I forgot to align those bottom tiles with the center of the camper, so the line is off from the window…maybe I’ll swap those out…
In the rear of the camper, however, there is a curve that is just too tight for these tin tiles to bend. Even if I could get them to flex that much, the paint would chip off really bad. I found some plastic material that would make the curve to fill in that space, and while the pattern isn’t an exact match, I think it looks much better to continue the white field down to the floor. I might eventually do the same thing to line the tiny bathroom!
I still had a couple trim pieces cutting across the white above, so I covered that up with some adhesive backed silver glitter vinyl.
Cleaning up the edges of this in a curvy camper is tricky, because you can’t just bend crown moulding around the curves. I really just needed something decorative that was wide enough to cover the corners, so I ended up finding some 1/2″ diameter silver twisted cord online. It turned out great! The trailer originally has some vinyl piping all around the corners, so that’s what made me think of something fabric in nature.
One section of straight crown moulding worked here!
The back wall is the one place where I used a piece of actual trim, since it was a straight section. The rest was rope..glittery silver rope, of course!!
I first measured the entire length I would need, so I’d know to order 17 yards of trim. When it arrived I used a hot glue gun to attach it around the camper, taking care to keep the glue mostly on the tile and not on the wood, again, to preserve the original finish. (though hot glue peels right off the wood too if needed)
Aaah….that’s better. No more wood strips interrupting the flow of white from front to back!
The last little bit of tile that needed to go up was on the front wall, which I had held off on because there was no wall. I removed the original birch panel because it had some rot in the corners, and I had to access the dented corner to make some repairs. So, last week I picked up a sheet of 1/4″ birch plywood at Menards, measured and cut it to fit, installed it and stained it! Yes, I was going to cover it up with tin tiles anyway, but I still wanted to preserve that complete look of the original birch walls underneath. So, I did it right as if I were going to finish it with wood, and then added a few tiles. If I ever want to go back to original, I just have a few small holes to putty! Overall I think it turned out great! I achieved my goals of brightening up the space while preserving the original wood, and achieved the cohesive look of a continuous arch of white paneling from front to ceiling to back, keeping all the sides wood.
This was a big project and the tin tiles were crazy expensive. But, I am really happy with how it turned out in the end!! So many more projects to show you and more to start on, but I’ll leave it at this for now! Stay tuned for more!
As I mentioned last time, the interior of this camper is so beautifully original that, while I need and want to transform it to scream “Glitter Glamper,” I still want to achieve this while preserving the original state underneath. I need to brighten it up overall so that I can get great lighting to work in, and also create an environment that feels unmistakably and unforgettably “Glitter Glamper” to my guests. Yes, this has created significantly more time and expense versus just painting over everything with white and coating it with glitter, however, I am enjoying the process so far and loving the results!
I knew that the area between the countertops and cabinets presented a great opportunity to inject some glitter, by way of a backsplash. I explored a few options, from glitter wallpaper to a gem mosaic and everything in between, but in my mind they all started with cut panels that could be put up and removed if I wanted to later. In order to achieve the ultimate in glittery-ness (yup, that’s a word I have full authority to create as a glitterologist, haha!), I decided to go with a poured resin and super chunky glitter. This would enable me to use big, sparkly glitter but still seal it up in a durable, wipe-able surface that can easily be kept clean without glitter constantly shedding!
I started by purchasing some pressed hardboard from Home Depot, and cut panels to fit above the counter, carefully measuring to make sure it fit around outlets, the window, etc. When going for a solid, uniform color coverage with glitter, just as I would paint the skin under one of my glitter “wannabeards” before applying the same color glitter, I want to lay down some paint as a background. This gives the illusion of full, opaque coverage of glitter, even if you may have spots here and there where glitter has fallen off or isn’t as thick. I went with a white base coat here, because I’m using silver glitter. A gray would work too, but my goal is brightness and silver reflects white as well, so it was perfect! Not only did the white paint give me a more even look, but it helps seal up the wood, so it took less glue and less resin in the end. I painted the back, front and edges of each piece and allowed them to dry. Then on to the fun part…
I bought a couple 1 lb jars of chunky glitter from the craft store. (Note: we do not EVER use metallic craft glitter on skin…only cosmetic grade glitter!) I laid each piece of wood on a large piece of tagboard that had been folded in the middle (or newspaper for the longer ones), and then coated the wood with Mod Podge. School glue would work too…but Mod Podge is already watered down glue, so it spreads farther and quicker, which was my goal. After a coating of Mod Podge, I then dumped plenty of glitter over the wet glue and allowed it to dry. Then I carefully lifted the panel and shook off the loose glitter, set it aside, folded the paper and funneled the extra back into the jar.
Pouring the Resin
Before pouring the resin, there is a bit of prep work to do. You have to prepare a very level surface to work on, as gravity will spread your resin out, and you want it to be an even thickness. I used my kitchen counter, and covered it with many layers of newspaper, to protect it if any resin spilled over. (For the next round I laid out painters’ plastic, which is better as it won’t soak up resin like newspaper!) Also, make sure that you have the ability to leave your pieces there for 24 hours to set, where it will remain stable, level, and free of floating particles of dust or whatever! Making dinner was tricky around this and made me a little nervous, but it worked out just fine.
Then, you have to create some sort of “fence” around whatever you are pouring resin onto, of course, to keep it from just pouring off the edge. I used painters tape and went around all edges, making sure to fold it under and rub it tightly against the underside of the wood to contain the resin while it was still liquid.
Here is what I used for my resin:
Whatever resin you use, make sure to carefully read and follow the directions! I got out some paper cups to pour each part into, and then a cool whip bowl to mix them together in. I also got out a couple plastic knives and a foam brush to help spread the resin. Different brands will have different amounts of time that the resin is work-abe, before it hardens. Pay attention to that, as you only have so much time to spread it before it sets up.
Pour out equal parts of resin into the paper cups to ensure you have an equal amount of both resin and hardener. Then, pour the two cups together in your larger container, and mix. Make sure to mix it well…epoxy resin is a chemical process that requires equal parts and thorough mixing! Once I had it well mixed, I slowly drizzled it over the glitter, trying to distribute it as evenly as I could. Then, I used the foam brush (and plastic knives for the tighter corners) to make sure that it was spread out and covering all of the glitter.
Get down low so you can catch a reflection in your resin. This will show you where you may need to add more, spread it out, etc. The act of mixing resin will undoubtedly fill it with lots of bubbles. When doing a smaller project, all you need to do is get down close and exhale over the surface, and you’ll see the bubbles rise and pop! For this I took a heat gun and ran it over all the surfaces. A hair dryer would probably also work, though a heat gun blows less and will disturb the surface less. The heat causes the bubbles to rise and pop. Be careful not to burn your project! With this particular project, air bubbles were virtually unnoticeable anyway because of all the light bouncing around inside from the glitter. However, removing them helps it to be smooth and strong.
There is one little ledge area above the fridge where I had a lip on the panels, to hold things in during transit. Since a couple inches of the back of my panels was visible here, I glued some fun fabric on that edge. When installing each panel, I first drilled pilot holes so as not to crack the resin when I screwed it in. Everything went up beautifully with minimal screws!
There were just a few edges that showed in the end, including this little ledge where I had the fabric backer, so I covered those with some bling-y trim and a glue gun.
Overall I LOVE how it turned out. Photos truly do NOT capture the amount of depth and sparkle in this! I love it so much, that I’m toying with the idea of an epoxy resin flooring as well. We shall see…that may be a project for spring! In the meantime, this turned out exactly as I had imagined, and consider it a big win in achieving my intense glittery-ness and remove-ability!
Thanks for stopping by…Stay tuned for more updates on the progress! 🙂
The ONLY thing photoshopped here is the logo decal…I’ll likely order a decal like this for now (I already have them on my storage trailer), but hope to have a real neon sign made down the road that can be hung on the outside while “open,” and then stowed away when driving!
If you’re a fan and follower of our Glitter Glamper on social media, you’ll know that on September 25th I took a huge leap of faith and purchased the REAL, live Glitter Glamper! Why was this such a huge leap of faith, you ask? After all, the Glitter Glamper was a raging success it’s first year at the Minnesota State Fair, and my concept had been proven beyond my wildest dreams without even having a physical Glamper yet! Well, as we all know, we are in the midst of a global pandemic, which has put a screeching halt to the event industry, and in turn, nearly all of my income, making it a big financial risk to take on the hope that “someday soon” we’d be back to “somewhat normal” life! Here are some of the factors that nudged me just far enough to put what’s left of my money where my now slightly shaky confidence was:
With virtually all of my events cancelled since March, I had a little more TIME on my hands to work on a big project.
With no income stream in sight for most of 2020, this may be a good year to create tax deductions!
We WILL eventually get past Covid. Events WILL eventually come back. But in the meantime, even if they don’t come back with the volume they once were for a long time, having the ability to go mobile and set up “shop” outdoors at an event, where I can easily control the number of people within that 6′ radius at a time and sanitize as needed, is a huge plus! People may not be able to book a large indoor gathering for a while, but being able to spread out outdoors opens up unique covid-friendly opportunities.
My current space at the state fair is inside a “cage” type booth, but even if they don’t have an outdoor space for this trailer in the near future, it can still be utilized at events around the Twin Cities. And, it MIGHT actually fit INSIDE my current “cage” space…hmm…I’m exploring possibilities. 😉
I can’t leave out the fact that my husband has a much more stable job than I, which sustains us and our cost of living even during a pandemic…so I fully realize that I am incredibly fortunate and privileged in that respect. If my business fails, we won’t be on the streets (or crammed in the Glamper), and that is the one thing that gives me the ability to do these crazy things!
Essentially, I had decided even while working in an awesome and successful state fair booth last year, that I didn’t come this far only to come this far.
While I moved very fast on this purchase as soon as I saw it on Facebook marketplace, it was not an impulse decision. I have been researching and searching steadily for probably over 2 years. I knew from the beginning that I wanted a Shasta Airflyte. This is evident by the business cards I created, and Photoshopped rendering of what I wanted my booth to look like for the State Fair’s application. I knew I wanted one that was manufactured between 1961 (the year that Shasta started their iconic “wings”) and 1964 (when they moved their body design from the classic “canned ham” shape to a more boxy design). At least 12′ long would be ideal, and under 20′ for ease of pulling and squeezing into festivals. A bathroom would probably be impossible, but would be a major plus if I ever were to sleep over in it at a weekend event. I had seen plenty of vintage trailers that “would have worked,” but held out for that elusive dream. I spent countless hours killing time, scrolling through Facebook Marketplace and Craigslist. I knew what was out there, what they were going for, and how much work I’d be getting into.
I got a little more serious when Covid hit, but still was starting to get to the point where I didn’t think what I had in my mind’s eye would ever become available, at least in my state or budget. But, just as things always work out the way they should, the wrong deals fell through and along the way made it so that I knew this was THE one when it turned up. Just when I was ready to settle for something other than a Shasta which also fell through (no title), and then let the whole idea go entirely and move on, I found it! The day before I went to pick it up I even got a call from a prospective client who was wondering if I really had a real camper that I could park at their curb for a covid friendly party. Um…please hold for just one day, haha!
Yes, I’m wearing tiny earrings with tiny red & white campers. Hehe!
I have a LOT of catching up to do on the progress of this thing on my blog, so I’m starting with some of the bigger things I’ve worked on so far, and will be sharing a lot more in upcoming posts!
So, back in September I purchased this 1963 Shasta! It really had everything I was hoping for, even an elusive bathroom! The bathroom is suuuper teeny, but it was a wish list item in the event that I ever take this trailer to a weekend festival or fair somewhere and spend the night in it, enabling me to work at an event out of town and save money on lodging. The goal here is to have a camper that embodies my “Glitter Glamper” brand, that functions for the work I want to do in it, and still remains camp-able. Another huge plus with this one was that it wan’t totally falling apart, the floor wasn’t rotting and in need of total replacement (we already went through that with our family camper and I did NOT want to tackle a floor again), it was clean and cute and mostly original! The exterior does not match my imagined turquoise on my business graphics, however, I have decided to stick with red and white. Red is my favorite color, I love how much bolder and eye catching this combination is (which is important for a business), and it gives me future potential to rent it out as a photographer’s backdrop for holiday photos! Later on I’ll show you the history of layered paint jobs on this thing, but for now, here’s where I started…
Interior the day I bought it! The tiny bathroom is in the back right corner closet.
This is the front dinette, which will become my main work space.
After some research in my vintage Shasta Facebook groups I learned that what I have here is not actually an Airflyte, but a Shasta 16-SC. (Ariflytes apparently didn’t come with the bathroom!) The 16 I believe refers to the length, as it is 16 feet bumper to hitch. No worries though…I wasn’t married to the Airflyte model as much as I was married to those WINGS! (Which I don’t believe are original on mine…I’ll tackle that later!)
We had a family camping trip planned for the same day that I bought this, so it was tough to bring it home, park it, and then scramble to head out of town and leave it behind! Needless to say, I couldn’t wait to get back home and get to work! The first thing I did was curtains! I know, probably the least important thing…but this is something I knew I could do quickly and make a big visual impact for very little money! I found the shiniest fancy fabric at a local fabric warehouse, and crocheted overly dramatic tiebacks using glittery yarn and hanging crystals! Do you expect anything less for the Glamper? I think not!
Crocheted tiebacks, as blingy as possible, haha!
New, shiny curtains that scream “Glitter Glamper!”
Of course I have my “Friends of the Fair” decal on the window!
Since September I’ve been working on it a little almost every day, racing against the clock and Minnesota’s impending winter to do as much as I can before it has to be put away for winter! The most immediate things that had to be done were really just sealing up cracks and crevices to keep mice out over winter, however, I really wanted to get it looking like the GLAMPER and not your average camper, as much as possible, so that it would be as ready as possible for events come spring. In order to actually physically WORK out of this camper though, I really needed to make space for a work station and chair space for customers.
We got a freak October snowfall this year…it’s gone now, but this shot was enough for me to agree that she must remain red & white…this is just SCREAMING to be set up for Christmas photo shoots!!
Time to start some of the dreaded DEMO!
I decided to remove the dinette to make my work area. While I originally figured I’d have to buy a camper in much worse shape and gut it, this one is really beautiful inside and original. SO, my goal has now become to make this camper be what I need it to be for my work and deliver the full Glitter Glamper experience, but still preserve as much of it’s original design as possible. For this reason I very carefully removed the dinette and have saved all of the original pieces, should I want to ever convert it back to a camper just for camping. (I currently have my state fair booth components tucked away in a storage trailer, so I was able to squeak these parts into the trailer for now)
Pulling out the dinette served another purpose though, to remove the front wood panel which had some rot to take care of, and access the front left corner where pervious owners had hit a deer. This corner was pretty beaten up…not too bad looking from outside but once I removed the booth I could see daylight through the floor, could crumble pieces of the framing with my fingers, and could actually reach my hand down to the ground if I wanted to. Not a hole I would want to leave open for winter! It also greatly compromised the structure itself.
These old Shastas were constructed surprisingly poorly back then. The framing is not one nice, solid, curved piece of wood, but rather, these are made with a bunch of little pieces of wood stapled together to form the curves. If you were to pull the siding off of the outside of a Shasta, what you’d see would look much like something pieced together from the scrap bin. I learned this, among many other things, from the vintage Shasta owner Facebook groups I’m in! So, between the rot and the deer damage, there was really nothing attaching the front left corner of the trailer to the walls or floor. The front panel of aluminum was actually flopping loose as well, once I took the booth out!
Removing the booth, piece by piece! I saved all the original wood facing, cushions, platform and tabletops in my Glamper storage trailer if I ever want to put it back.
After removing the whole booth and the front wood panel which had rot in the corners. Luckily the rot had not spread to anywhere else!
Removing the damaged and rotted wood. I didn’t even have to cut anything here…that is how long the original piece was.
Gah! This part is ugly! Time for a “pretty” break!!!
Okay, so far this is probably the ugliest piece of the whole project…and was a little daunting. I admit that to keep motivated and keep my eyes on the prize, I had to occasionally turn my gaze back to the other side of the camper, look at the parts that didn’t need replacing, and sprinkle in a few more creative mini-projects. I do this a lot in work and life in general…I often bounce from one thing to the next. It helps me get through the boring parts of business ownership like accounting and paperwork while still keeping motivated with the creative, artistic side! 😉
I painted and blinged out several small mirrors to hang in the Glamper!
Hanging mini LED lights, and setting up some fun accessories from my state fair booth! The afghan my grandma made and happens to match perfectly, and I found the mermaid sequin pillow at a thrift store!
I bought this wood sign at a thrift store years ago. It fit perfectly above the door (after removing a little spice rack that was not original to the camper), so I coated it in glitter and stuck it up there!
Okay, let’s go back to the dirty work….
So, I set to work pushing out the dent as much as I could, cutting new wood to replace the rotted and crumbling pieces that had broken in the collision, re-attaching the aluminum siding from the outside, re-attaching the framing to the floor itself, filling up any remaining cracks with rodent-resistent spray foam & caulk.
Removing old wood
Replacing with fresh wood
Closing up the wall after filling gaps and insulation
Removing the booth, of course, left me with a patch of unfinished floor. I’m still thinking about what I want to do with the final floor surface, but in the meantime I needed to at least bring the newly exposed floor up so it sits flush with the rest of the newer sub floor that the previous owner had put in. This involved scraping off the original tile to expose the original subfloor, and putting in a new piece.
Removing old, loose, curling tile with a chisel
After I cleaned the subfloor and cut a new piece, I laid down some construction adhesive.
New floor laid down and ready for screws! Now the floor matches up with the rest of the floor, so I can decide what to do with tile.
Now to find a fresh piece of birch paneling to close up the front wall!
Now that the deer hole/dent is fixed and everything is secure and stable, and the floor is all level, I just need to find some 1/8″ birch paneling or plywood (tougher to find than you’d think!) to close up that front wall, and can get to work finishing the floor and building a work station that will sit over the water tank! So this left corner is where my customer will sit in a tall chair, and the right corner is where my paint/glitter kit will sit!
Honestly I’m thankful that this was all I had to pull out…so many of these trailers seem to have a little rot, then when you pull off a panel it reveals a major problem requiring a complete frame-up rebuild! My husband is going to help re-attach the water pump and re-route the water, and we’ll do a bunch of electrical work. Now I just need to land on a flooring solution…fill in this space with the existing tile, or replace the whole camper with something…GLITTERY?
Okay, this was a long post with a bunch of things I’ve been working on earlier on in the process…next time I’ll share some more of the fun cosmetic things I’ve done! Stay tuned!!


You must be logged in to post a comment.