Posted on Leave a comment

2022 Year in Review

Happy new year!! I always love to look back on the previous year on new year’s day.

It’s SO hard to pick just one photo from each month, especially those summer months! But here are just a few highlights…

Window painting – My little covid pivot has really paid off this year, as I took on 4 brand new clients and got repeat work from my existing clients. Dunkin’ is definitely my biggest window client, and their locations grew from 4 to 6 stores this year, which now gives me about 24 painting jobs every year just from them! This year I did interior paint jobs, exterior, and vinyl!

The Glitter Glamper – The Glamper had a huge year!!! In May was our first year participating in the MN State Fair’s “Kickoff to Summer” over Memorial Day weekend. We were slammed for 5 days, and I believe this was the Glamper trailer’s foot in the door to landing our new fair location, as shortly after I was offered a huge, new space to park the trailer in August at the MN State Fair! In between the two, the Glamper set up camp at Interlachen Country Club (our 2nd year with the Glamper there) for the 4th of July, and we also set up at the Carver County Fair for 5 days in early August. This was the year I really got to see my Photoshopped renderings of this Glitter Glamper concept turn to reality!

Private Sessions – I love painting for private sessions! I don’t do a lot of them but when I do they are SO much fun. This year I got to paint Rachel’s belly for the 2nd time, this time with a super cute “Up” theme! I also had the opportunity to paint Diane to complete her jester costume for Halloween!

County Fair – This year’s Carver County fair was like no other! I was able to bring in the Glamper and set it up right outside the building where my face painting booth has always been, and bringing in some of my amazing team of artists to help, I was able to juggle two booths at once! I had SO much fun having friends with me (normally I work alone here), and my boys got a chance to run the cash registers too!

MY AMAZING TEAM! – In looking back at my year’s worth of hundreds of photos, my favorites are always those of the amazing artists and family members without who’s help I would most certainly NOT be able to pull ANY of this off! Thank you all for doing such amazing work in sometimes very challenging scenarios, but always with smiles on your faces! You all make my job SO much fun and I am SO INCREDIBLY thankful for each and every one of you! Here’s to many more adventures in 2023!

Posted on Leave a comment

Christmas Window Painting Season!

It’s been one busy month here at Paintertainment with window painting! Besides the three Dunkin’ Donuts locations I have the pleasure of painting seasonally throughout the year, I also did an interior job, painting some conference rooms in an office building! So much fun…here are some photos and movies of what I’ve been up to so far this winter!

Dunkin’ Donuts…all set for winter!
This was the Chaska, MN Dunkin’ Donuts’ location…I did the top painting in the fall, and had designed it so that I could easily remove just the fall foliage, to update it for winter. Thankfully the lettering all looked just as pristine as the day I put it up, so it is able to hang on through another season!

Here is a time lapse video of the Chaska Dunkin’ location…this one is on two sides of the building…

Below is the Rogers, MN Dunkin’ location! This design was SO much fun! I love this client…she really lets me just have creative freedom and always chooses something super fun from my sketches. I love incorporating donuts into their designs! The previous fall design had a fun owl design on the lower panes, so we kept the text again here and I updated it for winter with some ice fishermen! This design definitely screams “Minnesota” as we love to ice fish here, and I was sure to paint a few of my favorite fish to catch here: sunfish, walleye and bass!

This window was the hardest physically for me to paint. It was supposed to be 50 degrees this day, however, it only ended up getting to 37 while I was painting. This is all fine of course if it’s sunny and not windy…I painted Chaska in 37 and sun and didn’t even need a coat. But, for whatever reason, this day I was absolutely freezing to the point of shaking! I think it was a combination of the cloudiness, the dampness (it had just rained the day before), and the breeze. So, the paint dried very slowly…but in the end I love how it turned out!!

Here is a video…

The third Dunkin’ location didn’t need much updating…I just removed some pumpkins and replaced them with snow!

With some careful planning, you can save a little time and money with seasonal updates! Of course, window paintings aren’t really meant to last more than a few weeks, but these ones stay relatively protected from weather, and still looked like new. So, why not make them last? I did turn her earmuffs from orange to red here as well. The other side of the building didn’t have anything super fall-ish so I left that one as-is.

The last window job I’d like to share with you was my first INTERIOR job! This was for three conference rooms, which have basically a wall of glass.

This was a really fun and HUGE job! I probably painted around 50 feet lengthwise, and floor to ceiling. It was nerve wracking painting on carpet, but I made sure to have plenty of drop cloths and am super careful about making sure any paint I’m not using at the moment is closed up and in a safe spot. The tricky part here was keeping everything within just a few feet of the windows, so that people could still walk by me in the hallways!! It involved a lot of shuffling of my supplies. Also, being on the 7th floor, I probably spent 1/2 hour or so just bringing stuff in and out. I did also have to run out to Home Depot to grab a better, darker green…so all in all I spent about 10 hours straight here! Everything took more coats than usual…just because I am picky and I like it to be as opaque as possible. But, since these windows have exterior windows behind them, there is no way to completely avoid seeing brush strokes with the sun shining through them. I love how it turned out in the end, and it was really nice to be inside and not worry about weather! I also got to try out my new Posca paint pens for the ornaments. I didn’t take any time lapse movies of this, being that it was in an office, for privacy reasons.

So, as you can see I’ve been busy lately squeaking in window jobs between entertainment jobs! But, I really love window painting and I’m so glad that Covid pushed me to add this to my repertoire. It blends perfectly with my schedule, as I can paint windows on week days during the day, leaving those busy holiday weekends for face painting and balloon twisting!

Interested in learning more about becoming a window painter? Check out the latest issue of Wet Paint Magazine! I recently wrote an article about how I got into window painting, and the process I followed getting started, including some tips & tricks of the trade, resources to learn more, and a list of what supplies you need to get going!

Posted on Leave a comment

Glitter Glamper Progress: Epoxy Resin Glitter Backsplash

Yesterday I finally started blogging about my process of turning my 1963 Shasta into THE Glitter Glamper! I shared some of the uglier work yesterday: removing a little rot, fixing a dent and sealing up holes. Today I thought I’d share one of the “prettier” projects: the glitter backsplash!

As I mentioned last time, the interior of this camper is so beautifully original that, while I need and want to transform it to scream “Glitter Glamper,” I still want to achieve this while preserving the original state underneath. I need to brighten it up overall so that I can get great lighting to work in, and also create an environment that feels unmistakably and unforgettably “Glitter Glamper” to my guests. Yes, this has created significantly more time and expense versus just painting over everything with white and coating it with glitter, however, I am enjoying the process so far and loving the results!

I knew that the area between the countertops and cabinets presented a great opportunity to inject some glitter, by way of a backsplash. I explored a few options, from glitter wallpaper to a gem mosaic and everything in between, but in my mind they all started with cut panels that could be put up and removed if I wanted to later. In order to achieve the ultimate in glittery-ness (yup, that’s a word I have full authority to create as a glitterologist, haha!), I decided to go with a poured resin and super chunky glitter. This would enable me to use big, sparkly glitter but still seal it up in a durable, wipe-able surface that can easily be kept clean without glitter constantly shedding!

I started by purchasing some pressed hardboard from Home Depot, and cut panels to fit above the counter, carefully measuring to make sure it fit around outlets, the window, etc. When going for a solid, uniform color coverage with glitter, just as I would paint the skin under one of my glitter “wannabeards” before applying the same color glitter, I want to lay down some paint as a background. This gives the illusion of full, opaque coverage of glitter, even if you may have spots here and there where glitter has fallen off or isn’t as thick. I went with a white base coat here, because I’m using silver glitter. A gray would work too, but my goal is brightness and silver reflects white as well, so it was perfect! Not only did the white paint give me a more even look, but it helps seal up the wood, so it took less glue and less resin in the end. I painted the back, front and edges of each piece and allowed them to dry. Then on to the fun part…

I bought a couple 1 lb jars of chunky glitter from the craft store. (Note: we do not EVER use metallic craft glitter on skin…only cosmetic grade glitter!) I laid each piece of wood on a large piece of tagboard that had been folded in the middle (or newspaper for the longer ones), and then coated the wood with Mod Podge. School glue would work too…but Mod Podge is already watered down glue, so it spreads farther and quicker, which was my goal. After a coating of Mod Podge, I then dumped plenty of glitter over the wet glue and allowed it to dry. Then I carefully lifted the panel and shook off the loose glitter, set it aside, folded the paper and funneled the extra back into the jar.

Pouring the Resin

Before pouring the resin, there is a bit of prep work to do. You have to prepare a very level surface to work on, as gravity will spread your resin out, and you want it to be an even thickness. I used my kitchen counter, and covered it with many layers of newspaper, to protect it if any resin spilled over. (For the next round I laid out painters’ plastic, which is better as it won’t soak up resin like newspaper!) Also, make sure that you have the ability to leave your pieces there for 24 hours to set, where it will remain stable, level, and free of floating particles of dust or whatever! Making dinner was tricky around this and made me a little nervous, but it worked out just fine.

Then, you have to create some sort of “fence” around whatever you are pouring resin onto, of course, to keep it from just pouring off the edge. I used painters tape and went around all edges, making sure to fold it under and rub it tightly against the underside of the wood to contain the resin while it was still liquid.

Here is what I used for my resin:

Whatever resin you use, make sure to carefully read and follow the directions! I got out some paper cups to pour each part into, and then a cool whip bowl to mix them together in. I also got out a couple plastic knives and a foam brush to help spread the resin. Different brands will have different amounts of time that the resin is work-abe, before it hardens. Pay attention to that, as you only have so much time to spread it before it sets up.

Pour out equal parts of resin into the paper cups to ensure you have an equal amount of both resin and hardener. Then, pour the two cups together in your larger container, and mix. Make sure to mix it well…epoxy resin is a chemical process that requires equal parts and thorough mixing! Once I had it well mixed, I slowly drizzled it over the glitter, trying to distribute it as evenly as I could. Then, I used the foam brush (and plastic knives for the tighter corners) to make sure that it was spread out and covering all of the glitter.

Get down low so you can catch a reflection in your resin. This will show you where you may need to add more, spread it out, etc. The act of mixing resin will undoubtedly fill it with lots of bubbles. When doing a smaller project, all you need to do is get down close and exhale over the surface, and you’ll see the bubbles rise and pop! For this I took a heat gun and ran it over all the surfaces. A hair dryer would probably also work, though a heat gun blows less and will disturb the surface less. The heat causes the bubbles to rise and pop. Be careful not to burn your project! With this particular project, air bubbles were virtually unnoticeable anyway because of all the light bouncing around inside from the glitter. However, removing them helps it to be smooth and strong.

There is one little ledge area above the fridge where I had a lip on the panels, to hold things in during transit. Since a couple inches of the back of my panels was visible here, I glued some fun fabric on that edge. When installing each panel, I first drilled pilot holes so as not to crack the resin when I screwed it in. Everything went up beautifully with minimal screws!

There were just a few edges that showed in the end, including this little ledge where I had the fabric backer, so I covered those with some bling-y trim and a glue gun.

Overall I LOVE how it turned out. Photos truly do NOT capture the amount of depth and sparkle in this! I love it so much, that I’m toying with the idea of an epoxy resin flooring as well. We shall see…that may be a project for spring! In the meantime, this turned out exactly as I had imagined, and consider it a big win in achieving my intense glittery-ness and remove-ability!

Thanks for stopping by…Stay tuned for more updates on the progress! 🙂

Posted on Leave a comment

Birthday Window Painting: Happy 13th Birthday Wyatt!

We’ve recently started offering window paintings as a fun, no-contact alternative to help you celebrate your family’s milestones! Window paintings are great for birthdays, graduations and other special events, especially in quarantine! Last weekend I had the opportunity to paint a surprise birthday window for Wyatt! Above is my initial sketch, with the final window in the background.

Here you can see the progression. First I start by cleaning the window, then apply a base coat of white. In the center photo you can see the gradient I laid down for the “13th.” I then carved out the numbers & letters using a razor blade!

There’s just something that is oh so satisfying about scraping off fresh paint! Haha!

Me with the finished product!

Posted on Leave a comment

Introducing Our New “Future Face Painters Club!”

Does your chid LOVE to have their face painted? Have they always wanted to BE the face painter? Well now we have put together a special club just for kids like yours! Designed for kids age 6 through 13, the Future Face Painters Club gives your child the instruction and supplies they need to explore the fun world of face painting!

How does it work?

When you purchase a Future Face Painters Club Kit, we will mail you a cool binder that contains information, sheets to take notes and sketch designs, practice faces and a board to paint on, and a convenient 3-ring zipper pouch stuffed with brushes, safe cosmetic glitter and professional quality paints!

Your purchase automatically gives you access to our members only website, which contains video tutorials to help get your child started in the fun world of face painting! We realize that there are a lot of options out there for kids when it comes to activities, and nobody wants to spend a fortune on supplies for something their child will lose interest in, so that is why we’ve started with the most basic and economical, yet quality professional supplies in their kit!

If you discover that your child has really developed a love for face painting, you can choose to invest in their new hobby by adding to their kit as they learn new techniques and skills explained through tutorials our website. There are endless options for face painting supplies, but we’ve made it easy by recommending logical next steps for your child, and your membership entitles you to an exclusive 10% discount on additional supplies!

We also have a members only Facebook page, where your child can share their work with professional face painters and other kids who love to paint!

Members of our Future Face Painters Club will be allowed to join our private Facebook group to share their work with professional artists and other kids!

Win a FREE Club Kit and 1 year Membership!!

As a fun way to launch our new kids’ club and get it off the ground, we are putting on a COLORING CONTEST! Two grand prize winners will receive a full club kit and annual membership to the club!! We also have some super fun 2nd and 3rd place prizes, all of which will be awarded to two age groups. Click HERE to learn more, read the rules and print out the contest to color!

Posted on Leave a comment

Now Offering Virtual Zoom Paint Parties!

We are super excited to announce one of our pandemic projects…something that has been in the works now for months: Live zoom paint parties!

How Does It Work?

First, you book your actual party date and time, simply by filling out a form on our zoom party page! We’ll get back to you to arrange the time and send an invoice. (Booking a virtual party includes a full 1-year membership for the birthday child to our Future Face Painters Club, including the full club kit full of supplies and instruction!)

Once your date is booked, you put together your guest list and we’ll help invite them AND equip them with the supplies they need to paint along! We’ll create a pdf invite with your party details that can be sent out to your guests. If you wish, you can send us a photo of your child that we can turn into a practice board! We’ll include that with the invite and your party guests can paint their practice designs right on the birthday child’s face!

Once you know how many will attend, decide how you’d like to get our party guest packs out to each guest! (pick them up from us and distribute yourself, have us ship them all to you, or ship to each individual guest) Our mini party packs include the paints, glitter and brushes each child needs to paint along, in a convenient zipper pouch with your Zoom call information!

Party Time!

When the party day arrives, everyone logs into Zoom for a live session with a professional artist! We’ll give the kids a basic lesson in how to use their paints, and show them how to paint a design or two, in about 30-40 minutes. You can even request a specific theme for the designs, or we can incorporate a favorite sport, hobby or character of the birthday child!

The Fun Doesn’t Stop There!

The fun doesn’t end when the live zoom stops, however! Kids have been known to keep painting for hours afterwards! You are encouraged to set up an additional conference call with the kids so they can continue painting together as long as you wish! Afterwards, we’ll encourage your guests to share photos of the paintings they’ve done. The birthday child can also get access to our club members’ Facebook group where he or she can share their work with us and other artistic kids as they continue to learn and build their skills through the Future Face Painters Club members only content library!

Discovered a New Passion?

Should you discover that your child has really taken to face painting and has found a new passion, our members only online learning resources will show your child more techniques and skills, and we can recommend additional supplies if you choose to grow your child’s kit of supplies. Likewise, if one of your party guests wants to upgrade their party pack to the full club kit, we offer that as well!

Learn More or Book a Party!

Interested? To learn more about our virtual paint parties, check out our virtual party page, here! And feel free to contact us if you still have any questions!

Posted on Leave a comment

NEW: “Bling-to-Go” DIY Body Bling Kits!

We are SUPER excited to show you our all new “Bling-to-Go” Do-it-Yourself Body Bling Kits!! They are the perfect way to celebrate virtually with your friends, or bling yourself out for a socially distant night on the town! Each kit includes a storage tin, complete instructions, skin-safe Pros-Aide body glue, and coordinating cosmetic glitter gel! Simply peel your bling off at the end of the day and store it in your tin to use again!

We have a variety of different options as far as designs go, from unicorn horns to mermaid tails and everything in between! However, every kit includes full color instructions, a 1ml vial of body glue with applicator, a 1ml container of Pixie Paint glitter gel, and your hand made bling piece of choice, all neatly packaged in a little tin for storage!

  • Bling-to-Go Premium Bling Cluster Kit
    Bling-to-Go Premium Bling Cluster Kit
    $15.00
  • Bling-to-go Bling Cluster Kit
    Bling-to-go Bling Cluster Kit
    $15.00
  • Bling-to-Go Mermaid Tail Kit
    Bling-to-Go Mermaid Tail Kit
    $20.00
  • Bling-to-Go Monster Horn Kit
    Bling-to-Go Monster Horn Kit
    $20.00
  • Bling-to-Go Unicorn Horn Kit
    Bling-to-Go Unicorn Horn Kit
    $20.00

Our kits come complete with step by step instructions to get you started, and you can wear your bling cluster again and again! Loving the bling more than you thought you would? No worries…we have everything you need if you decide you’d like refills of your glitter gel and adhesive in the Glitter Glamper Shop!

Our handmade bling is even better when one of our talented “Glampette” artists brings it to your event and applies it along with their skilled makeup embellishments, and we can’t WAIT to get back out there and “Bring the Bing” to your celebrations! (Click here learn more about all of our in-person glittery offerings!) In the meantime, we hope that these Bling-to-go kits will help fill that sparkly void!

Posted on Leave a comment

Going Glamping at the Minnesota State Fair!

The Minnesota State Fair one of the largest state fairs in the country, a very close second only to Texas in attendance size. This year was no exception, with an all time attendance record set at 2,126,551. Half of the 12 days of the 2019 state fair set new daily attendance records. It has long been known as an impenetrable fair for local face painters who have tried for decades to get a booth space. After years of my fellow artists urging me to get into the fair so they could work in my booth, I had tried applying several years ago to no avail. The fair simply had no interested in adding any more face painters besides the one booth already located near the kiddie rides. However, one night last summer as I was drifting off to sleep on a family camping trip the idea came to me to combine several things I love into a new concept: Camping, bling, and retro 1950’s style. The “Glitter Glamper!” The Glitter Glamper would bring all forms of body glitter, focusing on bling rather than face painting, and be marketed at a wider age range to include teenagers and adults. I resisted the urge to wake my husband up and tell him my exciting idea and saved it ‘till morning, and instead proceeded to scroll through vintage camper listings on Facebook marketplace into the wee hours of the night.


Conveying the Concept

My extended family ends every summer with a big camping trip on Labor Day weekend, so I decided to take advantage of this captive audience of my kids and their cousins to capture photos of some of my ideas over Labor Day 2018. My nieces modeled my first ever unicorn horn, monster horns and mermaid designs, and a week or so later my husband let me glitter his beard for a photo shoot! 

I bought the url GlitterGlamper.com and created a quick website and Facebook pages so I’d have at least some online presence. I designed and printed one business card to put with my application. I worked hard to put together a colorful, glittery proposal as soon as my boys went back to school, complete with a photoshopped rendering of my booth design concept, and sent it off to the fair. Finally my brain was able to relax…my idea was out there, on paper, and now OUT of my hands. If it was meant to be, it would return to me in the form of a state fair licensing agreement. And if not, well, at least I had given it my best shot! 

My glittery application

Knowing that it can take many years before hearing back from the fair, I had no expectations of hearing back any time soon.  While my Photoshopped rendering included a retro camper, lighting, awnings, and a vintage barber chair, I was not ready to take on the expense of building and storing these things with no idea if or when I would ever be able to use them at the fair.

And then the phone rang…

Summer turned to fall, fall to winter, and then one day in the middle of May 2019 I received a call.  The folks at the MN state fair had been following up with their regular vendors, and finding that there were a few who were not returning.  A few spots had suddenly opened up in their new “West End Marketplace,” and they thought my concept would be “perfect for that hipster crowd” that frequents the West End. Would I like a spot? Um…YEAH! Where do I sign and please take my money! 

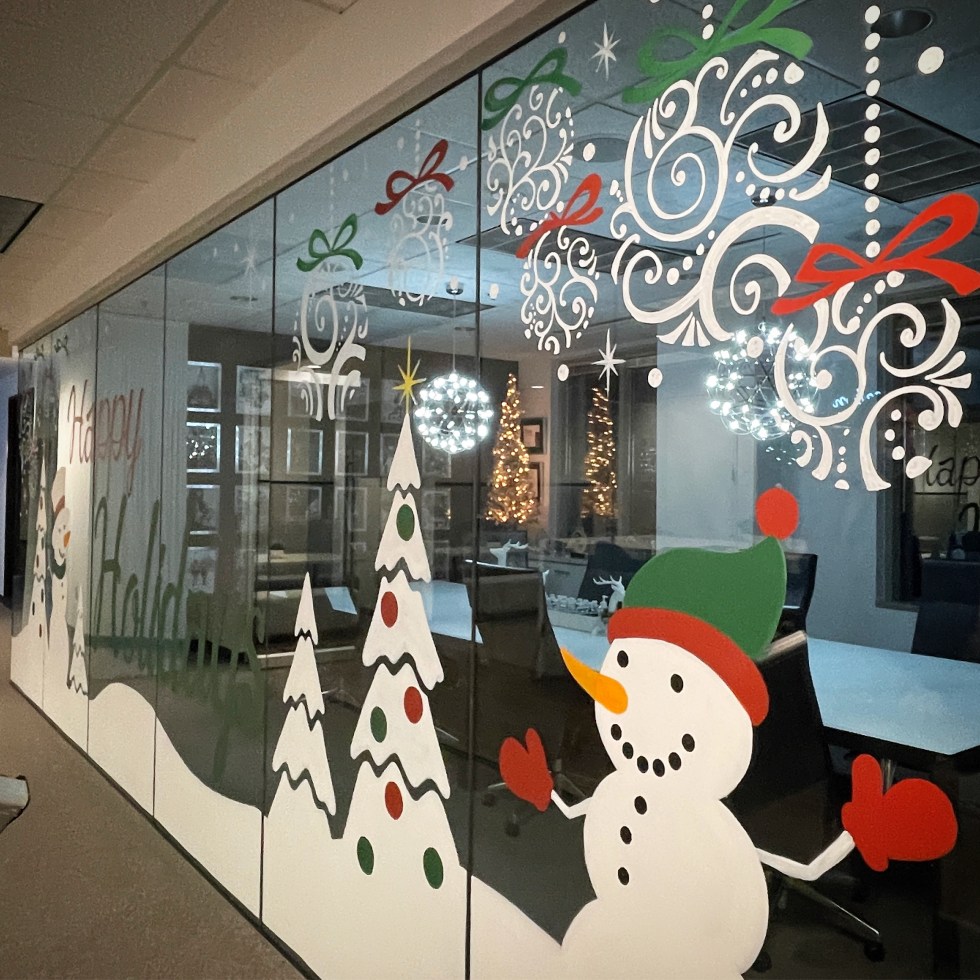
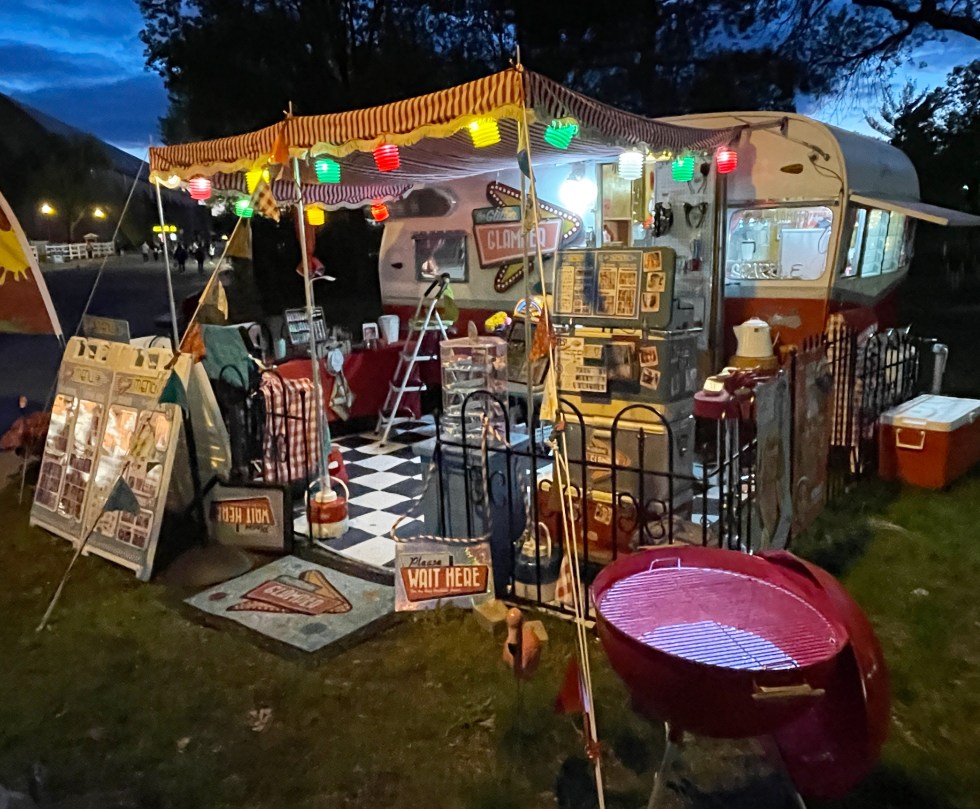
My space at the fair…the West End Marketplace “cages!” These are a really cool hybrid between an indoor and outdoor space. The fair provides this nice structure with lighting and electricity, and each vendor can close and lock up their own booth at night.


The woman on the phone was super nice and really loved my vintage camper look and feel, although the space wouldn’t be able to accommodate an actual camper. (This is still my goal and I do plan to have an actual “Glamper” soon!) I assured her that with my background in retail display design, I would achieve the retro camping feel in whatever space they give me. She said “oh I just love your antique barber chair, that will look great in your booth! And your flower planters can go here and there…” In my head I’m thinking “oh, you mean the non-existant chair and planters that I digitally rendered? I guess it’s time to start shopping for a vintage barber chair!”  If you subscribe to my free online e-newsletters, you’ve read about my tendency to bite off more than I can chew, and then proceed to teach myself to chew faster, haha! This was certainly another one of those cases! Heck, the glitter beard she saw and loved in my application was literally the only one I had done…ever!

Photoshop rendering that I included with my application


Ready … Set … GO!

Naturally, my head began flooding with amazing ideas, crippling fears, immense excitement and an endless list of what-if’s. How on earth would I pull this off? My boys were going to be done with school and home with me 24/7 in just a couple weeks. June and July were already jam packed with leading VBS crafts, family camping trips and a 16 day road trip, and the first day to start setting up at the state fair overlapped with my busy county fair week in early August. This was about to be a huge. HUGE. Undertaking.  What am I going to DO? Well, there’s nothing to do except GET STARTED! I immediately dove into sketching ideas and scouring Craigslist and Facebook Marketplace for the things I needed. I drove to the fair to take measurements of my 10’ x 20’ “cage” for design purposes. I set to work designing banners, sewing custom awnings, creating original graphics and signage, defining all of my offerings and their prices (many of which I had never “technically” actually done before), and finding just the right furniture and decor for the booth. 

My boys helping me haul foam floor tiles down 3 stories in an apartment building we drove 45 minutes to get to!
Vintage steel cabinets I rescued from a curbside for free, cleaned up and painted! 
Lit sign! I designed a banner first, then made a wood base for it that hinged in the middle for easier transport. I mounted all the letters, then delivered it to my brother who got them all wired up for me!

My dad helping to repair an antique secretary desk I had purchased at a local shop. Here it is partially painted. This would function as a decoration and storage when not in use, then fold down when we had enough artists, to function as an artist station. 
Sam helping me sort gems by color

Some of the fixtures I covered in shelf paper. This is the checkout counter and register cashwrap. They sat in my living room for a couple months!

Navigating the fabric warehouse in search of the perfect fabric to make my awnings
Figuring out how to recruit, organize and compensate other artists was new and stressful territory for me. (The county fair booth I had done for over 20 years has really only been run by myself, with my mom taking one partial day.) But the one thing I knew for sure was that there was no way I could run a booth 12 hours a day for 12 days completely on my own. I sent out a call for interested artists, thinking maybe I’d get a handful if I were lucky. After all, I was as transparent as possible in my communications, letting them know that this first year I have no idea how much they’d make, if it would be worth their while or their cost of entrance tickets and parking, if weather would be gorgeous or unbearable, etc. To my wonderful surprise, I ended up with 13 of my fantastic, highly qualified painty friends who were eager to take on the uncertainty and join me in this adventure! Oh how very blessed I am to live in this area with such an incredibly talented and giving community of artists!

Then there was the bling itself…how on earth would I know how much to make? Having never done this before, I simply made as much bling as humanly possible over the next couple months. I hauled all of my supplies on our road trip in giant Rubbermaid bins, creating bling clusters and unicorn horns at campground picnic tables across the US and Canada. 

Making horns at a campground picnic table


I had some fun with it, posting my ever changing “bling count” on social media. I spent countless hours on the road on my laptop, working through artists’ paperwork, contracts, and figuring out the giant puzzle of a schedule with 13 different preferences and no clue how many people I would need on any given day or hour.

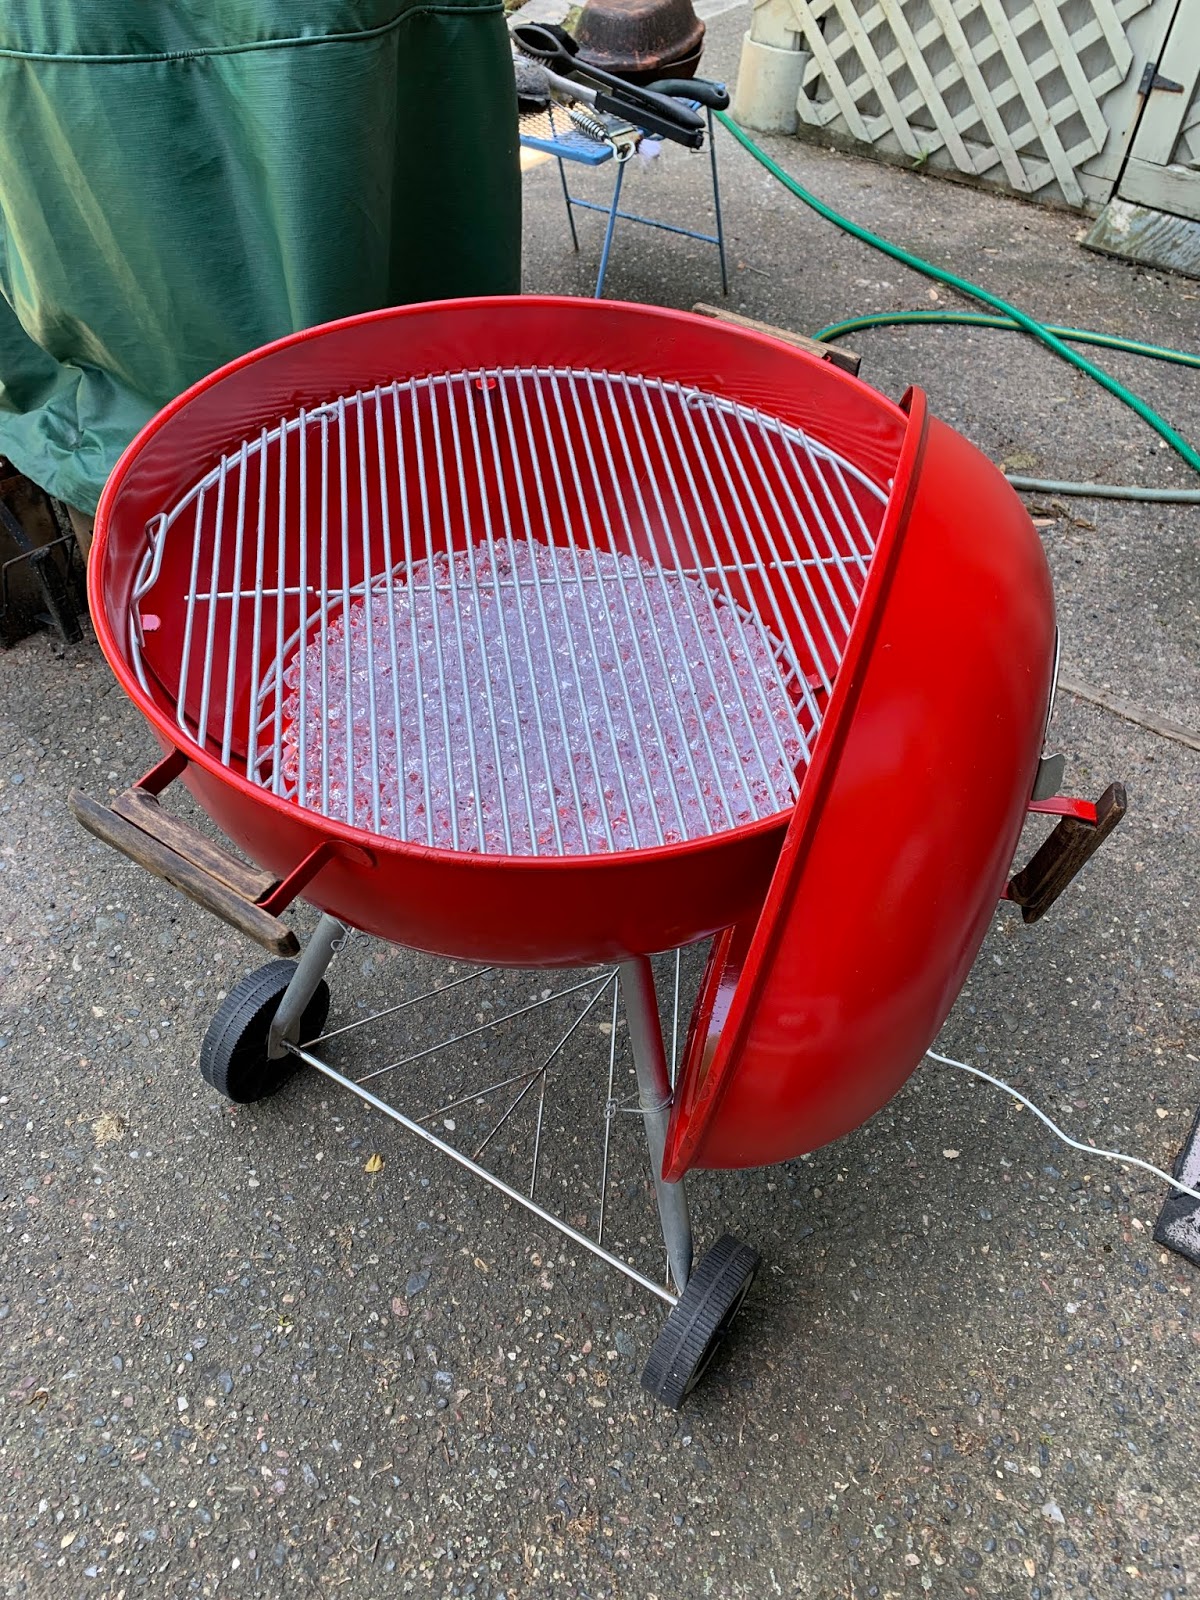
The seemingly rare moments I was actually home were spent building and painting a giant Paul Bunyan and Babe photo board, wire brushing and re-painting vintage steel cabinets I had picked up on a curbside, turning our old bbq grill into a glowing, gem-filled decorative prop, coating our rusty old lanterns with glitter and lighting them up with colorful lights, visiting the used retail fixture store in search of the perfect horn display, and running around town picking up Craigslist finds and scouring garage sales and thrift stores. Honestly, God’s fingerprints were ALL over this entire process as everything seemed to just fall right into place! (I could write a whole blog just on that!) A lot of things just CAME to me…by “things” I mean stuff I bought, and by “came to me I mean” I mean they were delivered by the Amazon fairy. I probably could have built a three story playhouse out of the Amazon boxes I acquired! But really, just the right items turned up just when I needed them at sales and thrift stores!

Paul and Babe in process! Yes I drove to the hardware store and loaded up a sheet of plywood, brought it home, drew it out and cut it out myself! My dad built me a base for it so people would have a step stool and it wouldn’t blow over!

Me and Wayde trying out the photo board! Notice the cobalt blue glitter beard on Paul…it quickly went from blue to purple to pink during the fair from the sun!

I was on a mission and my background in retail display design had given me enough experience to know that I did NOT have much time. This fact did force me to eat, sleep and breathe Glitter Glamper all summer, but it also thankfully kept me distracted from the reality that this was a HUGE undertaking: I simply could not afford to waste any time on worrying. Every time the enormity of the situation started to sink in, I dove into the next task, crossed one thing off my to-do list and then added three more.

Some of the many things I collected, made, found, refurbished, etc over the course of the weeks before the fair

The summer months slipped away in a flash among fair prep and family trips, and before I knew it August was here. My county fair which I had always previously considered my craziest week of the fair, seemed this year to be more like the calm before the storm. Five 12-hour days at the fair to simply paint, something I’d barely found time to do all summer, left me both energized and exhausted at the same time. I was ready to start setting up at the state fair, but had to push through the county fair as it’s entire profits would go towards chipping away at my state fair booth expenses!

No Time To Rest

On the last day of the county fair my husband, boys and I tore down my booth, unloaded the truck, and re-loaded the truck for the state fair. The next morning my boys and I took the first trip to the state fair. We laid down foam tiles (to save our feet on the concrete), a layer of astroturf (grass for our “glampsite!”), and hung banners. The next day a dear friend with a trailer helped us haul all the big, heavy stuff, including the elusive antique zillion-pound barber chair I had searched and stressed over and finally found just in time. Each day I drove to and from the fair to build and arrange my booth, as the radio personalities announced how many days left until the opening of the Great Minnesota Get-Together, sending shivers of terror and anticipation through my spine. It was going to happen, and I was going to be there, whether I was fully prepared for it or not!

Finally…the PERFECT barber chair!!

Needless to say, I didn’t get a ton of sleep in the month of August. I didn’t take the best of care of myself, and while I didn’t have time to worry, my body decided to stress on it’s own. I lost 5 pounds but thankfully stayed healthy throughout the month. (don’t be jealous, I immediately gained it back when the fair ended and all I wanted to do was eat and sleep, hahaha!) I shudder to think of what a simple cold virus could have done to me that month!

And Then There Were Artists!

Three days before the fair started I held an on-site meeting for my 13 wonderful artist friends who had graciously agreed to give up part of their busy, profitable summer month to take a chance with me on the fair. It was an emotional day, as it all became more real…I handed out sparkly hats with the Glitter Glamper logo and name tags, went over processes and the booth and answered lots of questions. All of my sweet painty friends were absolutely amazing! Not only did they all hike out to the fair for a meeting, but they even surprised me with sweet gifts, a cake, and sang to me! All I could think was that I didn’t want to let these amazing people down! 

My “Glampettes!” There’s NO way I could have done this without them!!

Naturally, with 13 artists and a handful of family members come dozens and dozens of ideas for ways to change or improve things. Everyone was very excited to see how the booth was coming along and had great ideas, and I was able to implement many of them in the couple days I had left before the fair started, though had to table some for next year as I just simply had run out of time! 

A few pics from our meeting day! My son Sam also filmed me opening up the booth so I could make an instructional video for the artists.


I would later learn that my husband had told my family wanting to help, to not suggest anything new or any changes to me…simply do what I ask…because I tend to take every suggestion as an item on my to-do list. This is true, and my desire to make my booth the most comfortable, fun and functional space possible for all of my artists, I left the meeting totally overwhelmed with new suggestions that I wanted to implement but simply couldn’t physically address them all. I had to force myself to prioritize and let a lot of things go. On top of that, my cash register drawer was not working, internet was not working, and I only had a couple more days to figure it all out. Aaah! Oh, and did I mention my vehicle which had never had issues in the decade I’ve driven it, suddenly decided to NOT start on random occasions for no clear reason? Yup, I ended up stranded at the fair during setup a couple times, and we still to this day have no idea what is wrong or when it will act up again and leave me stranded. Thankfully my best friend (who’s husband also hauled all my stuff with his trailer) loaned me her van for the entire fair and then some, and took my boys for multiple day-long play dates so I could get work done. 

The one thing I really, really wanted to do but just ran out of time for was hosting jams for all of the artists to practice what we were offering and develop some amount of consistency. Once again my wonderful friends stepped up, without me even asking, and hosted their own jams! Jodi hosted a jam, fed everyone pizza, printed out my “Glamping Guide” for everyone and even roped in a real beard to practice glittering on. Tricia hosted an ALL DAY open house style jam at her house, turning over her entire living room to glitter and made countless videos of her experimentations with various glitter products, tools and methods to share. Tiffany hosted a jam immediately following our on-site meeting to squeeze in some more practice before go time! They really picked up my slack and I’m eternally grateful! Jamming is one thing I will definitely make a lot more time for in 2020! In the huge list of things I had to “let go,” jamming was on the TOP of the list as far as importance to the whole operation, and will be the first item to move up to my DO list next year.

I really tried to capture pictures of every “shift” throughout the fair. Here are a few of our “Shift Pics!”


It Takes a Village!

I am really terrible at asking for or accepting help, and this state fair adventure really forced me to rely on friends and family! My engineer brother figured out how to wire up my lit sign so that I could plug it in instead of turning on individual battery powered letters. My husband let me basically take over the entire garage for the summer and overload the house with glitter and furniture. (As of this post it’s still too full to park in as we try to figure out where & how to store everything!) He even dropped me off and picked me up for the first few days of the fair and some of the last, and worked as my booth “babe” for two full days, sporting a colorful glitter “wannabeard!” (If you don’t have an actual beard to be glittered, we can give you a “wannabeard!”) My in-laws took our boys for the first 5 days so we could focus on the fair. My dad hung my beast of a sign above the booth and fixed countless little issues in the booth, and my mom made sure my artists and I had an assortment of yummy snacks and fruit for the fair, and worked the register one day as well! My boys were such good sports about finding glitter on all of their stuff, and happily helped me sort gems, trim laminated pieces, count glitter tattoo stencils and run a zillion errands. My niece worked as my booth babe for the first few days, which was her first job ever at 13! The amazing Lori Hurley made sure that I took a break to eat, and one day even brought in fresh salad ingredients so I would get something healthy! I definitely couldn’t have pulled it off without everyone’s help! But I have to say it was really cool to finally let my family catch a glimpse of my painty friends and how AWESOME they all are.

My husband Wayde and one of the several “Wannabeards” he wore while working in the Glamper!
Learning As We Go

My artists are really a class act and were so absolutely vital to the success of the first year! They were so open and crazy flexible, knowing that I had no clue how many of them I’d need on any given day, yet willing to set aside their time for me, just in case. I went in thinking the night crowd would be bigger with concerts nearby, but it turned out to be opposite: we were busiest before lunch. I had people “on call” in case we got busier than expected, and people on the schedule as “maybe’s” unless we were slow or it was rainy. They were true friends, sticking it out as we all learned as we went…(hopefully) not taking it personal if I had to cut them. I had to cut shifts, move people around, and rearrange things almost daily. By the end of the fair of course we had learned a lot, and next year I feel like I can arrange the schedule better to maximize everyone’s earning potential.

A few photos of the booth in action


Learning to Let Go

The first thing I did after receiving the call in May from the fair was contact everyone I knew who had worked at the fair, or other fairs, for advice. I got a lot of great advice, including the suggestion to take a couple days off to get my kids ready for school. Thanks to my spectacular team, I was able to take two days off in a row in the middle of the fair to get my boys to their respective school open houses, and pack for our big family Labor Day camping trip that now overlapped the fair. (yeah, I know…crazy…) This involved some of my artists arriving early to set up, staying late to tear down, and running my important paperwork on daily income totals to the fair office for me before the deadline every day. They were simply amazing. I knew the booth was in excellent hands, but handing over your baby to anyone is hard! 

On day 5 of the fair I was there sitting in my fancy barber chair, my feet throbbing and so happy to be there but so unbelievably exhausted. I told my mom who was being my “booth babe” that day, “I feel like I’ve just given birth, and it’s all I can do to just lie here and watch other people interact with it!” I wished I had more energy to take it all in, but just getting to this point had wiped me out! My fellow artists certainly carried me! And for those two days off, though MUCH needed and refreshing, I felt like I had just handed my 5 day old baby off to a babysitter already!

Wait..WHAT?!

My first “day off” at home I had just missed a call from one of these awesome artists, Tricia. It was hard to hear her voicemail over the noise (we are located right by an amphitheater), but what I made out was, “Call us as SOON as you get this! We are DYING over here!” Oh. My. Goodness. Which of my worst fears had happened? Did the Square terminal crap out on me? Is the register drawer stuck? Did Paul Bunyan blow over and crush a small child? Were there so many people they couldn’t handle the crowd? Had we run out of unicorn horns? Oh my goodness, why did I ever think I could miss a day at the booth?! 

With my heart pumping I called Tricia back immediately and to my complete surprise was informed that members of the fair board had just stopped by to present us with an award, for “Best of the Fair” of 2019! WHAT?! 


Turns out they were “dying” of excitement, haha! I was to appear a couple days later at one of their stages to accept the award with any other members of my staff. Tricia, Stella, Naomi and Jelly were all there that day, as were my husband and two boys, since it was the morning I had taken off to actually visit the fair with them. We were the only brand new booth to receive the award, which is given to only 12 out of 1,200 vendors. What an honor!


Live TV? No Pressure!

Even with my thrifty ways, I spent a LOT of money on the booth. I knew that this was the one and only year that I would be the NEW thing at the fair that the media would be interested in covering, so it had to be amazing no matter what. Money was no object. Well, okay, I limited myself to my credit card limit!

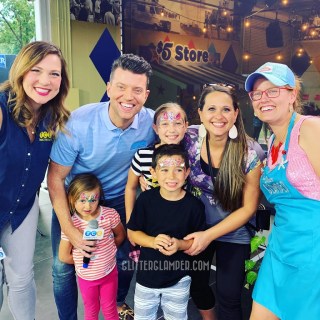
Boy am I glad I went all out, because the media requests came flooding in before the fair started! I had lined up several news station appearances during the 12 days of the fair, with the first being just two hours into the first day! Two local news personalities from KARE 11 came to our booth the first day for a short interview, and got glitter tattoos. 

Being filmed for KARE 11
It was a really fun time and their camera man stuck around for quite a while afterwards capturing more footage. Later we’d learn that they wanted me to come to their studio at the fair, where they’d play the recorded footage and have me do a live demo on camera. 
Me with my boys and one lucky girl from the audience, live on KARE 11
This live demo also happened to be the same day my family was visiting the fair with me, so they not only sat through the award ceremony but also the live newscast, but they loved it. My boys were so excited to spend the entire day at the fair which they had never done, and both of them got to be on the news, modeling our monster horns and glitter tattoos. Our wonderful friends (with the trailer, the van, the play dates…) were also there that day in the audience. Tricia accompanied me to the station and unbeknownst to her, got roped into doing a glitter beard live on camera! She rolled with it being the amazing person she is, and somehow not only found me a girl with her hair pulled back and ready for a unicorn horn, but snagged herself a guy with a long, white beard from the audience in a ZZ Top t-shirt willing to let her glitter him up!

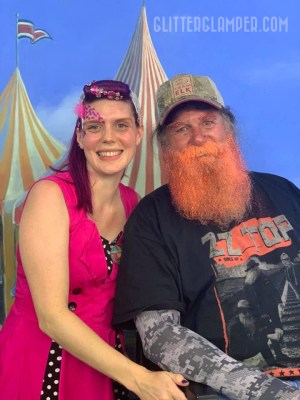
Tricia and her epic orange beard, done live for KARE 11! I’d later learn that Reggie, our beard model in this photo, loved it so much he didn’t shower for a couple days!
Besides our visit from KARE 11 and live demo on their stage, I also went live on KSTP channel 5’s newscast as well as their “Twin Cities Live” show, demonstrating mermaid tails, unicorns and the like. Tricia was so sweet to accompany me to a couple of these, leaving her chance to make money on the booth behind to help me haul stuff and keep my mind off of my nervousness. She even had her mom and kids one day, ready to go as models! Many of my other artists found themselves on camera from the booth coverage, and were surprised one day when a personality from FOX 9 just showed up and filmed them. I never did get to see that one since nobody saw it coming! 

The final live TV appearance of the fair I had to go it alone as we were short handed, but was relieved to have been given specific instructions this time for what they wanted. They were going to have me paint ears and affix a unicorn horn on one adult woman. Great, I thought…I’ll bring a few other pieces of bling just to show what we have, and will bring just what I need for one unicorn: a split cake or two, black, white, a couple brushes and glitter. Finally, I knew exactly what to expect and didn’t have to try to pack up everything to make anything, just in case. Well, it turned out when I arrived for this last appearance, and just before going on camera they decided instead that they wanted me to paint one of the news personalities’ kids because his family happened to be there. Okay, so there was a little girl instead of a grown woman…no biggie! “Oh, but he actually has three kids, and we don’t want the others to feel left out. So can you do all three instead? And by the way, one of them is a boy so just do something more boy-ish.” I proceeded to panic inside…I had this opportunity to also showcase our awesome monster faces, and I had a pair of horns but no scale stencils, no blues or greens, and no glitters to match. And I had another horn or a mermaid tail I could use on girl #2, but no fun mermaid pattern stencils, and no blues. I told them that I had so many cool boy things and other things I could demonstrate but just didn’t bring anything with for them, and their reply was, “well if you can just be flexible and do something boy-ish that would be great!” 

My inner perfectionist was freaking out, looking down at my pink and purple split cakes and unicorn horns, knowing I could do so much better with the right tools. However, in the end it all worked out. I had just enough time to quickly complete a unicorn, and partially complete the other so that I could finish it live on camera. For the little boy I was able to hand paint some colorful scales by picking a few of the more primary colors out of my TAG Pansy split cake with a round brush, and adding colorful festival glitter on top for a rainbow monster. In my mind it was not the ideal monster design, but this little boy totally pulled if off, roaring enthusiastically for the camera! And hearing the audience “ooh” and “aah” as I attached the final unicorn horn and spread on a layer of festival glitter was icing on the cake. The moral of the story: just wing it. It’ll work out. This ended up being a really great news spot and they even let everyone know that we do parties as well!

On Twin Cities Live

Me with the Twin Cities Live’s anchors and family after the segment was done!
I won’t lie, it was super stressful having to pack up my gear and leave the booth, hoping I remembered everything, not having planned on extra artists to fill my place…not to mention just hoping I didn’t pass out or throw up on camera, haha! The nerves tore me up and I was never able to eat until I finished with the TV stuff, but just like when I arrive at a gig, as soon as the paints come out, the nerves melt away. I survived…I wasn’t super eloquent and am definitely not made for TV, but every TV appearance brought a new rush of people who saw us on TV and had to come check us out!

Glamper Offerings

Here are a few photo collages of just a handful of the fairgoers we adorned with glitter this year!

I had a display book full of bling clusters that our guests could choose from! Bling clusters themselves ranged from basic to premium, all had glitter of course, and could come with or without a little painted embellishments.

Our festival faces included unicorns, mermaids and monsters! I’m excited to expand on these a little more in 2020!

Festival glitter was our most popular item at the fair!

Glitter freckles were popular and fun! Guests could choose to add star or heart patterns within their glitter freckles.

Glitter tattoos were a hit, and a great option for those rainy days because they are waterproof!

I have SO many photos…I may add more in the future! But in the meantime you can check out our Facebook and Instagram pages to see more!

So How Rich Are You?


Tell any Minnesotan that you’ve landed a booth in the state fair and the first thing they’ll say will be something in reference to Sweet Martha’s and how rich you are about to become! For non-Minnesotans, Sweet Martha’s is a wildly successful vendor that sells fresh baked chocolate chip cookies to the tune of about 1 million cookies per day. They are the fair’s top grossing food vendor, with over $4.73 million dollars in gross revenue last year among their three locations…almost $3.4 million more than the next highest grossing vendor on the list. So, naturally, everyone in the state fair leaves filthy rich, right? Well, not quite.

I had no grand expectations for profit this first year, and may have been the only one with realistic expectations. Maybe it’s because I’ve been running county fair booths for over two decades,  or maybe it’s because I was the only one watching my business credit card balance climb daily! But making money, while always something a business owner aims for, wasn’t really my main goal this year. My goal since trying to get into the fair was simply that…to get in…to prove to myself that I could conquer the impenetrable fair, land a space, design the heck out of it, create something that the fair had never seen before, become a new tradition for fairgoers, and finally provide a place in our own state fair for our own local, professional artists to showcase their rock star talent. Not only did I achieve all of these goals, but I did it in record time and got an incredibly exclusive award in the process! I’d say the first year was a raging success just by those standards!

Financially, I maybe broke even this year at best (still tallying up expenses)…though still have more expenses to come as I figure out how to store all my stuff until next year. However, in talking to the many friendly vendors around me, I learned that it typically takes 3 years to become profitable at the fair. The booth itself did very well, and I feel that if I can just restrain myself from making TOO many big, expensive improvements for next year, I may make some profit in 2020. 

The buzz was just incredible around the Twin Cities about our booth! Each day we seemed to draw more customers, even if the fair’s attendance had not necessarily increased from the day before. The word was getting out fast, and we soon were getting repeat customers already during the fair week. The media spots definitely drew in more people who wouldn’t have found us otherwise, and really helped to educate the community about what we actually offer. Countless fairgoers commented that next year they are coming right to our booth first thing, and many people said that this was just what the fair needed. The wonderful comments and encouragement from visitors to our booth were such great fuel to keep up our energy and excitement, and keep me looking forward to next year! Adult women were regularly commenting on how special they felt, how much fun it was to get blinged up, and how they were going to come back with their friends. We did over 50 glitter beards during the fair, and many of the men came back at the end of the day just to tell us how much fun they had all day with people stopping them for photos, and all the attention they received! The Glamper is out there, the word is spreading like glitter, and I am confident that our local following will grow more every year!

Want more?

This post got loooong, but if you want to know more, including my list of tips and advice for running a booth at your own state fair or similar event, you can find the full article in the Fall 2019 issue of Wet Paint Magazine

Posted on Leave a comment

“Where have you Been?!” My Recent Adventure

I think some of my followers have been wondering this lately…Where have I been?! In May I had signed up for the Inspiration to Paint group on Facebook, thinking I’d have a month to participate before my boys got out of school and the summer rush hit me full on! Then a couple weeks into the month I got a call from the Minnesota State Fair.

I had applied a couple years ago for face painting, but despite having literally millions of attendees each summer, they are dead set against having any more than the one single booth by the kid rides. So last fall I submitted a new proposal for a new concept that came to me one night while lying in my camper bed one weekend: The Glitter Glamper! The concept was a cool, retro, vintage camper, gutted and turned into a glitter body art studio on wheels. Unicorn horns, gem cluster, festival glitter and even glitter beards were on the menu, with just a touch of paint to go along with them. I bought the URL, opened various social media accounts, created a Photoshopped rendering of the concept, bound it together in a glittery, diamond studded presentation booklet explaining the idea and shipped it off to the fair board for consideration, expecting to hear back someday, if I was lucky!

My State Fair “Glamplication”

My original concept rendering
glitter beard

unicorn horn
bling cluster and decolletage

I believe that normally folks find out in the dead of winter whether they’ve been selected to be a licensee for the following summer. Much to my surprise, I got the call in May as the fair began calling around their regular vendors to confirm, and found out that a few were not coming back, and I was offered a 20′ x 10′ corner stall! They were genuinely excited about the concept, and felt it would be perfect for the type of crowd that visits their newly remodeled “West End Marketplace!”

Our location in the West End Marketplace

So, realizing that the fair was only 3 months away and at least half of that was already packed with summer family fun, camping trips, leading crafts at my church’s VBS and my other county fair, I literally dove right into design and production mode without looking back. I bowed out of the Inspiration to Paint group for the month (sorry guys!), ordered zillions and zillions of gems, and began my hunt, scouring the Twin Cities Facebook Marketplace and Craigslist adds for the pieces I needed for my booth.

Glamper Location for 2019! This front corner, and the stall next to it! (20’x10′)

While my original concept was for a physical “glamper,” the space I’ll be given for the fair won’t accommodate a camper. It’s basically like an outdoor stall space but is nicer because it’s a solid structure with lighting, electric, and doors that lock. The folks at the fair really liked my whole “glamper” branding, look & feel though, so my goal is to still achieve that without an actual camper. With my degree in Industrial Design and background as a retail display designer, this whole thing is definitely in my wheelhouse, so I’ve been loving the whole design process, albeit a fast & furious one!

I’ve been having a ton of fun but spending every last minute and dime prepping for the fair, so this is what has kept me SO busy lately! I can’t wait to unveil the new “Glamper” setup this August! In the meantime, here are a few photos of my progress so far!

What’s a fair booth without a photo op board?! Paul has a glitter beard and Babe has glittery horns!

Working on my overhead sign with light up letters…my electrically and mechanically inclined brother is working on wiring these up to a plug instead of 9 individual battery boxes and switches!

Bling making in progress…gummy bear bling!

My boys are great at sorting gems for me!

My youngest posing by the 12 foot banner that will hang in the back of the booth…the booth will essentially be like the campsite that the Glamper is in, rather than being inside a camper itself. Be prepared for grass, trees and wildlife! 😀

What’s a “glampsite” without some Vintage lanterns?!

Staying cool in style

Yes, I’ve been making bling so much that I even have been sculpting unicorn horns while actually camping myself!

My table on any given day this summer…

Sweet antique barber chair for the booth! It weighs a TON! Thanks to my husband and good friend for helping get this thing OUT of the truck and into the garage! 
You can’t go glamping without a bbq grill! This one has color changing lights inside, underneath clear gems!

Of course I’ll be providing some sparkly new branded aprons and hats for my fellow artists!
Lanterns are a must for camping. Glittered lanterns are a must for GLAMPING!

Antique secretary desk as I purchased it…a bit broken. My carpenter dad fixed the fold-down desk for me!

Hutch after a facelift, before re-attaching the desk part! This will make a great work station that can close up and be out of the way when we have less artists!

My boys have been such great sports this summer as Mom spends so many hours out in the garage painting and building things, and driving all around the Twin Cities to pick up Craigslist finds for the booth!!

My 11 and 9 year old helping haul foam floor mats down 3 floors of an apartment building in Prior Lake last month! This was a long drive added to a long day while also leading crafts at my church’s VBS, but my feet and my artists’ feet will thank us for having these puppies tucked under the astroturf! 12 hours on concrete is hard on the feet!

We drove to Maple Grove to pick up these trees! My boys had to ride with them tickling their ears, but they got lunch at Jimmy John’s out of the deal! Can’t have a “glampsite” without some trees!!

When I saw this posting for FREE vintage, steel, 1950’s cabinets on a curb just 5 minutes from my house, I had to swing by and check them out. My youngest Toby is totally my enabler, haha! He’ll say, “Oh Mom, you HAVE to go to that garage sale if it says ‘vintage/retro’ in it!” Well when I got back in the car after inspecting these cabinets he said “Oh mom, I can tell you really want these. We can help you load them…I can fold the seat down!”

free cabinets on the curb

 It took me 3 or 4 trips I think to get all of these home, since I had two kids in the Jeep! But these were definitely dropped on the curb near me by God himself because they were just minutes from home and light enough for me to load! And did I mention…FREE?!

These needed a lot of love but were still totally functional. The lazy susan in our kitchen squeaks horribly, and my boys thought this one was SO nice because it is quiet, haha! It required a lot of scrubbing and cleaning. I’m sure there was dirt, oil and rust on these dating way back before I was born. I spent several days with a wire brush, steel wool and spray paint and got them looking gorgeous…some of these will serve as work stations in the booth while others will serve as storage space in the “back room.”

Ooooh…you had me at RED and CHROME!

Let’s just say that my basement, garage, and part of the living room has been taken over by pieces of the Glamper!! HUGE HUGE thanks to my wonderfully supportive husband for allowing me to basically take over his garage this summer! Okay, if one more person asks me where I’m going to store all this stuff, I just might scream…but right now I don’t have time to think that far ahead. (which if you know me is crazy unlike me, I’m a MAJOR planner-ahead-er!) After the fair we will see if this stuff pays for itself, and if so, I’ll search out storage options! Until then, I’ll stay way outside of my comfort zone and build now, plan later! Haha!

This has been a massive undertaking so far in a short amount of time. I eat, sleep and breathe Glamper but have had such an outpouring of support from family and friends, it’s been very humbling! I had dozens of artists step up wanting to help run the booth. Friends and family offering to watch our boys, help set up and tear down, help find random things I need for the booth, and offer to help in any way. My husband has helped lift crazy things and let me invade the garage and house. My dad has helped me repair and modify my furniture finds. My brother is working on lighting up my sign as we speak. My boys have not only run all over town with me gathering stuff and running errands, but help with many aspects of the booth, down to sorting gems and letting me paint glitter beards on them. My mom convinced her sweet neighbors (one of whom has a huge beard) to let me bling them out for photos. I even have fellow artists offering to donate their time to help me make bling clusters. What an awesome tribe we have here in the Twin Cities!! I SO hope and pray that this whole adventure turns out to be a worthwhile effort for all involved…or if nothing else, is FUN in the process!! The one thing I know is that we will all sparkle and shine in the process! I can’t wait to see how it all turns out…hope to see you at the fair!

Want to keep up with the Glamper’s adventures this summer? Follow us on social media! We’re sure to be posting lots of fun photos throughout the fair! 😀

Posted on Leave a comment

There’s No Place Like Home

What were you most thankful for this Thanksgiving? I know there are 13 children in Minnesota who were thankful just to have a family this Thanksgiving!

A couple weeks ago I had the privilege of being a part of the Hennepin County Adoption Days event, which I’ve painted at with my mom for several years. During this year’s event 13 kids were adopted into 9 families.  According to their website, Hennepin County has finalized 1,761 adoptions from 2000 to 2009.

What a privilege to be able to take part in such a big day for so many families as they finalize their adoptions! This event is always held right before Thanksgiving, and serves as a timely reminder of what is really important in life.

“There’s no place like home”… this was the quote worn by one family who were all coordinated in custom made Wizard of Oz clothing for this year’s adoption days!  I had a lot of fun painting these ruby slippers, yellow brick road, and emerald city on the kids’ grandmother!