Posted on Leave a comment

Fast & Fun Halloween Bat Eye Design

We’re more than a week into October and our busy Halloween gig season is in full swing! Today I thought I’d share a super fast, fun and easy bat eye design! Taking full advantage of time saving products like split cakes, double-loaded daubers and stencils can help you create impactful designs in minutes! Check out the step by step photos and instructions below, along with links to the products used!

Step by Step Instructions:

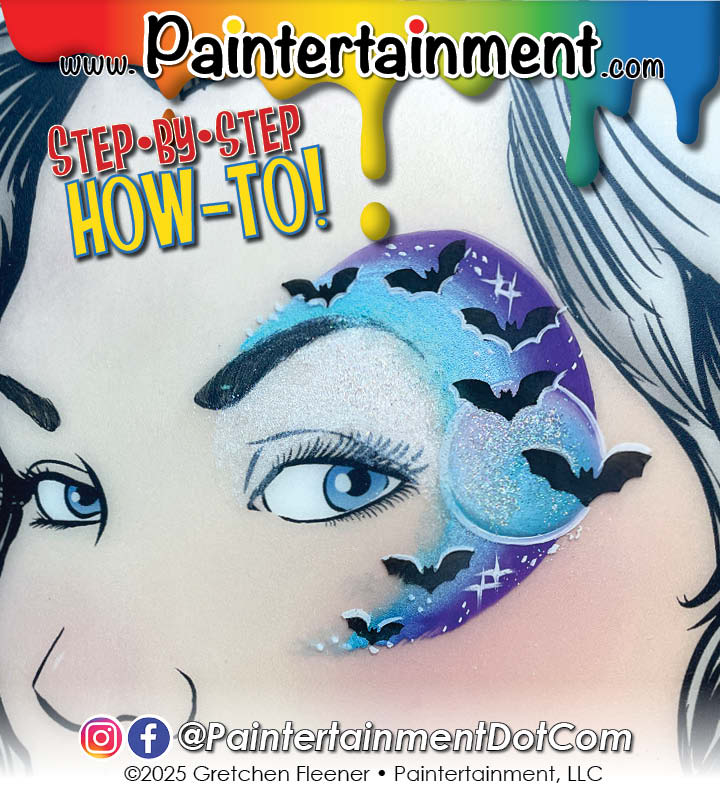
1 – Load up a 1″ flat brush (I used a Bolt 1″ firm) with the darker side of a Sillyfarm Rainbow Cake “Mermaid“.
2 – Swoosh around the eye. I also used a Cameleon large blending brush to add a little of the pearl white on the eyelid and some holographic white glitter.
3 – Load up a jumbo dauber with white, then scrub just the edge on some blue.
4 – With the blue on the bottom, press and twist to create a moon. Add a little holographic white glitter!
5 – Using a mini kabuki brush (my secret weapon for perfect stenciling!) and this Ooh! Stencil, add some quick bats! I used Wolfe black for this.
6 – Add a few white outlines, starbursts and dots, and more glitter to finish off the design. I used Wolfe white for this.

Posted on Leave a comment

Step-by-Step: Googly Ghost

Let’s have some more fun with googly eyes!!

Want to offer some googly eyes to your designs but don’t have a lot of them on hand? You can make them stretch twice as far by making your characters WINK! 😉

This little ghost is SUPER simple and only requires ONE googly eye!

Step 1:

Using a round brush loaded with your favorite blue (I’m using FAB Shimmery snow petrol!), outline the curves of your ghost, and then paint around that for a background.

Step 2:

Fade the edges of your blue background. I love to use my Cameleon large blending brush for this!

Step 3:

Add some stars! I’m using my Ooh! Star Flip stencil and a finger dauber loaded up with yellow. First I lay down the stencil and use a makeup remover wipe to wipe away the blue, then apply the yellow paint, and finally tap on some yellow glitter before removing the stencil. This gives me crisp, clear, bright yellow stars that are glittery only ON the stars!

Step 4:

Fill in the ghost with white. I’m using Wolfe white and a round brush. Add a little dimension with some light blue if you wish!

Step 5:

Clean away a spot where your google eye will go. I use mini daubers to do this but a wipe works too, or a clean brush. Using a small round brush loaded with black (I’m using Wolfe black), outline the design and add the mouth and winking eye. Add a little tongue if you like!

Step 6:

Adhere one googly eye with Pros-Aide II (it is easier to remove than the original Pros-Aide, which I reserve for glitter tattoos), and finish it off with some chunky glitter! I used Vivid Candy Cosmos up in the sky, and Amerikan Body Art Biosphere on the ghost.