

Happy Tuesday! Today I’d like to share a great tip that I learned from my artist friend Linda John! I’ll show you her cool trick for making super easy snowflakes without using any stencils or even a brush!
Blog posts centered around particular holidays
Happy Tuesday! Today I’d like to share a great tip that I learned from my artist friend Linda John! I’ll show you her cool trick for making super easy snowflakes without using any stencils or even a brush!

Happy Tuesday and happy independence day!! Today I thought it would be fitting to show you 6 different ways to paint fireworks!
I hope you have a fun filled day of painting patriotic designs…please feel free to comment and share what YOU painted this year!


The snowfall here in Minnesota the past couple of days has been MAGICAL! My favorite kind…the thick, fluffy kind that falls slowly like a snow globe and sticks to the branches, making everything look like a fairy land! Here are just a few pics I took in my yard:


Today felt like just the perfect photo backdrop for me to paint a little snowball juggling snowman idea that I drew in my sketchbook during my paint jam earlier this month!
Here’s a little time lapse tutorial!


If you follow me on social media, you’re already way ahead of me here! It just dawned on me that I have failed to include my blog in the locations where I’m now sharing tips every Tuesday! SO, I’m going to take this opportunity to introduce my new “thing” to my blog readers here and get you all caught up!
Basically, every Tuesday at 10:00 am central time, I am going to be sharing some sort of tip with you! It could be face paint related or something for other art forms like balloons, glitter tattoos, etc. It could be a business tip. Some might be mind blowing, some might be “well duh, I already knew that!” But my goal is to share as many tips as I can come up with, and I hope that at least a few of them help you out in some way! I’ll try to keep them roughly 2 minutes long, give or take, but it’ll depend on the tip of course. Quick and helpful is my goal!
I started on Tuesday, November 22nd so there are a few already out there. I’ll post them below! And from here on out, I’ll try to remember to post these here on the blog so you don’t miss any if you are a blog subscriber! You also should be able to find these on Facebook, Instagram and YouTube.
SO, watch, subscribe, and enjoy! Please do comment if you find any of these useful…it helps me to know if I’m sharing good stuff or not! 😉 And if YOU have a great tip to share, send it our way! I’d love to share your tips too, and of course give YOU credit!
Thanks so much and happy painting!
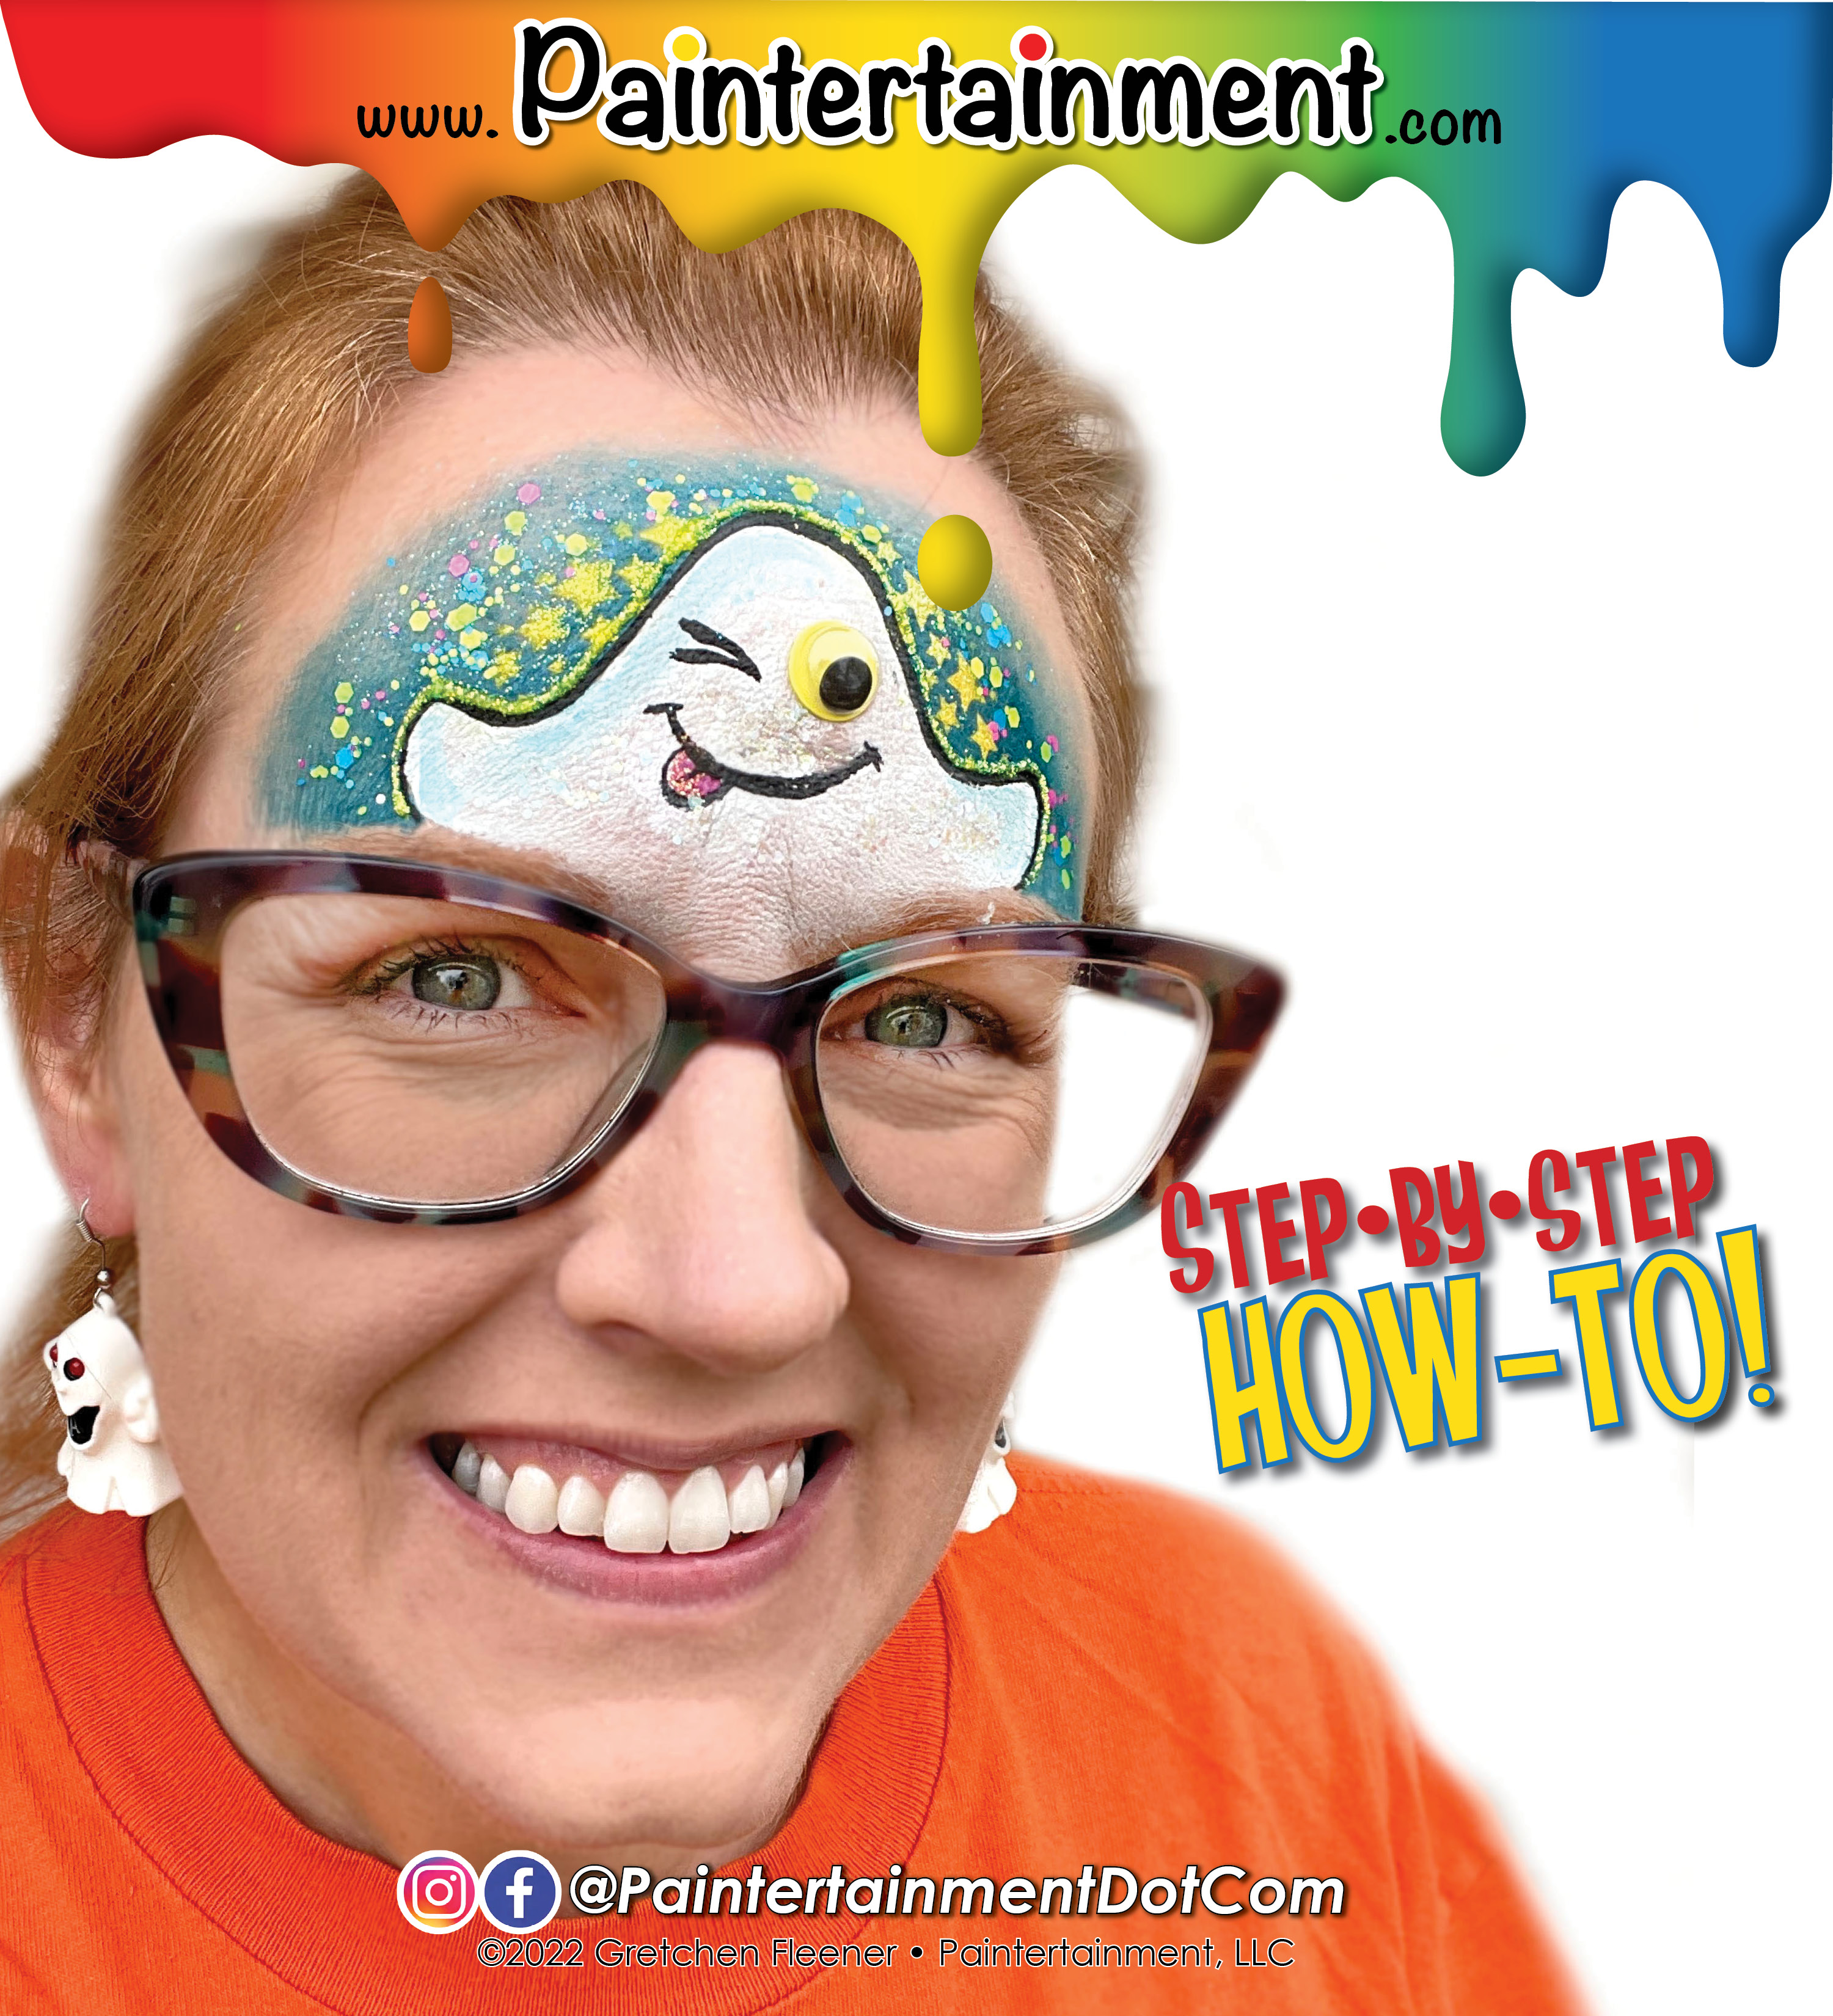
Let’s have some more fun with googly eyes!!

Want to offer some googly eyes to your designs but don’t have a lot of them on hand? You can make them stretch twice as far by making your characters WINK! 😉
This little ghost is SUPER simple and only requires ONE googly eye!

Step 1:
Using a round brush loaded with your favorite blue (I’m using FAB Shimmery snow petrol!), outline the curves of your ghost, and then paint around that for a background.
Step 2:
Fade the edges of your blue background. I love to use my Cameleon large blending brush for this!
Step 3:
Add some stars! I’m using my Ooh! Star Flip stencil and a finger dauber loaded up with yellow. First I lay down the stencil and use a makeup remover wipe to wipe away the blue, then apply the yellow paint, and finally tap on some yellow glitter before removing the stencil. This gives me crisp, clear, bright yellow stars that are glittery only ON the stars!
Step 4:
Fill in the ghost with white. I’m using Wolfe white and a round brush. Add a little dimension with some light blue if you wish!
Step 5:
Clean away a spot where your google eye will go. I use mini daubers to do this but a wipe works too, or a clean brush. Using a small round brush loaded with black (I’m using Wolfe black), outline the design and add the mouth and winking eye. Add a little tongue if you like!
Step 6:
Adhere one googly eye with Pros-Aide II (it is easier to remove than the original Pros-Aide, which I reserve for glitter tattoos), and finish it off with some chunky glitter! I used Vivid Candy Cosmos up in the sky, and Amerikan Body Art Biosphere on the ghost.


I’ve been on a google eye kick lately! Here’s a fun bat design that uses “human-style” google eyes! These eyes have fun colored irises, as opposed to your typical google eyes with just a black “pupil.”

Step 1:
Load a 3/4″ angled or flat brush with a pink & purple split cake. I pulled the neon pink & purple from my Superior Sunset base blender. With purple on top, paint the outlines of the wings.
Step 2:
Use a fluffy brush to blend the pink down over the eyes, and feather the purple. I love using my Cameleon large blending brush for this!
Step 3:
Paint some pink for the insides of the ears. I left a couple little tears in the edges of his ears!
Step 4:
Add a little texture to the inside of the wings. I used my mini stencil kabuki brush and purple with a HAS 5701 stencil (from the “Alive” set) to create a little texture, and wrapped it around and under my eyes a bit.
Step 5:
Using your favorite round brush and black, paint the bat’s head, tuft of hair, and wings.
Step 6:
Using a small round black loaded with white, add a smile, fangs and highlights. I also used a halftone stencil to fade the head onto the bridge of my nose. Finish it off with google eyes applied with Pros-Aide II, and some fun chunky glitter! I used “Valley Girl” Pixie Paint!


It’s OCTOBER! We face painters LOVE October for obvious reasons! I’ve been getting my usual flood of requests for painters at events this month and am doing my best to fill them, but if you happen to be looking for a face painter for YOUR event, make sure to plan ahead! We start booking Halloween events up to a YEAR in advance! So, if you think you may be having a Halloween party even next year, make a note in your calendar at least as early as June if you’d like to book the BEST before their schedules book up!
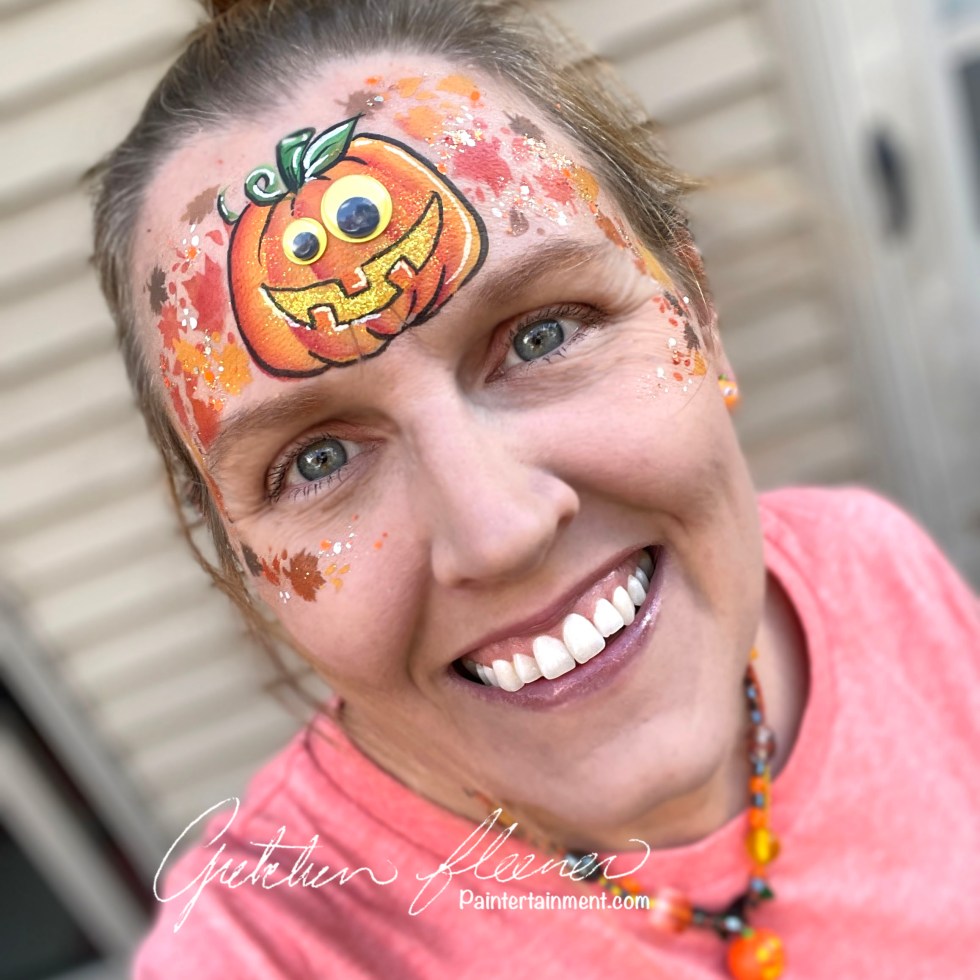
Now that my public service announcement is aside, I thought I’d share this fun and simple pumpkin design with you! I LOVE to play with google eyes, and they look especially fun when you mismatch the colors and/or sizes.

Step 1:
Load up a 1/2″ flat brush with a red/orange/yellow split cake. I used my TAG Dragon cake, and only loaded the yellow-to-red section. Paint the curved outer edges of your pumpkin, then repeat the strokes working your way towards the center. Make sure that you are consistent with which side is your shaded side (darker red) and lighter side (yellow) to get the best dimensional effect! I am assuming my light is coming from the upper right side here.
Step 2:
Use the lighter yellow corner of your brush to fill in the center area of the pumpkin.
Step 3:
Using a mini kabuki brush and an Ooh! fall leaf wrap stencil, surround your pumpkin with a variety of fall leaves! A mix of yellows, oranges, red and brown add some fun variety.
Step 4:
Load a small round brush with yellow and add a smiley mouth. I like to dab on a little yellow glitter here. Don’t worry about outlining teeth, you’ll whip those out in seconds in the next step!
Step 5:
For the teeth, just load a small 1/4″ flat brush with orange, and paint on three short strokes over the top of your mouth!
Step 6:
Outline the pumpkin with black and add a few highlights. I love Wolfe black and white for all of my outlines and highlights! Use a face wipe, Q-tip or clean dauber to remove paint on a couple spots where the eyes will stick. Apply some Pros-Aide II to these spots, and the back of your google eyes, let dry clear and stick. I use Pros-Aide II for gem clusters (original formula for glitter tattoos) because it is designed to break down easier for removal! Top. it all off with some sparkly Vivid Gleam glitter cream…I used “Trick-or-Treat!”Harvest!”


The lake outside of my studio may still be frozen, but spring is technically here, haha! As I wait for those elusive 50 and 60 degree days in the extended forecast to reach me, I’ve decided to do a little Easter and springtime painting! Not only to get into the springy mood myself, but to warm myself up for my Easter gigs which start this weekend! In honor of spring’s inevitable return, today I wanted to share this simple little eye design…a bunny peeking around some eggs!

First, do a quick “sketch” outline of the eggs and bunny. I used a small, round brush with a little white.

Next, fill in the eggs with whatever springy colors and patterns you like! Try stripes, polka dots, zig zags, or just solid color! Experiment with metallic paints if you wish! I used my Cameleon small blending brush to blend the colors of the egg over to my eyelid.

With a round brush, fill in the white of the bunny. Add a few pink details inside the ears and the nose. I like to use a little light blue to add shading to white objects…it gives them a little dimension and a bit more color!

Outline the design with a fine, round brush and your favorite black. I like Wolfe black for my outlines. I also used some tiny dotters to add polka dots to my eggs here!

Add some fun flourishes around the design! I used my new Topaz Fleur Mirror eye stencil, combined with my Topaz Tiny Bubbles stencil. I then used a Deb’s Dotter to add a few more colorful dots to tie it all together.

I finished off the design with some “Capricorn” glitter creme by Amerikan Body Art…one of my favorites for the bright, cheery colors, and it blended perfectly with my colorful polka dots!
I have another fun Easter design that I will share soon, and hopefully some more as my schedule allows over the coming week! Stay tuned! Thanks so much for stopping by, and happy painting!


Lately I’ve been having some fun painting some lesser known Christmas special/movie characters and posting them on our Facebook page! Here are a few I’ve done so far…there are more coming next week, so make sure to like and follow us on Facebook for more fun inspiration to come!


Okay, this one below is not a particular movie character, however, it was an idea that came out of the Charlie-in-the-Box design with the pom poms! I thought they would make cute snowballs! 😀

Here are a few of the products I used for the snowflakes in many of these designs…I love the short kabuki brush for detailed stencil designs, and am totally in love with these Ooh! Snowflake stencils!!

Stay tuned to our Facebook page for some more fun Christmas designs next week, as well as photos from our upcoming weekend events!
It’s been one busy month here at Paintertainment with window painting! Besides the three Dunkin’ Donuts locations I have the pleasure of painting seasonally throughout the year, I also did an interior job, painting some conference rooms in an office building! So much fun…here are some photos and movies of what I’ve been up to so far this winter!


Here is a time lapse video of the Chaska Dunkin’ location…this one is on two sides of the building…
Below is the Rogers, MN Dunkin’ location! This design was SO much fun! I love this client…she really lets me just have creative freedom and always chooses something super fun from my sketches. I love incorporating donuts into their designs! The previous fall design had a fun owl design on the lower panes, so we kept the text again here and I updated it for winter with some ice fishermen! This design definitely screams “Minnesota” as we love to ice fish here, and I was sure to paint a few of my favorite fish to catch here: sunfish, walleye and bass!

This window was the hardest physically for me to paint. It was supposed to be 50 degrees this day, however, it only ended up getting to 37 while I was painting. This is all fine of course if it’s sunny and not windy…I painted Chaska in 37 and sun and didn’t even need a coat. But, for whatever reason, this day I was absolutely freezing to the point of shaking! I think it was a combination of the cloudiness, the dampness (it had just rained the day before), and the breeze. So, the paint dried very slowly…but in the end I love how it turned out!!
Here is a video…
The third Dunkin’ location didn’t need much updating…I just removed some pumpkins and replaced them with snow!

With some careful planning, you can save a little time and money with seasonal updates! Of course, window paintings aren’t really meant to last more than a few weeks, but these ones stay relatively protected from weather, and still looked like new. So, why not make them last? I did turn her earmuffs from orange to red here as well. The other side of the building didn’t have anything super fall-ish so I left that one as-is.
The last window job I’d like to share with you was my first INTERIOR job! This was for three conference rooms, which have basically a wall of glass.

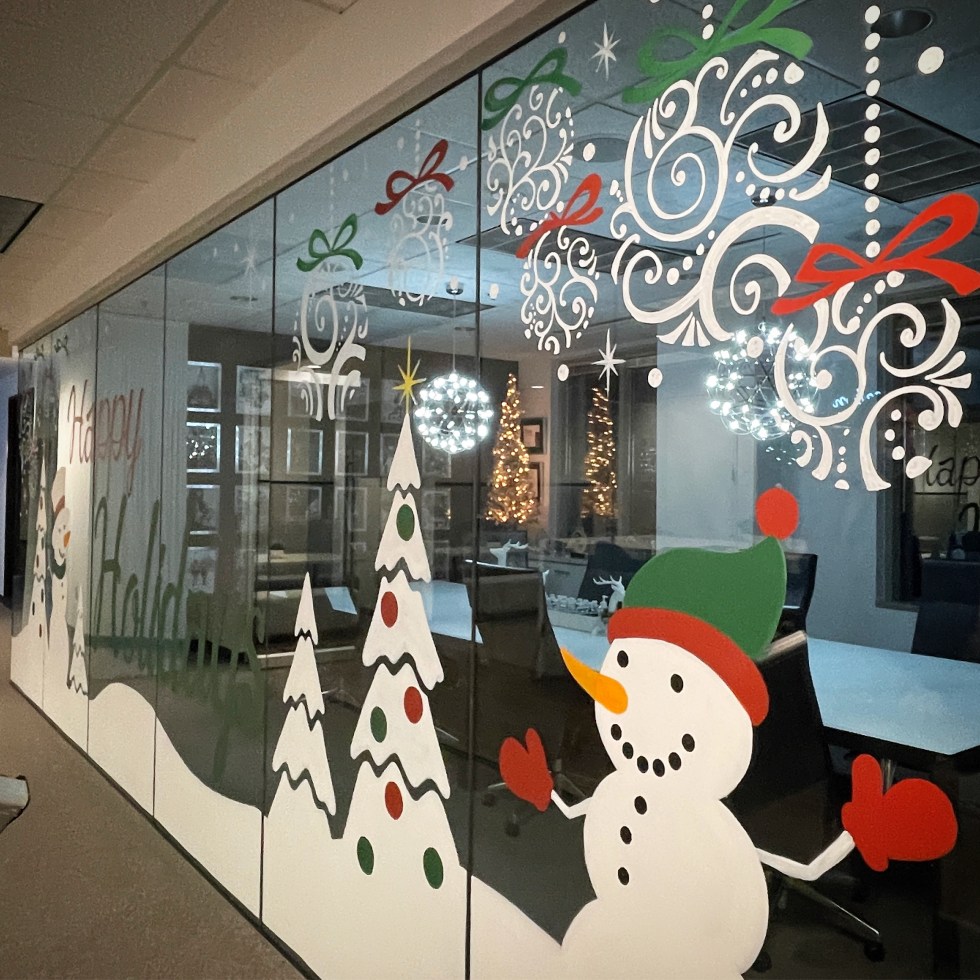
This was a really fun and HUGE job! I probably painted around 50 feet lengthwise, and floor to ceiling. It was nerve wracking painting on carpet, but I made sure to have plenty of drop cloths and am super careful about making sure any paint I’m not using at the moment is closed up and in a safe spot. The tricky part here was keeping everything within just a few feet of the windows, so that people could still walk by me in the hallways!! It involved a lot of shuffling of my supplies. Also, being on the 7th floor, I probably spent 1/2 hour or so just bringing stuff in and out. I did also have to run out to Home Depot to grab a better, darker green…so all in all I spent about 10 hours straight here! Everything took more coats than usual…just because I am picky and I like it to be as opaque as possible. But, since these windows have exterior windows behind them, there is no way to completely avoid seeing brush strokes with the sun shining through them. I love how it turned out in the end, and it was really nice to be inside and not worry about weather! I also got to try out my new Posca paint pens for the ornaments. I didn’t take any time lapse movies of this, being that it was in an office, for privacy reasons.
So, as you can see I’ve been busy lately squeaking in window jobs between entertainment jobs! But, I really love window painting and I’m so glad that Covid pushed me to add this to my repertoire. It blends perfectly with my schedule, as I can paint windows on week days during the day, leaving those busy holiday weekends for face painting and balloon twisting!

Interested in learning more about becoming a window painter? Check out the latest issue of Wet Paint Magazine! I recently wrote an article about how I got into window painting, and the process I followed getting started, including some tips & tricks of the trade, resources to learn more, and a list of what supplies you need to get going!


You must be logged in to post a comment.