Posted on — 8 Comments

Thrift Store Remake: My New Compact Kit!

My new super compact kit!

If you know me, you know I can get slightly obsessed with designing and creating the perfect kit.  With my degree and passion in industrial design (product design and retail store fixture design are what I do when not face painting), the desire to solve problems through design plagues me CONSTANTLY!  My obsession with thrift shopping also has me picking up all kinds of funky items to reconfigure and utilize in my face painting business. I have several different kits now, and all are really great in different ways and for different gigs. (see this post for my last kit creation)

When I came across this aluminum case at Goodwill for $6.99, I of course HAD to pick it up and turn it into a sweet kit!!  It was in excellent condition and even came with a set of keys to lock it.

$6.99 aluminum case found at Goodwill

The first thing I did was pull the cardboard base lining out.  It had some vinyl pieces on it that were designed to secure whatever this case originally held, which I saved and ended up re-using.  (the Velcro, too!)  This piece pulled out pretty easily.

Ripping out the lining. I left the black foam sheet in the top half.

I saved the cardboard as well, since it was already made to fit the size of the case.  I covered it with some fun, colorful fabric, and proceeded to trick it out with all sorts of pockets and elastic loops. I added a couple more pieces of velcro after taking this picture, but you get the idea:

My custom made “insert!”

I bought the fabric, elastic, and velcro, and then re-used those black vinyl pieces as pockets.

It was pretty easy to just run this cardboard with the fabric through my sewing machine which worked great.  The velcro is positioned just right for some small plastic containers I used (see below), which I found at Michaels (in their bead storage).

I then put some velcro on the back of this piece, with the other pieces on the inside of the case lid, so that I could velcro the whole works to the case.  I don’t know if I’ll ever remove it, but if I ever want to sew anything else on, or even swap out the whole deal with a new setup, it’ll be super easy now.

In the base of the case, where I pulled up the cardboard, it looked ugly.  But, I covered that with a black towel (cut to fit, and hemmed), which also attaches with velcro.  This way I can pull it out and toss it in the washing machine if when it gets dirty.

Sewing the removeable brush holders

 For my brushes I sewed some velcro to the back of one of the leftover scraps of vinyl, and then added red elastic to the other side, creating loops to stick the brush handles through.  I then was able to add the other half of the velcro to my case wherever I wanted to mount my brushes.  The velcro enables me to put my brushes in one spot to pack them away, and then move them to another spot to make them easy to access while I’m working.

Using the brush holder

 Above you can see the brush position when in use (far left), the brush holder being removed (center), and the two brush holders being fixed into position when packing up my kit for travel (right).


I positioned the velcro strips across the back at just the right height (below) so that I can have these larger containers open while I’m working.  In those I have my bobby pins, daubers, kabuki brush, and some larger gems.  When I’m NOT using the kit, that top space is where I can mount my brushes to keep them safely packed up.

Kit in use, with plastic containers open

Below the larger plastic containers I have some smaller ones that I only open when I need them.  They hold my various gems, google eyes, metal tips and pins for my Liquid Bling, and even one with a few Tylenol.  Nobody likes being stuck with a headache at a gig! 😉  I had the worst time finding adhesive that would stick the velcro to these containers.  I tried super glue, some special Velcro adhesive, 2-part expoxy and Gorilla glue.  NOTHING worked…I even tried roughing up the plastic with sandpaper, and the velcro just popped off like nothing.  I finally tried some “extreme” foam tape by 3M and that seems to be working!


Below is a photo of the kit open, and all of it’s contents spread out. You can see that it holds a LOT of gear for a small space!!

 Below you can see how everything fits inside the kit.  An assortment of my liquid bling, glitter, metallic powder, adhesive, and Detailz sit nicely along the bottom of the lid in their red elastic loops.  Above my glitter I have more elastic loops that hold my lollipop blenders, small dauber, dotting wand, Mehron pencil, mini screwdriver (I use to mix my paints), body glue, and a chapstick sushi horizontally.  The flat pockets hold my business cards and BAM stencils.

All of my supplies packed away!

In the base of the box I have another plastic box that holds my small screw-together jars of paints.  Behind that I have my larger cakes, all screwed together and rolled up in my green washcloth.  Wolfe black and white are in the upper right corner.  Under that is another small washcloth.  My mirror sits on top of my paints.  I have a little plastic zipper pouch on the lower left corner, which holds my makeup remover wipes, an assortment of sponges, and daubers.  The pink circle is a cool collapsible cup for my rinse water.  (I may buy another so I have two rinse pots though) On the lower right corner are my two water bottles.  I like a spray bottle and a dropper bottle.  I may find smaller ones for this kit though.  A palette of Mehron INtense Pro pressed powders sits under the cup, and underneath everything is my towel-lined (with velcro again) paint tray and my design sheet.

Open and ready for business!

Above is a photo of the kit all opened up and ready to paint with.  My brushes are mounted upright in the lower right corner, my mirror is poised handle-out, ready for me to grab for the big reveal!  I have my green wash cloth under my water cup, draped over the edge of the kit to soak up any drips that may fall off my brush while I’m painting.  Everything else is pretty much already on display which I love!

Here it is all packed up and ready to go!  Pretty slick…I am excited to take this to my next gig.  I’ll let you know how it works out!  Knowing me, I’ll probably come home with more improvements to make! 😉

Kit filled and closed!

Update January 2015: I still LOVE this kit! I did get a deeper case though that can hold my bulky brush tub, so I use that one more currently.  But, I’m exploring options for smaller brush tubs so I can go back to this.  I’ve also since created an entire playlist on YouTube of videos showing my kits in detail.  Check them out HERE and don’t forget to subscribe to my channel for the latest! I’m CONSTANTLY working on improving my kits!

Here is one video showing you my current standard gig kit:

Check out my channel to see tours of my pocket sized kit, my travel kit, and a time lapse of me creating one of my insert panels.

Happy painting!!  🙂

Posted on — Leave a comment

Handy Balloon How-To’s

Here are a few YouTube videos that I learned from and was ispired by when creating all of the balloons on our new pocket balloon menu cards! Several of you have asked for instructions, so this is my attempt to share as much info as I can.  I’ll see if I can put together some pdf’s in the future! These are all pretty basic designs, and there are many, many videos online for every one.  Many of these I just figured out looking at pictures, however, I’ve done my best to find videos that are as close as possible to the designs in the photos, if not the same! Some I simply described below, but will add videos later if I’m able to find some.  Feel free to email me though if you still have questions!

Red Card (1-Balloon Designs):
Sword
Pig
Rabbit (I started mine with a tulip twist for the nose)
Dog (I’m sure there are hundreds of videos of the basic dog out there!)
Alligator
Elephant (I work backwards, starting with the opposite end (non-nozzle) making the trunk, then two big ears, and legs/body just like a basic dog.)
Swan
Giraffe (same as the basic dog, but with a long neck instead of long tail, and shorter ears)
Monkey
Turtle Bracelet

Blue Card (2-Balloon Designs):
Flower
Monkey with Banana (Similar to the red card’s monkey, but without the hand details, and with a short yellow balloon tucked in the arms for a banana!)
Fishing Pole (Learned from a friend…The reel is made from an apple-twisted bee body that has been twisted in half, then the pole tucks in between. The “line” is a white balloon with all the air squeezed out, and the fish is made from a heart shaped balloon with most of the air let out.)
Helicopter
Princess Wand
Rose (there are many variations out there!)
Dragon (add the fire too if you are able!)
Ladybug Bracelet (I make mine like the turtle bracelet but in black, and stopping at the head and legs, then add a little piece of red twisted and folded over for the shell/wings)
Snake (on the card the tongue is different, just an uninflated red balloon)

Yellow Card (3-Balloon Designs):
Princess (I do my arms a little different, linking the hands)
Monkey on a tree (The one on the card uses the simpler monkey from the red card, but the tree is similar to this video)
Penguin
Dog (ears and head are similar to this video, but the one on the card is standing, leaves out the extra balloons needed for the nose and tongue, and has a collar instead)
Butterfly
Princess Wand
Princess Crown
Horse
Airplane (Haven’t found a video similar to this yet.  Start the yellow propellers with a tulip twist, then make 3 “petals” for the props.  The main body in blue is like a loose bird body with more smaller propellers on the back.  The wings are similar to the monkey’s palm tree, just slipped through the main body.)

Happy twisting!!  🙂

Posted on — Leave a comment

New Paintertainment Exclusive: Pocket Balloon Menu Cards!

I am super excited to introduce our latest new product, which is designed and made right here at Paintertainment… Pocket balloon twisting menu cards!

 When I started balloon twisting, I loved the portability of my balloon apron, yet still wanted the ability to display some sort of visual menu.  So, I came up with my own prototype of these cards that fit nicely into my apron pocket.

Here is a list of the designs on each card:

Red Card: sword, pig, rabbit, dog, alligator, elephant, turtle bracelet, monkey, swan and giraffe.
Blue card: flower, rose, monkey with banana, helicopter, fishing pole, ladybug bracelet, dragon, snake, princess wand
Yellow card: princess, monkey on a tree, penguin, dog, butterfly, horse, princess wand, crown, airplane

If you’re having trouble making these just from the pictures, I have put together another blog post full of video tutorial links to help you out!

As a new twister, they were not only helpful to show the kids what I could make, but also as a visual cheat sheet for me! There were enough fellow twisters on Facebook interested in purchasing them, that I designed, printed, laminated and put together some for my online store. They are available now for $9.00

Right now they come in a set of three cards: 1-balloon designs, 2-balloon designs, and 3-balloon designs.  Each card is laminated, and has a hole in the corner that is reinforced with a metal eyelet.  The cards can then be connected with a metal ring (also included).

The ring is easy to open and close, enabling you to add or remove cards depending on the crowd or type of gig you are working at.  It also allows you to attach the menu cards to a loop on your apron:

In my Twist-em-up apron, I’m able to hook these on a loop, flip them around and slip them into an apron pocket without even opening the ring.  You can also attach it using a recoiling badge lanyard so they don’t walk away, which is how I hold my scissors and sharpie too.  And if you end up being stationed at a table, they can be laid out for the kids to look at!

If you like the idea of these cards, be sure to keep an eye on the shop or follow us on Facebook for updates.  You can also find my popular face painting cheek art menus, as well as a build-your-own menu option!

Posted on — Leave a comment

Think SPRING with our New St. Patrick’s Day Package Deal!

The winds are blustery and we’re getting ready for our 3rd day of closed school due to extreme cold windchills tomorrow… so spring can’t come soon enough around here!  That’s why we’re already thinking ahead to St Patrick’s Day! 

I’ve just put together another all new package deal, specially geared for St Patty’s Day!  The design done in the above photo was created using all of these items included in the package:

This package is available for $44.00!  If you were to purchase these items separately, it would total $49.74.  So, you save $5.74 with the package deal!

Here’s what comes in the kit:

 This package is also a great deal just for anyone looking to try out some new things….like the new Paradise “Brilliant” line of metallic paints, an awesome TAG one-stroke “Leaf Yellow” (which will also be great for leaves on your Valentine’s day rose designs), Liquid Bling, and some fun BAM stencils! The shamrock rhinestones make your St Patty’s day designs extra special. (don’t forget the adhesive if you don’t already have some in your kit!)  And the greens and gold are great for other times of the year too, like spring, Christmas, etc!  Want to add even more to your package?  Pick up a stick of green lipstick for just $2.50!

Check it out today in the shop, and think SPRING!!


Posted on — Leave a comment

New “Hot Wingz” Stencils Now Available!

We are now carrying a selection of the new Hot Wingz stencils, from the makers of the very popular BAM stencils!  Today I took some time to try out the ones we are currently carrying, so that I could display photos of what they could look like with paint on the shop website.

Each stencil comes with one “Wing Dingz” piece (the peanut shaped piece you see in the photos below), which can be used to block out certain areas of the stencil that you might not be using in your design.  The Wing Ding can be used alone as a curve template as well. The Hot Wingz also have a “shadow shield” to protect paint from getting under the eye if being used with an airbrush.

Hot Wingz, much like our beloved BAM and HAS stencils, are durable, flexible, washable, and re-useable.  The stencils shown below are available now on Paintertainment.com for $9.00 each.


Posted on — Leave a comment

Help Me Design a NEW Balloon Twisting Product for my Shop!


Last month I made this little set of pocket menu cards for my balloon twisting.  They work really nice, and fit right into the pockets of my apron.
I posted the above photo in a group on Facebook and there were a lot of people interested in me adding them to my online shop. I’m close to being able to print these now, and thought that it would be fun to let you all in on the ground floor of this new addition by soliciting your feedback on the design selection. 
 This is a rough draft of some of the designs I’m thinking for each card, sorted by # of balloons involved. I still need more on the 4+ card, but not sure if I’ll keep that card in or not. Are there any missing that you strongly feel should be there? Any that shouldn’t? I’m still a fairly new twister so there are many I haven’t done but would love your input! 
It’s not really meant to be an all-encompassing menu of ALL that you can do, but something to get the kids’ ideas going. For example, the heart wand could just be a wand representation…you could make all sorts of wand versions.  The animals of course can all change colors to suit the child.
 I’m trying to keep them mostly done with your standard 260’s that everyone has, nothing too fancy, so they can work for a wide range of twisters. 
I’m envisioning the final cards to be postcard sized & laminated. They will have a hole punched in the corner with a metal rivet to keep them sturdy, and then will come attached with a single metal binder ring. The ring can then be attached to your apron by whatever method you’d like, or they can be taken out of the ring and passed around.  
Holiday ones are in the works next! Would love to hear your thoughts before I go to print!  I am hoping to print these within the next few days, so if there’s something you’d like to see changed on them, now is the time!  Please leave your feedback here in the form of comments to this post.  Thanks so much!!
Posted on — Leave a comment

Free Valentine’s Day Cheek Art How-To + NEW Valentine’s Package Deal!

Valentine’s day is fast approaching!!  Here’s a cute little Cupid cheek art design that I put together for you today! If you’re a subscriber to our free e-newsletter, you’ll see this one in our January issue, along with several other cute Valentine’s cheek art designs!  And don’t forget the 15% off coupon, good on your next order of $20 or more through Valentine’s day!

Looking to kick your Valentine’s designs up a notch? We have a new Valentine’s day package deal!!  This deal saves you over $5.00 versus purchasing each item separately.  The package comes with two BAM stencils, two sizes of acrylic heart rhinestones, a sheet of 3-D heart and gem stickers & rhinestones, two bottles of cosmetic glitter (pink and red), and a Paradise Prisma Fleur cake, which is perfect for your Valentine’s day hearts and roses.

While it’s not QUITE ready to ship yet, I thought I’d let you in on it a little early.  I don’t normally post deals before they’re ready, but we’re just waiting on the heart BAM stencils to arrive! They are currently in the mail and on their way here, so as soon as they arrive, this package deal will be ready to ship!  I’m noting a ship date of this Friday just to be safe, but I’m guessing they’ll be here before then. If you’re on a time crunch, shoot me an email and I’ll check the tracking for you to give you a more accurate ship date.  Otherwise, feel free to order and know that it will ship just as SOON as these stencils are in!

Posted on — Leave a comment

Using Paint Pot Strips for Double Dip Flowers

We are now carrying paint pot strips!  These little pots ($4.50 for a set of two strips) are great for double dip flowers!  They can be used a couple of ways for double dip flowers…

One way is to fill them each with whatever contrasting colors you like to use for flowers in addition to white.  So, you load your brush with white paint, then swirl the tip on the color of your choosing in these mini pots.  This helps to keep your larger kit clean, avoiding the white swirls on top of your colors from making double dip flower petals!

The other way you can use these is to fill them with both the white and color, enabling you to load your brush with both at the same time.  I heard about this idea during a face painting jam and had to give it a try!  Here are some photos of my attempt…

Press your colored paint in the bottom half or third of the pot.

Fil the rest of the pot with white.

Using the end of your brush handle, make a hole in the center.  Reach down just through the white paint and slightly into the colored paint area.

Brush hole

Now, wet and load your brush in the hole, loading white on the brush with your color on the tip!

Press your double dip petals!

I’ve been experimenting a bit with this method.  So far I’ve found the only tricky part is preventing the colored paint from streaking up the white paint while pulling the brush back out of the hole.  But, I think with a little practice, it could definitely help speed things up and keep the white out of your other paints!

Posted on — Leave a comment

Balloon Fun at my Son’s School!

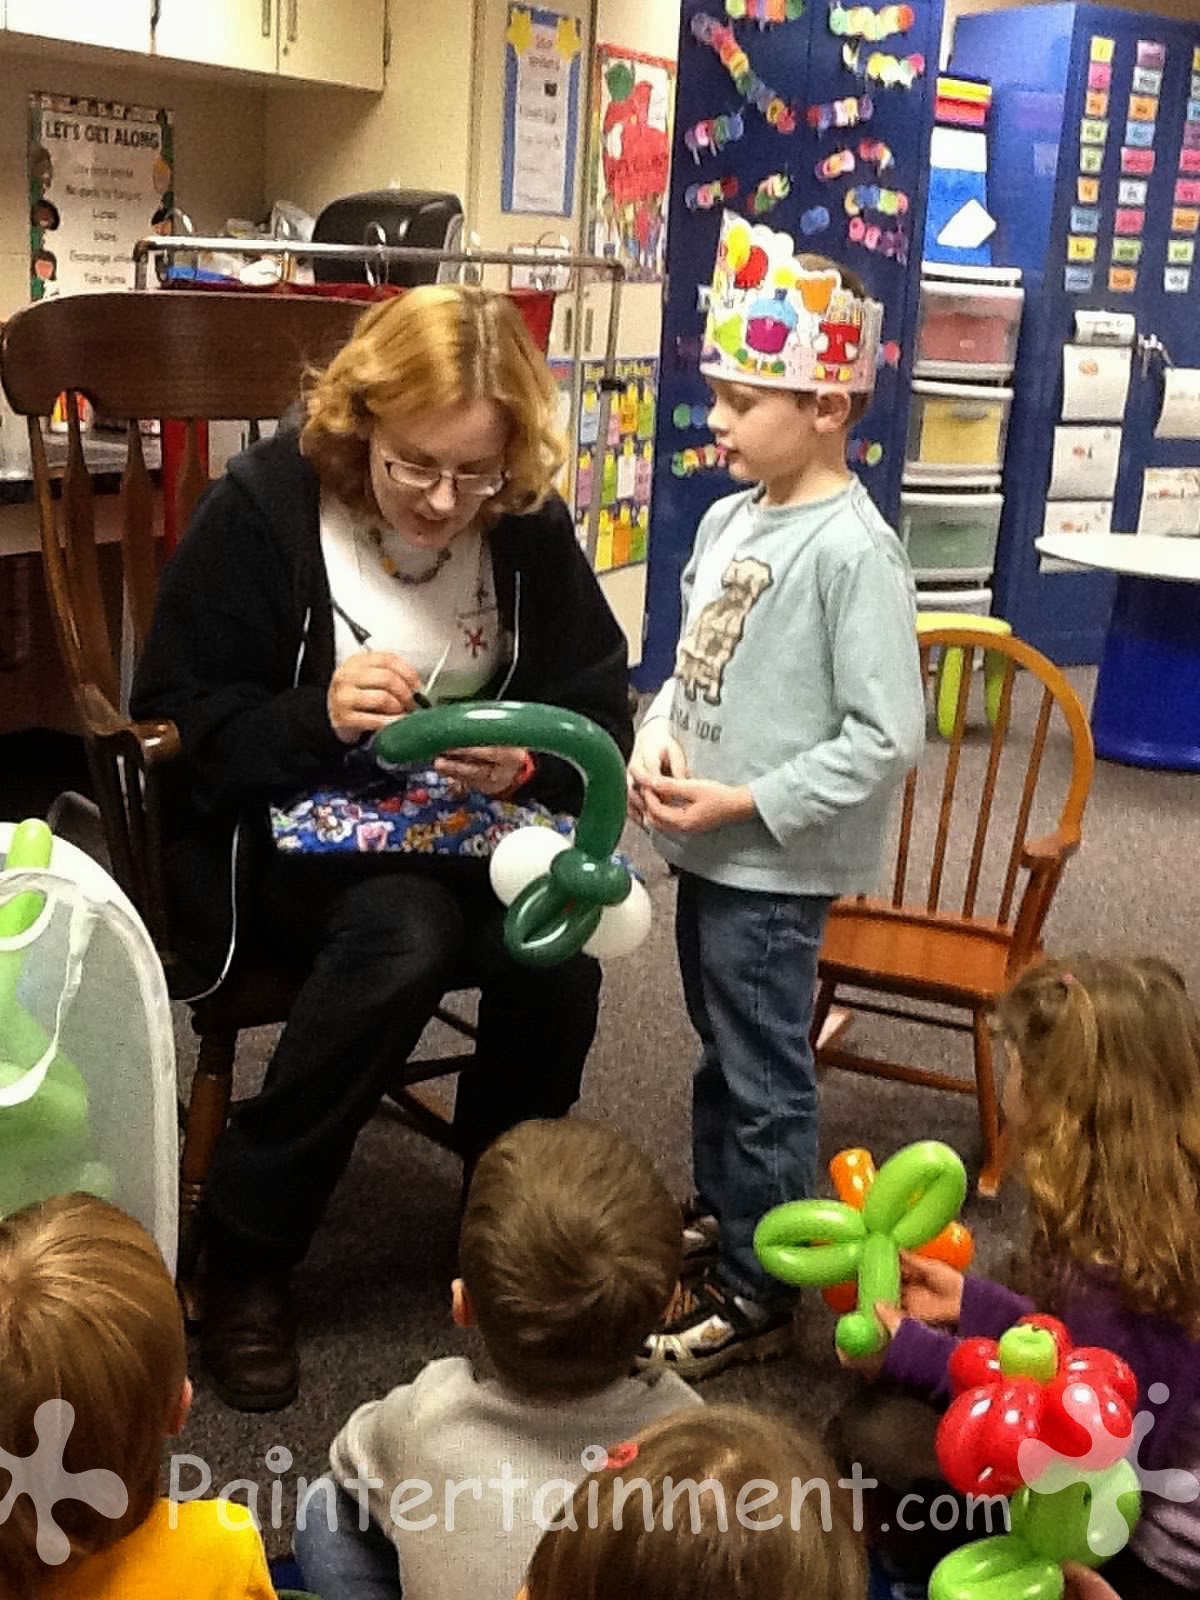
At the beginning of this month I went to my son’s kindergarten class and did balloons for them!  This was for my little man’s 6th birthday, as his special “treat” for his friends.  It was so much fun!  I only had about 20-25 minutes, so I decided to make balloons ahead of time.  This way, I could be sure that every kid would get one, and then I could do a few others for them to watch.  To make things simple, I did a flower for every girl, and a snake for every boy. 19 kids in all!

My countertop, the night before!
Bouquet I made for Sam’s teacher, Mrs Jordahl! Many thanks to her for taking so many great pictures of the day!  I love that she publishes a Shutterfly album of photos from class every week or two.
I started by writing everyone’s names on their balloons.  It gave the kids a chance to spell their names for me!  We also talked about my two very important balloon rules: 1) do not bring balloons to bed, and 2) Never put them in your mouth!

The kids and teacher having fun with their balloons

Doing a candycane…Sam was a great little helper!

Mrs Jordahl with her bouquet (and bee!)

My Birthday Boy!  He was so cute and proud to have his mom come in to do balloons!  Gotta soak this up while it lasts….
All of the “extra” balloons I did in the time I had left, which we decorated the room with!

Sam had so much fun…he insisted that we go to the principal’s office and make her one too.  He even opted to ride home with Mommy instead of riding the bus…I think that’s proof that I did him proud!  😉


Posted on — Leave a comment

My Little Pony Party

A couple weeks ago I had the privilege of doing both face painting and balloons for a super fun My Little Pony themed birthday party! I had a blast and the kids sure seemed to be having a great time too!

For face painting, I had a nice variety in my design menu that included full face designs, as well as mask designs and single eye designs. However, EVERY girl at the party wanted a cheek art design!  They still turned out really cute…just goes to show ‘ya that cheek art isn’t dead!!  I’m still kicking myself for not getting any photos of “Rainbow Dash.”  For her I used my TAG rainbow one-stroke cake for her hair which was really slick, and some of my Paradise brilliant blues.  Unfortunately the birthday girl didn’t want her face painted! So, I did lots of extra special balloons for her instead, including a crown to wear.

Cheek Art

 For balloons, many of the girls wanted simple flowers!  I did a few special My Little Pony designs for the birthday girl, complete with the little designs they have on their rumps…

“Apple Jack”

One girl asked for a fairy, and I did one of my fairy design with some wings added (with a clear balloon).  It turned out really cute and got a lot of “oooh’s” and “aaahhh’s” from the crowd!

Overall I think the party went well and everyone had tons of fun! It was during our week of record breaking cold, so I think the kids enjoyed having a little extra colorful fun in their weekend!